
Windows 11 でフル/部分/長いスクリーンショットを撮る方法
Windows 11 でスクリーンショットを撮る次の 6 つの効率的な方法を学びます。全画面、部分領域、またはスクロール ページをキャプチャする場合でも、適切な方法を見つけることができます。
- AnyRec スクリーン レコーダー: Windows であらゆる種類のスクリーンショットを高品質でキャプチャします。
- Windows + Shift + S: スクリーンショットをクリップボードに撮り、さらに編集します。
- PrtSc: Windows 11 で全画面のスクリーンショットを簡単に撮ることができます。
- Alt + PrtSc: 編集機能なしで現在のウィンドウをすばやくキャプチャします。
- Ctrl + Alt + PrintScreen: Windows 11 で Web ページのスクロール スクリーンショットを撮ることができます。
- Snipping Tool: 3 つのモードでスクリーンショットを撮るための Windows 11 のデフォルトのキャプチャ プログラム。
安全なダウンロード
安全なダウンロード
時には、 Windows 11でスクリーンショットを撮る お気に入りの映画のセリフ、歌詞、会話、ビデオチャット、ミームなどをキャプチャできます。幸いなことに、デフォルトのスクリーンキャプチャを使用すると非常に簡単です。フルスクリーン、ウィンドウ画面、または特定の領域でキャプチャできます。Windows 11でスクリーンショットを撮る6つの効率的な方法と詳細な手順については、読み続けてください。
ガイドリスト
Windows 11で希望するエリアのスクリーンショットを撮る最良の方法 Windows 11 でショートカットを使ってスクリーンショットを撮る 4 つの方法 Windows 11 でスクリーンショットを撮るには Snipping Tool を使用する Windows 11 でのスクリーンショットの撮影に関する FAQWindows 11で希望するエリアのスクリーンショットを撮る最良の方法
全画面表示、ウィンドウ画面、または画面の一部でWindows11OSのスクリーンショットを撮るのに役立つツールを探しているとします。その場合、 AnyRec Screen Recorder はあなたに最もお勧めのアプリです。さらに、必要に応じてスクリーンショットに絵、テキスト、矢印、線を追加できます。カスタマイズ可能な出力設定も提供しているため、スクリーンショットの品質を心配する必要はありません。
全画面、ウィンドウ、または画面の一部でWindows11のスクリーンショットを撮ります。
スクリーンショットをJPG、BMP、GIF、PNG、TIFFなどのさまざまな形式で保存します。
スクリーンショットに描画、矢印、テキスト、線、図形などを追加します。
カスタマイズされたホットキーを提供して、Windows11/10/8/7でスクリーンショットをすばやく撮ることができます。
安全なダウンロード
安全なダウンロード
ステップ1。まず、 AnyRec Screen Recorder Windows 11 で、メイン インターフェイスの [スナップショット] ボタンをクリックします。
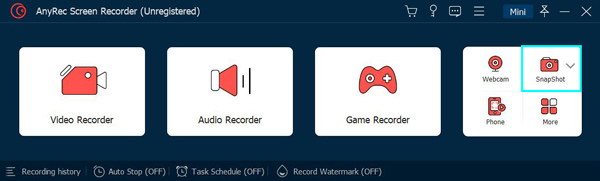
ステップ2。Windows 11でスクリーンショットを撮りたい場所にマウスを移動し、左クリックしてスクリーンショットを撮ります。全画面または 選択したエリア.
ステップ 3。クリックすると、キャプチャ領域をさらに設定したり、編集したりできます。最後に、「保存」ボタンをクリックして、ローカル フォルダーに保存します。

安全なダウンロード
安全なダウンロード
Windows 11 でショートカットを使ってスクリーンショットを撮る 3 つの方法
Windows 11 でスクリーンショットを撮るためのデフォルトのショートカットもあることをご存知ですか? ただし、これらのツールは高度な編集機能がなく、コンピューターの固定画面のみをキャプチャできることに注意してください。読み続けて詳細を確認してください。
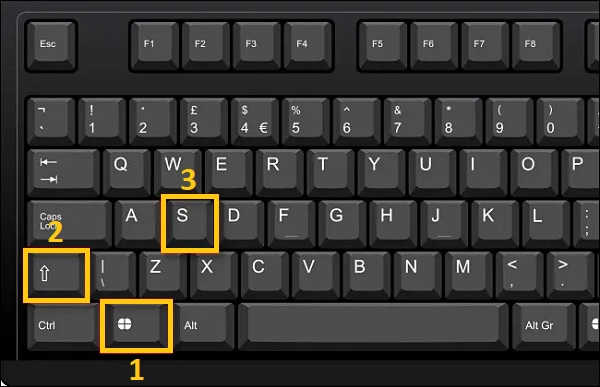
1. Windows + Shift+Sを押します
Windows 11でスクリーンショットを撮るときに知っておくべき最初のショートカットは、「Windows + Shift + S」です。この方法を使用すると、Windows 11 でマウスをカーソルとして使用して画面を掴み、スクリーンショットを撮ることができます。フリーフォーム スニップ、ウィンドウ スニップ、およびフルスクリーン スニップでスクリーンショットを撮ることもできます。
スクリーンショットはクリップボードに保存され、ペイントなどのツールを開いてコピーすることができます。また、ソーシャル アプリを通じてスクリーンショットを友達に直接送信することもできます。
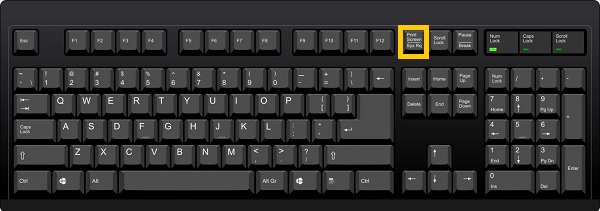
2. PrintScreen(PrtSc)を押します
スクリーンショットを撮る最も速い方法の 1 つは、キーボードの「PrintScreen (PrtSc)」を押すことです。 Windows 11 で画面全体のスクリーンショットを撮ることができます。そうは言っても、編集してトリミングしない限り、画面の一部を選択することはできません。しかし スクリーンショットはWindowsのどこにありますか?このようにして、クリップボードでのみそれらを見つけて、保存することを選択できます。
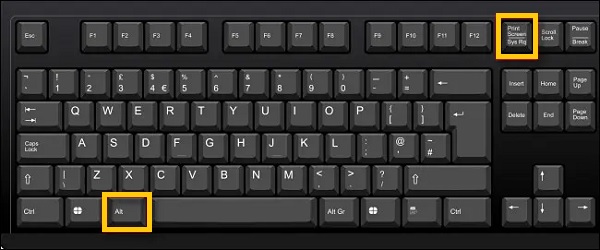
3. Alt + PrintScreen(PrtSc)を押します
「Alt + PrintScreen」を押すと(PrtSc)キーボードで、これにより、現在のウィンドウのWindows11でスクリーンショットを撮ることができます。したがって、この方法は、多くのウィンドウを開き、現在のウィンドウをすばやくキャプチャする方法が必要な場合に最適です。
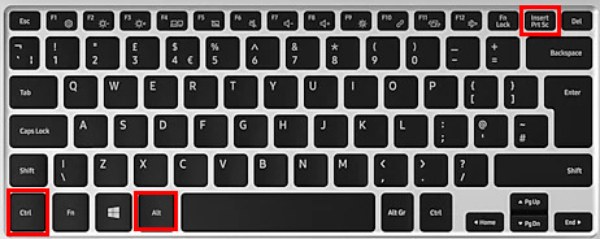
4. Ctrl + Alt + PrintScreen (PrtSc) を押します。
Windows 11 では、Web ページのスクロール スクリーンショットをキャプチャすることもできます。「Ctrl + Alt」ボタンを押したまま、「PrtSn」ボタンを押して全画面表示にします。これで、マウスの左ボタンを押したままにして、長いスクリーンショットをキャプチャできます。
ノート: Windows 11 でスクリーンショットを撮ると、スクリーンショットは自動的に PC に保存されます。「この PC」、「ピクチャ」、「スクリーンショット」フォルダから見つけてください。
Snipping Toolを使用してWindows 11でスクリーンショットを撮る詳細な手順
スニッピングツール はWindows11に組み込まれているスクリーンショットアプリです。このツールを使用すると、自由形式の切り取り、長方形の切り取り、ウィンドウの切り取り、または全画面の切り取りを使用してスクリーンショットを撮ることができます。また、タイマーの後にWindows11で自動的にスクリーンショットを撮る遅延機能もあります。したがって、これ以上面倒なことはせずに、以下の手順に従ってください。
従う手順:
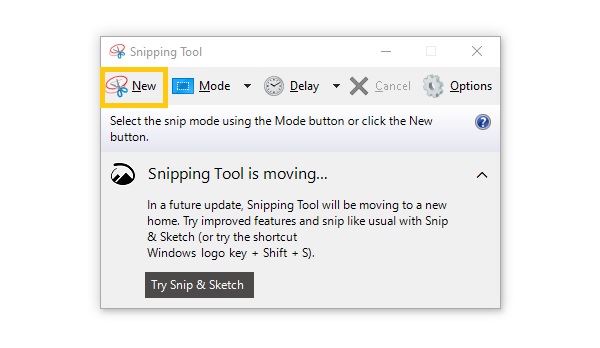
ステップ1。まず、検索 スニッピングツール 次に、ツールを開いて「新規」ボタンをクリックします。または、使用できます WindowsSnippingToolのショートカット 同じように
ステップ2。その後、目的の画面を選択します Windows11でのスクリーンショットを切り抜く。次に、それに図面を追加することを選択できます。
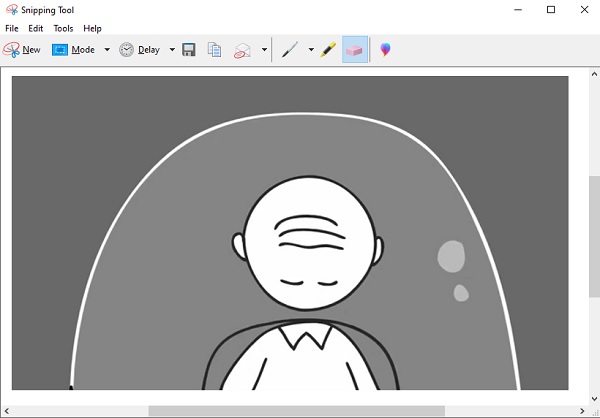
ステップ 3。最後に、写真の編集が完了したら、[ファイル] セクションに移動し、[名前を付けて保存] ボタンを選択してファイルに保存します。

安全なダウンロード
安全なダウンロード
Windows 11 でのスクリーンショットの撮影に関する FAQ
-
1. Xbox GameBarを使用してWindows11でスクリーンショットを撮る方法は?
Xboxゲームバー は、ゲームプレイをキャプチャするために特別に作成された、Windows11OSに組み込まれているもう1つのスクリーンショットツールです。ただし、画面の任意の部分をキャプチャする際にも利用できます。これを使用するには、WindowsでXboxゲームバーを検索するか、キーボードでWindows+Gを押すだけです。次に、[カメラ]ボタンをクリックして、Windows11でスクリーンショットを撮ります。
-
2. Windows 11/10/8/7でスクリーンショットを切り抜く方法は?
キーボードの組み込みのPrtScボタンを押してWindows11/10/8/7でスクリーンショットを撮ると、スクリーンショットは全画面表示になります。あなたから スクリーンショットが見つかりません ローカルフォルダで、ペイントアプリを開いて貼り付け、目的のサイズにトリミングを開始する必要があります。
-
2. Windows 11ラップトップでスクリーンショットを撮る方法は?
幸い、Windows11コンピューターとラップトップは同じ方法で画面をキャプチャできます。したがって、Windows 11でスクリーンショットを撮る方法については、上記の手順に従って、ラップトップでスナップを撮ることができます。
結論
あります! Windows 11でスクリーンショットを撮る方法についての説明は以上です。デフォルトのショートカットまたはSnippingToolを直接使用して、画面を簡単にキャプチャできます。しかし、それらのほとんどは、選択された領域でさえ、多くの編集機能を提供していません。この場合、あなたは頼りにしたほうがいいです AnyRec Screen Recorder そしてそれを使用してWindows11/10/8/7でスクリーンショットを撮ります。それでも質問がある場合は、メッセージを送信することをお勧めします。
安全なダウンロード
安全なダウンロード


