4 Ways to Crop a Screenshot on Windows [and More Tools]
Knowing how to screenshot and crop on Windows is very effective, especially if you wish to highlight precisely what you want to share after capturing. Whether it is for a presentation or tutorials, the good news is that Windows has tools that make this task simple. In this entire post, you’ll see various ways to crop a screenshot on Windows, from built-in familiar tools to reliable software. Read the following parts now and crop your screenshots in just a few clicks!
Guide List
How to Take a Cropped Screenshot on Windows (Screenshot and Crop) How to Crop a Screenshot on Windows (After Capturing) More Tools for Taking a Partial Screen Capture on Windows 11/10How to Take a Cropped Screenshot on Windows (Screenshot and Crop)
While Windows offers several built-in tools for taking screenshots and cropping on Windows, a third-party app can be a powerful upgrade. So, before exploring built-in options, get to know the AnyRec Screen Recorder first. It is not just for recording screen activities, but also lets you take screenshots with precision and ease. Whether you want to capture a specific region, a window, the entire screen, or a scrolling one, this powerful tool makes the whole operation quick and smooth. You can even annotate your captured images after capturing them. Using AnyRec Screen Recorder, you can ensure you won't be overwhelmed with unnecessary features, easily making it your go-to screenshot tool.

Take a screenshot of full-screen, window, region, and scrolling.
Edit screenshots with cropping, drawing, adding text, and more.
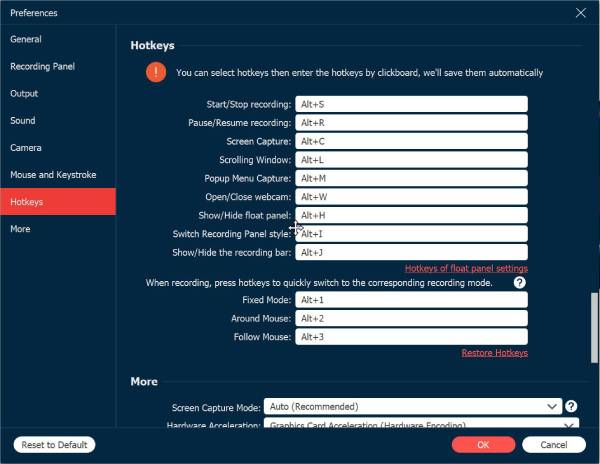
Set customizable keyboard shortcuts for faster screenshots.
Save all images in formats including PNG, JPG, BMP, etc.
Secure Download
Secure Download
Step 1. On the main screen of AnyRec Screen Recorder, find and click the “Screen Capture” option from the recording dropdown menu. Once selected, your cursor will turn into a crosshair, letting you click and drag the part of your screen you want to capture.
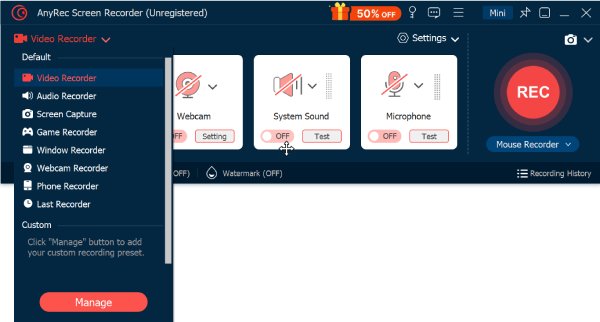
Otherwise, you can use your assigned shortcut keys, like “Alt + C”, to instantly bring up the screenshot tool and select the area to be captured.
You can change this in the “Hotkeys” section by clicking the “Settings” button. For other settings, select the “Output” section.
Step 2. As soon as you select your capture area or window, release the mouse, and the program will quickly take the screenshot. Right after that, you’ll be taken to the editing window, where you can crop a screenshot on Windows, add text, shapes, and more.

Step 3. Once you’re happy with your edits, click the “Save” button (Floppy disk icon) to choose where to save the image. You can pick the format you prefer, like PNG or JPG, before anything else.
Take a Quick Full Screenshot Using Print Screen
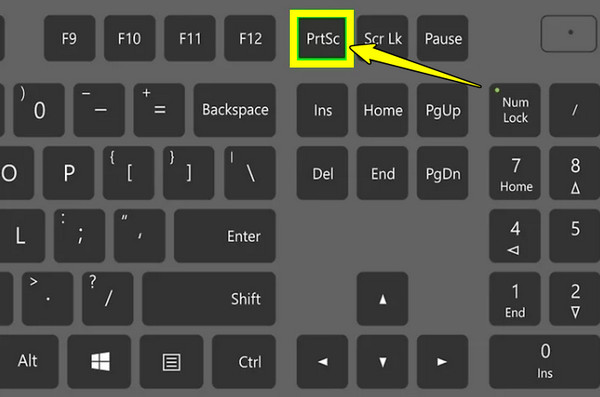
The Print Screen key is among the oldest and simplest ways to take a screenshot on Windows. By pressing this key, you can instantly capture everything visible on screen, covering the open apps, the taskbar, and the desktop background. But you have to paste the image manually to be able to crop it.
- 1. Make sure everything you want to capture is visible on screen. Once it’s ready, press the “Print Screen” key on your keyboard. This copies the snapshot of your screen.
- 2. Next, find any image editing app and press “Ctrl + V” to paste it. From there, you can save the image and then screen crop on Windows.
Take a Windows Screenshot Using Alt + Print Screen
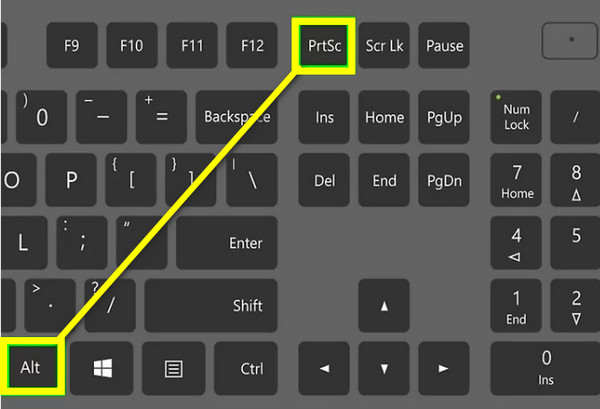
If you wish to capture just the active window instead of the entire screen, combine the Print Screen key with the Alt key. This method is perfect when working with multiple windows at once, and you wish to isolate one window. Like the first way, you must paste the image manually to be able to edit it.
- 1. First, make sure the window is active.
- 2. Then, press “Alt + Print Screen” together, snapping a screenshot of that window.
- 3. After that, launch an image editor where you can paste the image, and from there, you can save it and crop a screenshot on Windows.
Use Snipping Tool to Take a Screenshot
Here comes the built-in Snipping Tool, designed for clearer screen captures. With the Snipping Tool, you can take a screenshot on Windows with different modes: Rectangular, Freeform, Window, or Fullscreen. Right after, you can crop a screenshot directly from the app.
- 1. Start by opening the Snipping Tool from the “Start Menu”, simply type its name into the search bar. Once it runs, decide which capture mode you like: Rectangular, Freeform, Window, or Full-screen, depending on what you need.
- 2. After choosing the snip type, click the “New” button. Suppose you’re using the Rectangular or Freeform mode; drag your cursor to select the capture area. If you choose Full-screen, the screenshot will be taken instantly without picking anything.
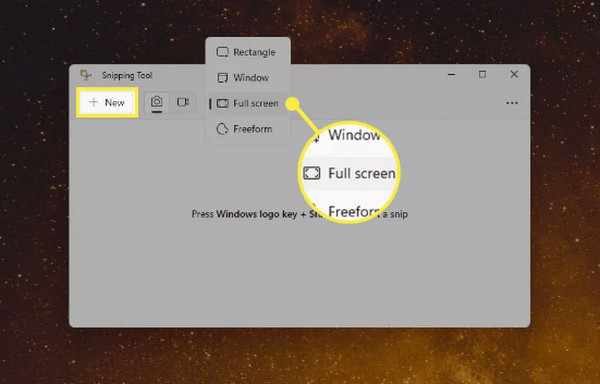
- 3. All captured images will appear in the editor, where you can add text, draw, crop, and do more edits. Once done, click the “Save” button to store it on your computer.
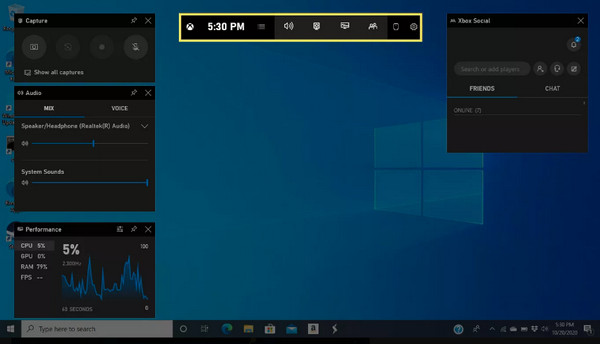
Screenshot a Game or App via Game Bar
While primarily made for capturing gameplay, Xbox Game Bar works with most applications. Once this built-in tool is enabled, you can take a cropped screenshot on Windows without leaving an app, capturing the current active window. The image will be saved automatically after that.
- 1. To get started, press the “Windows + G” keys on your keyboard, bringing up the Xbox Game Bar floating toolbar with several capture and performance tools.
- 2. When you're ready to take a screenshot, click the “Capture” button (Camera icon). The screenshot is saved in the “Captures” folder, in the “Videos” directory. Locate it and open the image in an image editor to cut and save a picture on Windows.
How to Crop a Screenshot on Windows (After Capturing)
As mentioned, for those who used the Print Screen key to take screenshots on Windows, you need an image editor to make those edits after saving. Fortunately, cropping those screenshots afterward is easy with the built-in tools in Windows. Here’s how to do it:
1. Screenshot the Selected Area on Windows with Microsoft Paint
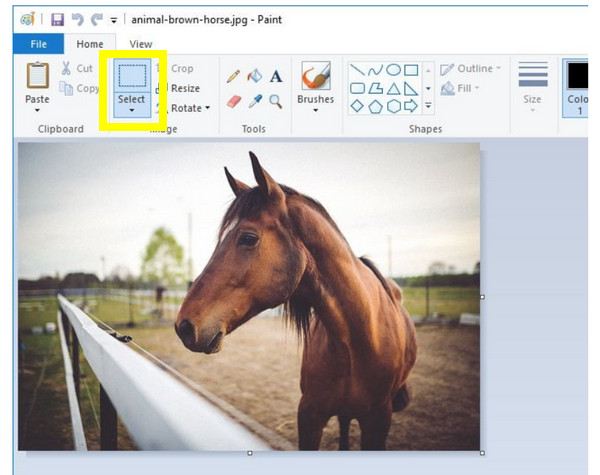
- 1. Once you've located where your Windows screenshot saved, right-click on it and select “Open with”, then select “Paint”. Upon its launch, click the “Select” tool from the toolbar.
- 2. Next, drag your mouse to highlight the part of the screenshot you want to keep, then click the “Crop” button.
- 3. Lastly, go to “File” then select “Save”.
2. Screenshot and Crop on Windows with Photos App
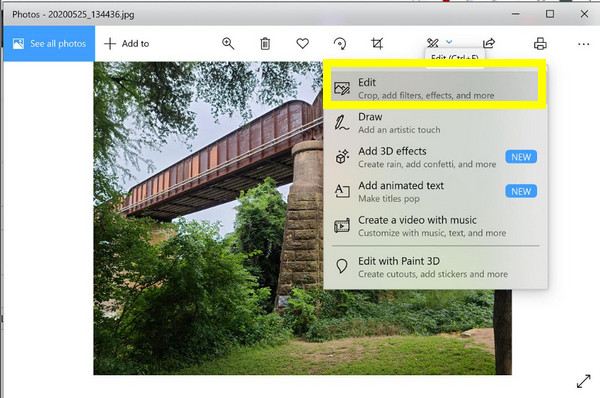
- 1.Go to the location of your screenshot, then double-click on it to open it in the “Photos” app. From there, click the “Edit Image” button (Pencil icon), and select the “Crop & rotate” tab.
- 2.Drag the corner of the frame to select the area you want to keep. After that, click the “Save a copy” option to create a cropped version of the image without affecting the original.
More Tools for Taking a Partial Screen Capture on Windows 11/10
Capturing a full screenshot is easy, but what if you only need to capture a specific part of your screen, so you won’t need to crop it after? Luckily, aside from the built-in tools that Windows has, several tools can make the process even easier.
Below is a comparison of the effective tools for capturing partial screenshots on Windows:
| Screenshot Tool | Annotation Tools | Editing Tools | Easy Sharing | Platform | Best For |
| Snipping Tool | Basic | Basic | No | Windows 10/11 | Quick and no-frills snipping |
| Snip & Sketch | Basic | Basic | No | Windows 10/11 | Annotating in real-time |
| ShareX | Advanced | Advanced | Yes | Windows 10/11 | Advanced workflows |
| Greenshot | Moderate | Moderate | Yes | Windows 10/11 | Technical documentations |
| Lightshot | Basic | Basic | Yes | Windows/macOS | Fast sharing |
Conclusion
With the right tools and methods, you can crop a screenshot on Windows quickly. Whether you’re using keyboard shortcuts or built-in apps, Windows offers a way to capture what’s on your screen. Each fits different needs, from quick edits to more polished screenshots. However, for a more powerful and flexible solution that combines capturing and editing in one place, try AnyRec Screen Recorder. This software is user-friendly, feature-rich, and made to make your screenshot workflow faster and easier. Regardless of your skill level, this program offers an easy process overall!
Secure Download
Secure Download