Complete Guide to Windows 10 Game DVR (Setup, Settings, etc.)
Windows 10 Game DVR helps you capture gameplay, app activity, and on-screen moments without any extra software. Despite being a handy tool, many users, like you, are still unsure how to enable it, adjust recording settings, or even access their captured videos. Therefore, this guide shows you a guide to Game DVR on Windows 10, from how to enable it, use it, customize settings, and more. Also, discussed here is the best alternative for all recording tasks.
Guide List
What Is Windows 10 Game DVR How to Enable, Disable, and Use Game DVR to Record Gameplay Where to Find Your Captures How to Change Game DVR Settings Troubleshoot Game DVR Not Working Best Game DVR Alternative for Low-end PCWhat Is Windows 10 Game DVR
As said, Windows 10 Game DVR is a handy built-in feature in the Xbox Game Bar, mainly for capturing gameplay on Windows PCs. While it is primarily for gamers, Game DVR on Windows 10 can also be used for apps, browser activity, tutorials, and walkthroughs, making it an ideal option for quick recordings.
Once it is enabled, it works quietly in the background, allowing you to start or stop recording via simple keyboard shortcuts. Besides that, here are the main features you can expect:
- Built-in screen recorder available in Windows 10.
- Supports system audio and microphone recording.
- Can record gameplay, apps, and many on-screen activities.
- Allows you to take instant screenshots during recording.
- Utilizes keyboard shortcuts for quick start and stop.
- Automatically stores recordings to its default Captures folder.
How to Enable, Disable, and Use Game DVR to Record Gameplay
Before recording gameplay or on-screen activity in Windows 10 using Game DVR, the feature must be enabled through the Xbox Game Bar settings. This section will show how to turn Windows 10 Game DVR on or off, and how to use it to record gameplay smoothly:
How to Enable Game DVR on Windows 10
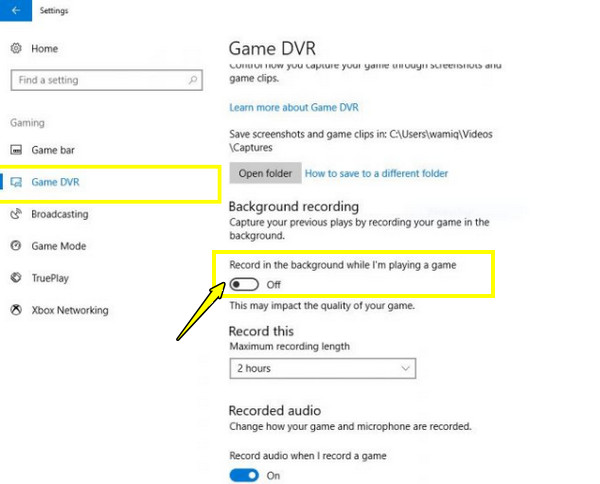
- 1. To open "Settings", press the "Windows + I" keys, then click "Gaming" and head to the "Xbox Game Bar" tab.
- 2. There, toggle "Enable Xbox Game Bar" ON.
- 3. Navigate to "Captures" from the left menu, and turn on "Record in the background while I'm playing a game" if needed.
How to Disable Game DVR on Windows 10
- 1. Open "Settings" by pressing the "Windows + I" keys.
- 2. Select "Gaming" and choose "Xbox Game Bar".
- 3. Next, toggle the switch to OFF.
- 4. Go to "Captures" and turn off the background recording options.
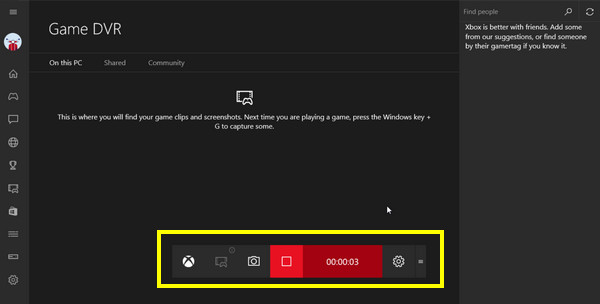
How to Use Game DVR to Record Gameplay
- 1. Start the game or app you wish to record.
- 2. Press the "Windows + G" keys to access the Xbox Game Bar.
- 3. Click the "Record" button or press the "Windows + Alt + R" keys to begin recording.
- 4. Play your game or navigate on screen as usual.
- 5. Later, press the same keys to stop.
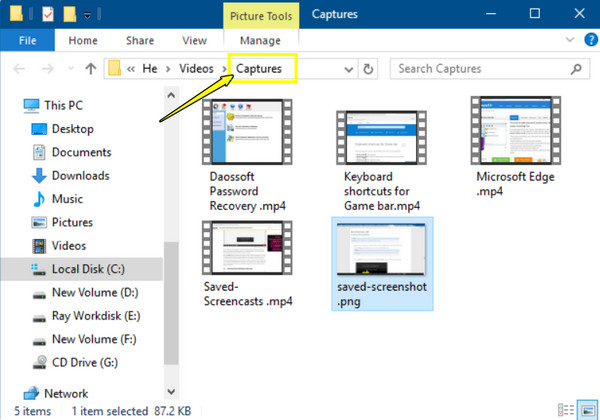
Where to Find Your Captures
After recording with Windows 10 Game DVR, your videos and screenshots are saved in a default folder. Knowing where to find Game DVR recordings can help you quickly review, edit, or share them.
Step 1. Go to "File Explorer" on your PC.
Step 2. Select "Videos", then click "Captures".
Step 3. There, you will find your recorded clips and screenshots organized by date and game name.
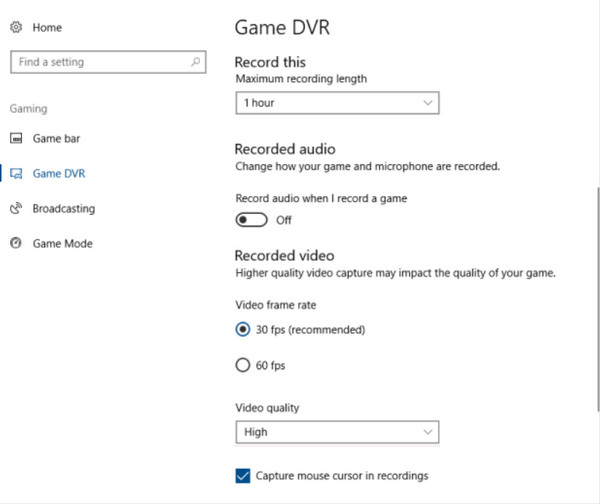
How to Change Game DVR Settings
Windows 10 Game DVR has basic customization options for settings, including video quality, frame rate, and audio recording. Adjusting these settings can improve screen recording performance or quality, depending on your system.
Step 1. Upon opening "Settings" (Windows + I), click "Gaming" then go to "Captures".
Step 2. There, adjust options like length, frame rate, and audio sources.
Step 3. Close "Settings" to apply changes.
Suggested Windows 10 Game DVR Settings
| Setting Option | Recommended | Best For |
| Video Quality | High | Smoother gameplay recording |
| Video Frame Rate | 60 FPS | Clear visuals |
| Recording Length | 30-60 minutes | Long recording sessions |
| System Audio | On | Game sound capture |
| Microphone | On (optional) | Commentary or conversation |
| Background Recording | Off | Better system performance |
Troubleshoot Game DVR Not Working
Sometimes, Game DVR on Windows 10 does not work smoothly due to system settings, outdated drivers, or compatibility issues. So, this section has got you common problems you may face and their quick fixes to resolve Game DVR not working issues immediately. If the problem still exist, you can use third-party game screen recorders instead.
| Game DVR Not Working | Cause | Quick Fix |
| Game DVR not opening | Xbox Game Bar is disabled | Activate it in Gaming Settings |
| Videos not saving | Storage permission conflict | Simply check Captures folder access |
| Recording button is grayed out | App is not supported | Switch to windowed mode |
| No audio in recordings | Audio input is disabled | Turn on audio options such as system and mic audio |
| Lag during recording | High resource usage | Lower recording quality or disable background recording |
Best Game DVR Alternative for Low-end PC
If Windows 10 Game DVR feels too heavy or causes lag on your PC, switching to a lighter alternative like AnyRec Screen Recorder is worth considering. It is made to run smoothly while still delivering clear audio and video for recording. There are 7 different recording modes that you can choose from. As for the built-in Game Recorder, it ensures smoother recordings with minimal frame drops. Despite being lightweight, it does not cut corners on essential features, making it a solid alternative for Game DVR on Windows 10.

Can record the full screen, a window, or a custom screen region.
No recording time limit, even for long game recording sessions.
Game Recorder for a smoother, lag-free gameplay capture on Windows PC.
Built-in preview window with a simple trimmer and other tools for quick edits.
Secure Download
Secure Download
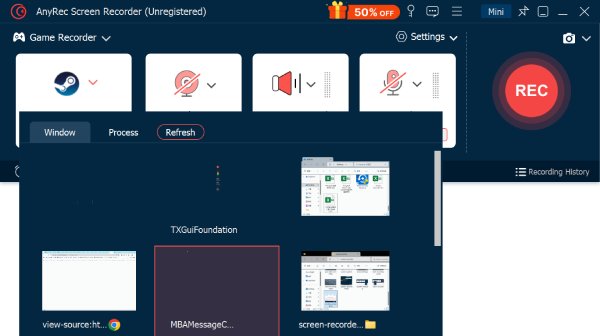
Step 1. Open your game first, then launch AnyRec Screen Recorder. Click the "Game Recorder" mode. Click "Select the game" and choose the game window you want to capture.
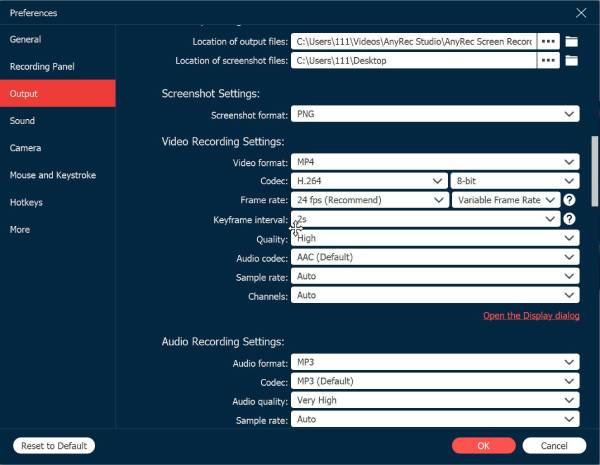
Step 2. Click the "Settings" button to adjust the output settings. Here, you can set the frame rate, format, and quality to balance everything for low-end PCs, then click "OK" to save all changes.
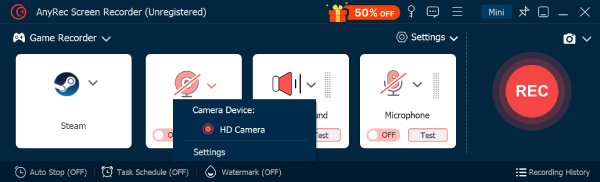
Step 3. Turn on toggle buttons before "System Sound" and "Microphone" to record screen with game audio and voice commentary. Moreover, you can activate "Webcam" for facecam overlay.
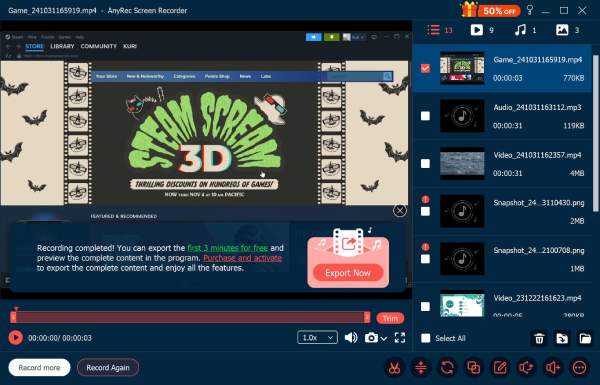
Step 4. Click the "REC" button to start gameplay recording. Later, click the "Stop" button to finish it. In the preview window, trim extra parts before saving your final gameplay video.
Conclusion
You've seen everything here about Windows 10 Game DVR, from turning it on/off and adjusting its settings to fixing common issues! Though Windows 10 Game DVR allows uses to record gameplay and on-screen activities without installation, it comes with limitations in terms of performance, flexibility, and customization. For this, using AnyRec Screen Recorder is a strong alternative. It is lightweight, friendly, and packed with features for your game recording needs. This tool is for anyone who wants a more powerful and dependable recording experience beyond Game DVR recording.
Secure Download
Secure Download


