เป็นที่นิยม
AnyRec Screen Recorder
เก็บทุกช่วงเวลา บันทึกภาพอย่างมืออาชีพ
ดาวน์โหลดอย่างปลอดภัย
วิธีถ่ายภาพหน้าจอเต็ม/บางส่วน/ยาวบน Windows 11
เรียนรู้ 6 วิธีที่มีประสิทธิภาพต่อไปนี้ในการถ่ายภาพหน้าจอบน Windows 11 ไม่ว่าคุณจะต้องการจับภาพเต็มหน้าจอ พื้นที่บางส่วน หรือเลื่อนหน้า คุณสามารถค้นหาวิธีที่เหมาะสมได้:
- AnyRec Screen Recorder: จับภาพหน้าจอทุกประเภทบน Windows ด้วยคุณภาพสูง
- Windows + Shift + S: จับภาพหน้าจอไปยังคลิปบอร์ดและทำการแก้ไขเพิ่มเติม
- PrtSc: เพียงจับภาพหน้าจอบน Windows 11 แบบเต็มหน้าจอ
- Alt + PrtSc: จับภาพหน้าต่างปัจจุบันอย่างรวดเร็วโดยไม่มีคุณสมบัติการแก้ไข
- Ctrl + Alt + PrintScreen: สามารถจับภาพหน้าจอแบบเลื่อนของหน้าเว็บบน Windows 11 ได้
- เครื่องมือสนิป: โปรแกรมจับภาพเริ่มต้นบน Windows 11 เพื่อจับภาพหน้าจอด้วย 3 โหมด
ดาวน์โหลดอย่างปลอดภัย
ดาวน์โหลดอย่างปลอดภัย
บางครั้งคุณอาจต้องการที่จะ ถ่ายภาพหน้าจอบน Windows 11 ของคุณ ของภาพยนตร์แนวโปรด เนื้อเพลง บทสนทนา วิดีโอแชท มีม และอื่นๆ อีกมากมาย โชคดีที่มันง่ายมากด้วยการจับภาพหน้าจอเริ่มต้น คุณจะสามารถจับภาพแบบเต็มหน้าจอ หน้าจอหน้าต่าง หรือพื้นที่เฉพาะได้ อ่านต่อเพื่อเรียนรู้วิธีที่มีประสิทธิภาพ 6 วิธีในการจับภาพหน้าจอบน Windows 11 พร้อมขั้นตอนโดยละเอียด
รายการแนะนำ
วิธีที่ดีที่สุดในการจับภาพหน้าจอบน Windows 11 ของพื้นที่ที่ต้องการ 4 วิธีในการจับภาพหน้าจอบน Windows 11 ผ่านทางลัด ใช้ Snipping Tool เพื่อจับภาพหน้าจอบน Windows 11 คำถามที่พบบ่อยเกี่ยวกับการจับภาพหน้าจอใน Windows 11วิธีที่ดีที่สุดในการจับภาพหน้าจอบน Windows 11 ของพื้นที่ที่ต้องการ
สมมติว่าคุณกำลังมองหาเครื่องมือที่จะช่วยคุณถ่ายภาพหน้าจอบนระบบปฏิบัติการ Windows 11 แบบเต็มหน้าจอ หน้าจอหน้าต่าง หรือบางส่วนของหน้าจอ ในกรณีนั้น, AnyRec Screen Recorder เป็นแอปที่แนะนำมากที่สุดสำหรับคุณ ยิ่งไปกว่านั้น คุณสามารถเพิ่มภาพวาด ข้อความ ลูกศร และเส้นลงในภาพหน้าจอของคุณได้หากต้องการ คุณไม่จำเป็นต้องกังวลเกี่ยวกับคุณภาพของภาพหน้าจอ เนื่องจากยังมีการตั้งค่าเอาท์เปอร์ที่ปรับแต่งได้
ถ่ายภาพหน้าจอบน Windows 11 แบบเต็มหน้าจอ หน้าต่าง หรือบางส่วนของหน้าจอ
บันทึกภาพหน้าจอเป็นรูปแบบต่างๆ เช่น JPG, BMP, GIF, PNG หรือ TIFF
เพิ่มภาพวาด ลูกศร ข้อความ เส้น รูปร่าง และอื่นๆ ลงในภาพหน้าจอของคุณ
ระบุปุ่มลัดที่กำหนดเองเพื่อจับภาพหน้าจอบน Windows 11/10/8/7 อย่างรวดเร็ว
ดาวน์โหลดอย่างปลอดภัย
ดาวน์โหลดอย่างปลอดภัย
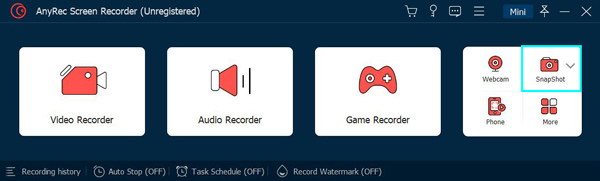
ขั้นตอนที่ 1.ในการเริ่มต้นให้เปิดตัว AnyRec Screen Recorder บน Windows 11 ของคุณ หลังจากนั้น คลิกปุ่ม "SnapShot" บนอินเทอร์เฟซหลัก
ขั้นตอนที่ 2.เพียงเลื่อนเมาส์ไปยังตำแหน่งที่คุณต้องการจับภาพหน้าจอบน Windows 11 จากนั้นคลิกซ้ายเพื่อจับภาพหน้าจอ คุณสามารถจับภาพแบบเต็มหน้าจอหรือ พื้นที่ที่เลือก.
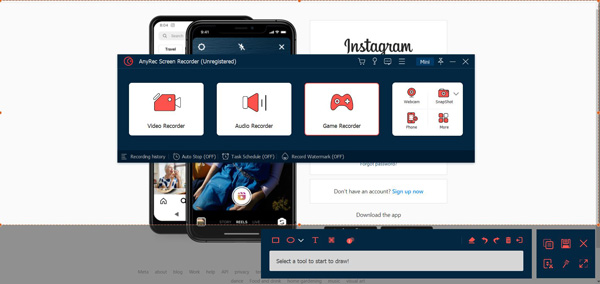
ขั้นตอนที่ 3เมื่อคลิกแล้ว คุณสามารถตั้งค่าพื้นที่จับภาพเพิ่มเติมและทำการแก้ไขเพิ่มเติมได้ สุดท้ายคลิกปุ่ม "บันทึก" เพื่อบันทึกลงในโฟลเดอร์ในเครื่อง

ดาวน์โหลดอย่างปลอดภัย
ดาวน์โหลดอย่างปลอดภัย
3 วิธีในการจับภาพหน้าจอบน Windows 11 ผ่านทางลัด
คุณรู้หรือไม่ว่ามีทางลัดเริ่มต้นให้คุณถ่ายภาพหน้าจอบน Windows 11 ด้วย แต่คุณควรทราบว่าเครื่องมือเหล่านี้สามารถจับภาพหน้าจอคอมพิวเตอร์ของคุณแบบคงที่เท่านั้นโดยไม่มีคุณสมบัติการแก้ไขขั้นสูง โปรดอ่านต่อและทราบข้อมูลเพิ่มเติม
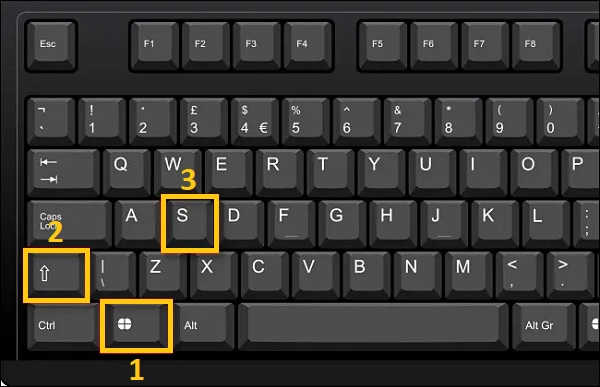
1. กด Windows + Shift + S
ทางลัดแรกในการจับภาพหน้าจอบน Windows 11 ที่คุณต้องรู้คือ "Windows + Shift + S" วิธีนี้จะช่วยให้คุณสามารถจับภาพหน้าจอบน Windows 11 ได้โดยการจับหน้าจอโดยใช้เมาส์เป็นเคอร์เซอร์ คุณยังจับภาพหน้าจอในรูปแบบ Freeform Snip, Window Snip และ Fullscreen Snip ได้ด้วย
ภาพหน้าจอจะถูกบันทึกไว้ในคลิปบอร์ด และคุณสามารถเปิดเครื่องมือเช่น Paint เพื่อคัดลอกได้ คุณยังสามารถส่งภาพหน้าจอให้เพื่อนของคุณผ่านแอปโซเชียลได้โดยตรง
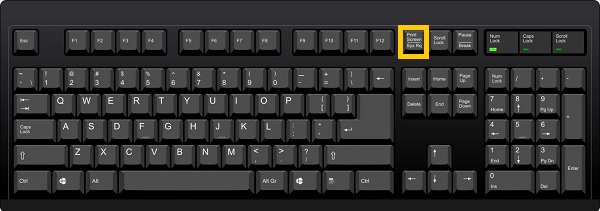
2. กด PrintScreen (PrtSc)
วิธีจับภาพหน้าจอที่เร็วที่สุดวิธีหนึ่งคือการกด "PrintScreen (PrtSc)" บนคีย์บอร์ด ช่วยให้คุณสามารถจับภาพหน้าจอบน Windows 11 ได้ทั้งหน้าจอ ดังที่กล่าวไปแล้ว คุณจะไม่สามารถเลือกส่วนของหน้าจอได้เว้นแต่คุณจะแก้ไขและครอบตัดมัน แต่ ภาพหน้าจอจะไปที่ไหนใน Windows? ด้วยวิธีนี้ คุณจะพบได้เฉพาะในคลิปบอร์ดแล้วเลือกบันทึก
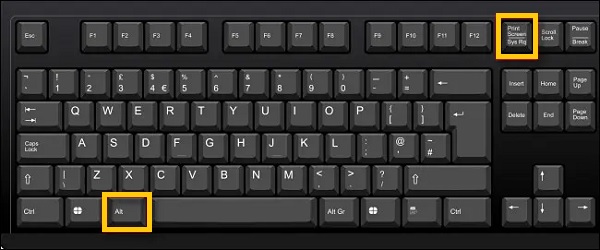
3. กด Alt + PrintScreen (PrtSc)
เมื่อคุณกด "Alt + PrintScreen" (PrtSc) บนแป้นพิมพ์ ซึ่งจะทำให้คุณสามารถจับภาพหน้าจอใน Windows 11 ของหน้าต่างปัจจุบันของคุณได้ ดังนั้น วิธีนี้จึงเหมาะสำหรับผู้ที่เปิดหน้าต่างหลายบานและต้องการวิธีที่รวดเร็วในการถ่ายภาพหน้าต่างปัจจุบัน
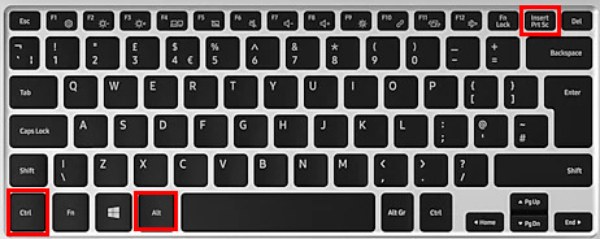
4. กด Ctrl + Alt + PrintScreen (PrtSc)
คุณยังสามารถจับภาพหน้าจอแบบเลื่อนของหน้าเว็บบน Windows 11 ได้อีกด้วย เพียงกดปุ่ม "Ctrl + Alt" ค้างไว้ จากนั้นกดปุ่ม "PrtSn" เพื่อเข้าสู่โหมดเต็มหน้าจอ ตอนนี้คุณสามารถกดเมาส์ซ้ายเพื่อจับภาพหน้าจอขนาดยาวได้
บันทึก: หลังจากถ่ายภาพหน้าจอบน Windows 11 ภาพหน้าจอจะถูกบันทึกโดยอัตโนมัติบนพีซีของคุณ เพียงค้นหาจากโฟลเดอร์ "พีซีเครื่องนี้" "รูปภาพ" และ "ภาพหน้าจอ"
ขั้นตอนโดยละเอียดในการถ่ายภาพหน้าจอบน Windows 11 ด้วย Snipping Tool
เครื่องมือสนิป เป็นแอปสกรีนช็อตในตัวบน Windows 11 เครื่องมือนี้จะช่วยให้คุณถ่ายภาพหน้าจอโดยใช้ Snip แบบฟรีฟอร์ม, สนิปสี่เหลี่ยม, สนิปหน้าต่าง หรือสนิปแบบเต็มหน้าจอ นอกจากนี้ยังมีคุณสมบัติการหน่วงเวลาที่จะจับภาพหน้าจอโดยอัตโนมัติใน Windows 11 หลังจากจับเวลา ดังนั้นโดยไม่ต้องกังวลใจอีกต่อไป ให้ทำตามขั้นตอนด้านล่าง
ขั้นตอนในการปฏิบัติตาม:
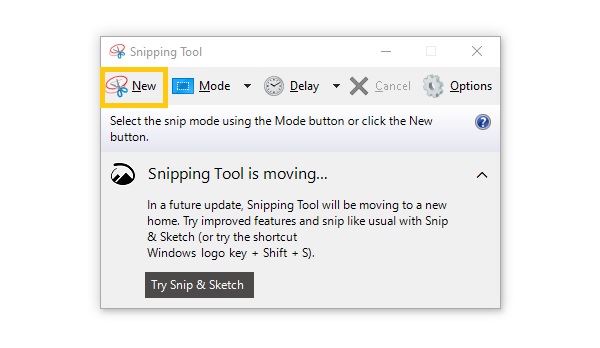
ขั้นตอนที่ 1.ก่อนอื่นให้ค้นหา เครื่องมือสนิป บน Windows 11 จากนั้นเปิดเครื่องมือแล้วคลิกปุ่ม "ใหม่" หรือคุณสามารถใช้ ทางลัดเครื่องมือ Snipping ของ Windows เช่นกัน
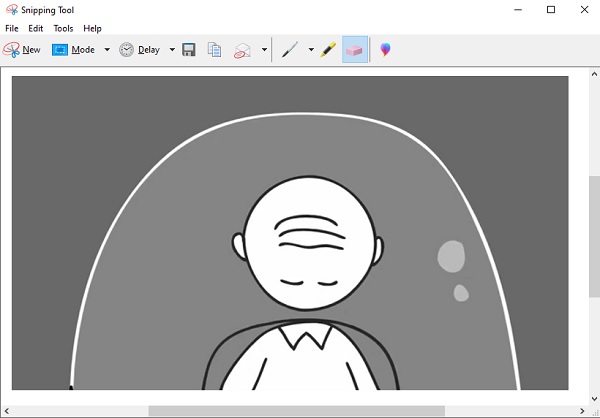
ขั้นตอนที่ 2.หลังจากนั้น เลือกหน้าจอที่ต้องการ ครอบตัดภาพหน้าจอของ Windows 11. จากนั้นคุณอาจเลือกที่จะเพิ่มภาพวาดลงไปได้
ขั้นตอนที่ 3สุดท้ายนี้ เมื่อคุณแก้ไขรูปภาพเสร็จแล้ว คุณสามารถไปที่ส่วน "ไฟล์" และเลือกปุ่ม "บันทึกเป็น" เพื่อบันทึกลงในไฟล์ของคุณได้

ดาวน์โหลดอย่างปลอดภัย
ดาวน์โหลดอย่างปลอดภัย
อ่านเพิ่มเติม
คำถามที่พบบ่อยเกี่ยวกับการจับภาพหน้าจอใน Windows 11
-
1. วิธีการจับภาพหน้าจอบน Windows 11 โดยใช้ Xbox Game Bar?
Xbox Game Bar เป็นเครื่องมือจับภาพหน้าจออีกตัวในระบบปฏิบัติการ Windows 11 ที่ทำขึ้นเพื่อจับภาพการเล่นเกมโดยเฉพาะ แต่คุณยังสามารถใช้เพื่อจับภาพส่วนใดก็ได้ของหน้าจอของคุณ ในการใช้งาน คุณสามารถค้นหา Xbox Game Bar บน Windows ของคุณ หรือเพียงแค่กด Windows + G บนแป้นพิมพ์ของคุณ จากนั้นคลิกปุ่มกล้องเพื่อถ่ายภาพหน้าจอใน Windows 11
-
2. วิธีการครอบตัดภาพหน้าจอใน Windows 11/10/8/7?
หากคุณกดปุ่ม PrtSc ในตัวบนแป้นพิมพ์เพื่อถ่ายภาพหน้าจอใน Windows 11/10/8/7 ภาพหน้าจอจะเต็มหน้าจอ ตั้งแต่คุณ หาภาพหน้าจอไม่เจอ ในโฟลเดอร์ในเครื่อง คุณควรเปิดแอป Paint แล้ววางเพื่อเริ่มครอบตัดให้ได้ขนาดที่ต้องการ
-
2. จะถ่ายภาพหน้าจอบนแล็ปท็อป Windows 11 ได้อย่างไร?
โชคดีที่คอมพิวเตอร์และแล็ปท็อป Windows 11 มีวิธีการจับภาพหน้าจอแบบเดียวกัน ดังนั้น คุณสามารถทำตามขั้นตอนที่อธิบายไว้ด้านบนเกี่ยวกับวิธีถ่ายภาพหน้าจอใน Windows 11 เพื่อช่วยให้คุณจับภาพแล็ปท็อปของคุณได้อย่างรวดเร็ว
บทสรุป
ที่นั่นคุณมีมัน! นั่นคือทั้งหมดสำหรับการสนทนาของเราเกี่ยวกับวิธีการจับภาพหน้าจอใน Windows 11 คุณสามารถใช้ทางลัดเริ่มต้นหรือเครื่องมือสนิปเพื่อจับภาพหน้าจอของคุณได้อย่างง่ายดาย แต่ส่วนใหญ่ไม่มีฟังก์ชันการแก้ไขมากมาย แม้แต่ภูมิภาคที่เลือก ในกรณีนี้คุณควรพึ่งพา AnyRec Screen Recorder และใช้เพื่อจับภาพหน้าจอใน Windows 11/10/8/7 หากคุณยังคงมีคำถาม เราขอแนะนำให้คุณส่งข้อความถึงเรา
ดาวน์โหลดอย่างปลอดภัย
ดาวน์โหลดอย่างปลอดภัย
บทความที่เกี่ยวข้องเพิ่มเติม
เกี่ยวกับผู้เขียนของเรา