เป็นที่นิยม
AnyRec Screen Recorder
เก็บทุกช่วงเวลา บันทึกภาพอย่างมืออาชีพ
ดาวน์โหลดอย่างปลอดภัย
[แก้ไขแล้ว] ภาพหน้าจอด่วนไม่บันทึกบน Mac โดยอัตโนมัติ
รับ 6 วิธีแก้ปัญหาเพื่อแก้ไขภาพหน้าจอ Mac ของคุณที่ไม่บันทึก:
- 1. ใช้ AnyRec Screen Recorder ระดับมืออาชีพแทน
- 2. ตรวจสอบให้แน่ใจว่าทางลัดในการจับภาพหน้าจอนั้นสามารถใช้งานได้
- 3. ตรวจสอบเส้นทางการบันทึกภาพหน้าจอคือสิ่งที่คุณต้องการ
- 4. อัปเดต Mac ของคุณเป็นเวอร์ชันระบบ Sonoma ล่าสุด
- 5. ทำการรีเซ็ต NVRAM เพื่อหลีกเลี่ยงการกำหนดค่าที่ไม่ถูกต้อง
- 6. ปลดล็อกโฟลเดอร์ภาพหน้าจอเพื่อเปิดภาพหน้าจอได้อย่างง่ายดาย
ดาวน์โหลดอย่างปลอดภัย
ดาวน์โหลดอย่างปลอดภัย
หาคุณ ภาพหน้าจอ Mac ไม่บันทึก โดยอัตโนมัติหลังจากการอัพเดต Mac Catalina? อาจเกิดจากสาเหตุหลายประการ เช่น การตั้งค่าทางลัดไม่ถูกต้อง เปลี่ยนเส้นทางการบันทึก และอื่นๆ แม้ว่าทางลัดที่มาพร้อมเครื่อง Mac จะเป็นวิธีที่ง่ายและรวดเร็วในการจับภาพหน้าจอ แต่เพื่อหลีกเลี่ยงปัญหาในการบันทึก คุณยังสามารถลองใช้เครื่องมือระดับมืออาชีพอื่นๆ ได้อีกด้วย อ่านเพิ่มเติมเพื่อแก้ปัญหาภาพหน้าจอ Mac ที่ไม่บันทึกปัญหาด้วย 6 วิธีที่มีประสิทธิภาพ
แอพภาพหน้าจอทางเลือก Mac ที่ดีที่สุด 5 วิธีในการแก้ไขภาพหน้าจอ Mac ที่ไม่บันทึกปัญหา- 2.1 ตรวจสอบการตั้งค่าทางลัดภาพหน้าจอ Mac
- 2.2 ตรวจสอบเส้นทางการบันทึกภาพหน้าจอเริ่มต้น
- 2.3 อัปเดต Mac ของคุณเป็นเวอร์ชันระบบล่าสุด
- 2.4 ทำการรีเซ็ต NVRAM
- 2.5 ปลดล็อคโฟลเดอร์สกรีนช็อต
แอพภาพหน้าจอทางเลือก Mac ที่ดีที่สุด
ไม่ว่าอะไรจะทำให้ภาพหน้าจอ Mac ของคุณไม่บันทึก คุณสามารถไปหามืออาชีพได้โดยตรง AnyRec Screen Recorder สำหรับแมค/วินโดวส์ มันไม่ได้เป็นเพียงชุดเครื่องมือจับภาพหน้าจอที่ทรงพลังเท่านั้น แต่ยังมีคุณสมบัติการแก้ไขที่ทรงพลังเช่นกัน นอกจากนี้ยังมีทางลัดที่ปรับแต่งได้เพื่อจับภาพหน้าจอและบันทึกวิดีโอบน Mac โดยไม่ต้องค้นหาการบันทึกภาพหน้าจอบน Mac คุณสามารถเปลี่ยนเส้นทางปลายทางทุกครั้งตามความต้องการของคุณ

จับภาพหน้าจอภูมิภาคแบบเต็มหน้าจอ หน้าต่าง และกำหนดเองได้อย่างง่ายดาย
เครื่องมือแก้ไขภาพหน้าจออันทรงพลังเพื่อเพิ่มคำอธิบายประกอบและทำการปรับเปลี่ยน
ส่งออกไปยังรูปแบบรูปภาพยอดนิยมทั้งหมด เช่น PNG, JPG/JPEG, BMP และ GIF
ตั้งค่าปุ่มลัดที่กำหนดเองและเส้นทางปลายทางเพื่อบันทึกภาพหน้าจอได้อย่างง่ายดาย
ดาวน์โหลดอย่างปลอดภัย
ดาวน์โหลดอย่างปลอดภัย
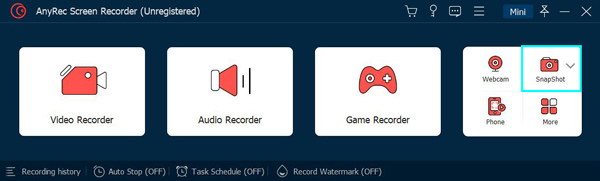
ขั้นตอนที่ 1.ดาวน์โหลดและติดตั้งแอพสกรีนช็อตทางเลือก Mac ที่ดีที่สุดจากเว็บไซต์ คลิกปุ่ม "Snapshot" ที่ด้านขวาบนของหน้าต่าง
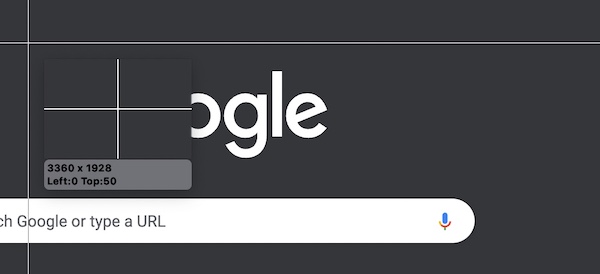
ขั้นตอนที่ 2.ลากเคอร์เซอร์ของเมาส์เพื่อเลือกพื้นที่หน้าจอ ปล่อยปุ่มเมาส์ ภาพหน้าจอจะถูกถ่ายโดยอัตโนมัติ
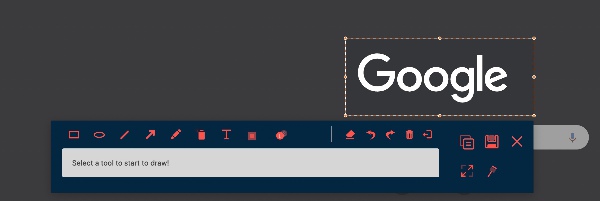
ขั้นตอนที่ 3แถบเครื่องมือจะปรากฏใต้ภาพหน้าจอซึ่งให้คุณสมบัติการแก้ไขขั้นสูงแก่คุณ เมื่อการแก้ไขเสร็จสิ้น ให้คลิกปุ่ม "บันทึก" เมื่อการแก้ไขเสร็จสิ้น
บันทึก: ถ้าคุณคือ มีปัญหากับยูทิลิตี้หน้าจอบน Windows PC, หรือ พยายามจับภาพหน้าจอ iPhone สำหรับ Facetimeเรายังมีคำแนะนำฉบับสมบูรณ์เพื่อช่วยเหลือคุณอีกด้วย
5 วิธีในการแก้ไขภาพหน้าจอ Mac ที่ไม่บันทึกปัญหา
2.1 ตรวจสอบการตั้งค่าทางลัดภาพหน้าจอ Mac
อาจเป็นไปได้ว่ายูทิลิตี้ภาพหน้าจอ Mac ของคุณกำลังทำงานอยู่ แต่คุณเพิ่งกดคีย์ผสมที่ไม่เกี่ยวข้องและพบว่าไม่มีการบันทึกภาพหน้าจอใด ๆ ทำตามขั้นตอนด้านล่างเพื่อรีเซ็ตแป้นพิมพ์ลัดของภาพหน้าจอ
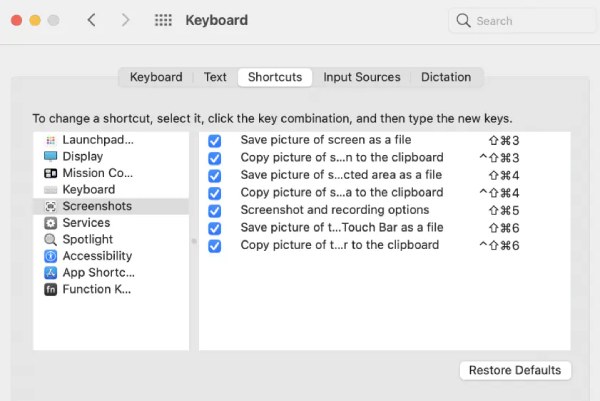
ขั้นตอนที่ 1.เปิดแอป "การตั้งค่า" และค้นหา "การตั้งค่าระบบ" จากนั้นไปที่ตัวเลือก "คีย์บอร์ด" แล้วคลิกปุ่ม "ทางลัด"
ขั้นตอนที่ 2.คลิกปุ่ม "ภาพหน้าจอ" ที่แผงด้านซ้าย ที่ด้านขวาของแผง ตรวจสอบให้แน่ใจว่าได้เปิดใช้งานฟังก์ชันภาพหน้าจอแล้ว
ขั้นตอนที่ 3คลิกปุ่ม "คืนค่าเริ่มต้น" เพื่อรีเซ็ตแป้นพิมพ์ลัดทั้งหมดเป็นค่าเริ่มต้น จากนั้นตรวจสอบว่าภาพหน้าจอ Mac ของคุณสามารถบันทึกด้วยทางลัดได้หรือไม่
2.2 ตรวจสอบเส้นทางการบันทึกภาพหน้าจอเริ่มต้น
คุณอาจเปลี่ยนโฟลเดอร์สกรีนช็อตเริ่มต้นไปเป็นโฟลเดอร์อื่นนอกเหนือจากโฟลเดอร์เดสก์ท็อป ส่งผลให้ภาพหน้าจอไม่ปรากฏบนเดสก์ท็อป ดังนั้นคุณอาจคิดว่าภาพหน้าจอของ Mac ไม่ได้ถูกบันทึกเลย ทำตามขั้นตอนเพื่อเปลี่ยนเส้นทางปลายทางของภาพหน้าจอที่ถ่าย
ขั้นตอนที่ 1.บนหน้าจอใดก็ได้ ให้กดคีย์ผสม "Shift + Cmd + 5"

ขั้นตอนที่ 2.คลิกปุ่ม "ตัวเลือก" บนแถบเครื่องมือ ในตัวเลือก "บันทึกไปที่" ให้คลิกปุ่ม "เดสก์ท็อป"
2.3 อัปเดต Mac ของคุณเป็นเวอร์ชันระบบล่าสุด
อีกสาเหตุที่เป็นไปได้คือระบบ Mac OSX ของคุณได้รับการอัปเดตหรือจำเป็นต้องซ่อมแซม คงจะดีมากหากคุณมีสำเนาสำรองของระบบของคุณอยู่แล้ว ถ้าไม่เช่นนั้น โปรดดูขั้นตอนโดยละเอียดด้านล่าง:
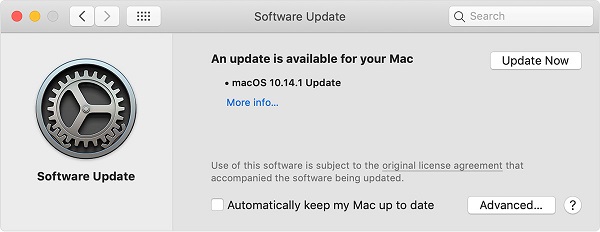
ขั้นตอนที่ 1.เปิดแอป "การตั้งค่าระบบ" คลิกปุ่ม "อัพเดตซอฟต์แวร์"
ขั้นตอนที่ 2.คุณอาจพบการแจ้งเตือนว่ามีการอัพเดทสำหรับ Mac ของคุณ คลิกปุ่ม "อัปเดตทันที" และปฏิบัติตามคำแนะนำ
2.4 ทำการรีเซ็ต NVRAM
ปัญหาทั่วไปอีกประการหนึ่งที่ Mac ของคุณอาจเผชิญคือการกำหนดค่า NVRAM ผิดพลาด บางครั้งปัญหากับระบบ Mac OSX ของคุณไม่สามารถแก้ไขได้จนกว่าคุณจะทำการรีเซ็ต NVRAM
ขั้นตอนที่ 1.รีสตาร์ท Mac ของคุณ เมื่อคุณได้ยินเสียงเริ่มต้นให้กดคีย์ผสม "Cmd + Option + P + R" ทันที
ขั้นตอนที่ 2.กดปุ่มค้างไว้ประมาณ 20 วินาที Mac ของคุณอาจเริ่มระบบใหม่หลายครั้ง
ขั้นตอนที่ 3ปล่อยปุ่มหลังจากนั้นและบูตเข้าสู่ระบบของคุณตามปกติ

2.5 ปลดล็อคโฟลเดอร์สกรีนช็อต
อีกสาเหตุที่เป็นไปได้ที่ทำให้ภาพหน้าจอ Mac ของคุณไม่บันทึกบน Mac นั้นถูกล็อคโฟลเดอร์ แม้ว่าคุณจะเปลี่ยนโฟลเดอร์บันทึกเป็นเดสก์ท็อปเริ่มต้น แต่ระบบอาจถูกล็อคและป้องกันไม่ให้คุณเปิดมัน รับขั้นตอนโดยละเอียดเพื่อแก้ไข:
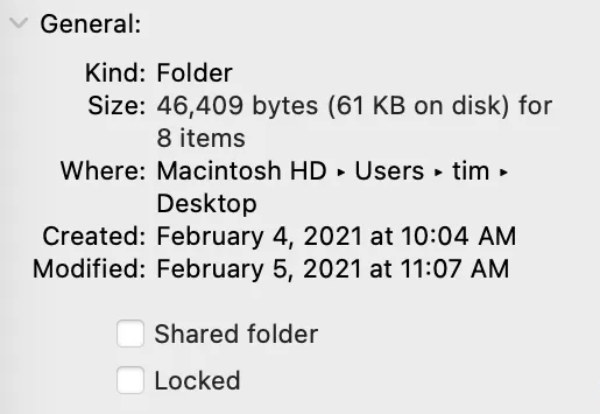
ขั้นตอนที่ 1.ไปที่โฟลเดอร์บันทึกการตั้งค่า การตั้งค่าเริ่มต้นคือเดสก์ท็อป
ขั้นตอนที่ 2.คลิกขวาที่โฟลเดอร์แล้วคลิกปุ่ม "รับข้อมูล" จากรายการแบบเลื่อนลง
ขั้นตอนที่ 3ในส่วน "ทั่วไป" คุณควรตรวจสอบให้แน่ใจว่าไม่ได้ทำเครื่องหมายในช่อง "ล็อค"
คำถามที่พบบ่อยเกี่ยวกับภาพหน้าจอ Mac
-
วิธีแก้ไข: คุณไม่ได้รับอนุญาตให้บันทึกในตำแหน่งนี้บน Mac
เปิดแอป "Finder" และไปที่โฟลเดอร์ "Home" ของคุณ บนแถบเมนู ให้ไปที่ "ไฟล์ > รับข้อมูล" และค้นหาส่วน "การแชร์และสิทธิ์" ตรวจสอบให้แน่ใจว่าตัวเลือก "สิทธิพิเศษ" แสดงเป็น "อ่านและเขียน"
-
ฉันจะเปลี่ยนรูปแบบภาพหน้าจอ Mac จาก png เป็น jpg ได้อย่างไร
หากคุณต้องการเปลี่ยนรูปแบบภาพหน้าจอ ให้เปิดหน้าต่างเทอร์มินัลแล้วป้อนคำสั่งต่อไปนี้: "defaults write com.apple.screencapture type JPG" กดปุ่ม "Enter" เพื่อใช้การเปลี่ยนแปลงของคุณ
-
เหตุใดฉันจึงไม่สามารถจับภาพหน้าจอบน Mac ด้วยแอพ Apple TV ได้
ยูทิลิตี้ภาพหน้าจอเริ่มต้นของ Mac จะถูกปิดใช้งานโดยอัตโนมัติด้วยแอพ Apple TV คุณสามารถใช้แอปสแนปชอตหน้าจอของบริษัทอื่นแทนได้
บทสรุป
ดังที่เราได้กล่าวไว้ในบทความแล้ว ต่อไปนี้เป็นวิธีแก้ปัญหาที่ดีที่สุด 6 ข้อเมื่อคุณ ภาพหน้าจอ Mac ไม่ได้บันทึกไปที่เดสก์ท็อปของคุณ- แม้ว่าเหตุผลจะแตกต่างกันไป แต่เราขอแนะนำให้คุณใช้การจับภาพหน้าจอที่ดีที่สุด - AnyRec Screen Recorder เป็นโซลูชันแบบครบวงจรสำหรับงานบันทึกหน้าจอ Mac ของคุณ
บทความที่เกี่ยวข้อง
เกี่ยวกับผู้เขียนของเรา


