5 Creative Ways to Take Sims 4 Screenshots You Must Know
When building a mansion or guiding your Sims through dramatic events, you know these moments just have to be saved! The Sims 4 is full of personal stories and taking Sims 4 screenshots will save those precious memories. Are you making the most out of the basic screenshot tool? This post will reveal five distinct ways how to screenshot Sims 4, capturing your game in all its glory to help you showcase images that truly pop.
Guide List
How to Take Screenshots in Sims 4 with 2 Built-in Tools Take Sims 4 Game Screenshots with AnyRec Screen Recorder How to Do Sims 4 Screen Capture with Keyboard Shortcuts How to Take Screenshots on Sims 4 with Snipping Tool Useful Tips for High-quality In-Game ScreenshotsHow to Take Screenshots in Sims 4 with 2 Built-in Tools
To begin with, The Sims 4 makes capturing gameplay moments easy with its two built-in tools. Whether you prefer clicking through a menu or pressing a quick keyboard shortcut, both ways are simple and effective for taking Sims 4 snapshots.
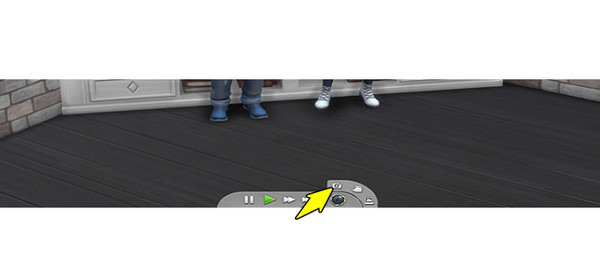
1.Take Sims 4 Screenshots Using the UI Board
The first way involves using the in-game camera controls from the user interface, which is perfect for visual control and access to several camera options. Here’s how it works:
- 1. Once you have launched The Sims 4 and started your game, click the "Camera" button at the top, then select "Take Screenshot".
- 2. The game will briefly pause and capture the exact view, and the image will be saved in the "Screenshots" folder.
2. Take Screenshots on Sims Gameplay Using the C Key
Meanwhile, using the C key is a fast and convenient keyboard shortcut for taking screenshots quickly during gameplay.
- 1. Open The Sims 4 and play as usual.
- 2. On your keyboard, press the "C" key at any moment you want to capture, and the screen will briefly flash.
- 3. The image is saved in the "Screenshots" folder.
Take Sims 4 Game Screenshots with AnyRec Screen Recorder
Looking for a flexible and powerful way to take Sims 4 screenshots? Using the AnyRec Screen Recorder can be a great alternative to the usual way of doing so. Unlike the in-game tools or shortcuts, screen recording software offers more control, advanced features, and high-quality output. AnyRec Screen Recorder goes beyond simple screenshots as it takes clear and customizable screenshots at any moment during your Sims 4 session without disrupting your gameplay. Also, it lets you define custom hotkeys, set image formats, and even annotate screenshots in real-time. It’s lightweight, friendly, and works well even on low-end PCs to record Sims 4 as well. Whether you’re a casual Sims player or a content creator, the AnyRec Screen Recorder is a solid choice for enhancing your in-game visuals.

Set your own hotkeys to take quick Sims 4 screenshots during gameplay.
Capture the full screen, a specific Sims 4 window, or a custom region.
Select your preferred resolution, format, frame rate, and more.
Save screenshots in formats like JPG, PNG, BMP, etc., with no loss in quality.
Secure Download
Secure Download
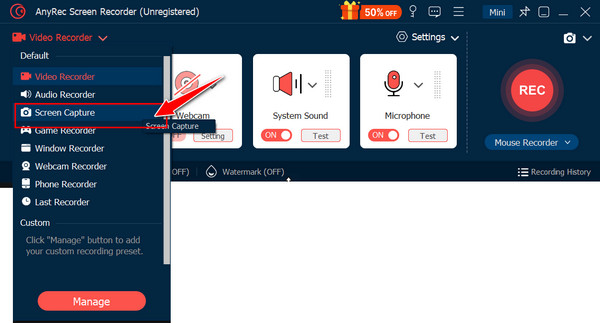
Step 1. Launch AnyRec Screen Recorder, then open The Sims 4 on your computer. In the main screen, click the "Screen Capture" button. Your mouse cursor will turn into a crosshair. Click and drag to choose the area of your Sims 4 screen you want to screenshot.
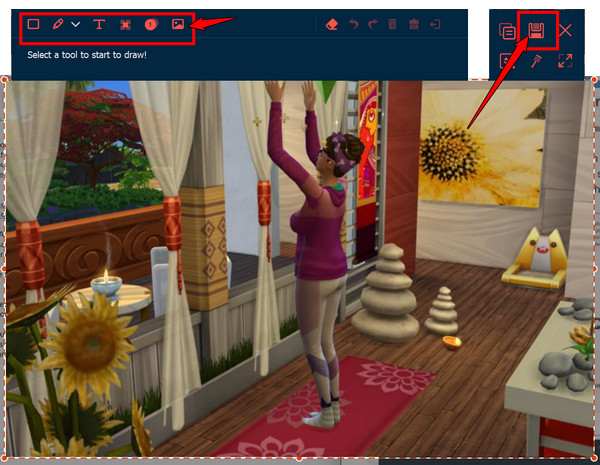
Step 2. After selecting the capture area, AnyRec Screen Recorder will instantly take a Sims 4 screenshot. Now, on the editing screen, you can annotate the image with text, arrows, highlights, and other tools.
Step 3. Once you're happy with your edits, click the "Save" button. Choose the folder where to store the screenshot and pick your desired format. Your captured Sims 4 image will now be saved and ready to share or edit further.
How to Do Sims 4 Screen Capture with Keyboard Shortcuts
For a faster way to screenshot Sims 4 gameplay, keyboard shortcuts are the way to go! Both Windows and Mac have straightforward key combinations that will let you capture while playing.
See the steps for Windows and Mac below:
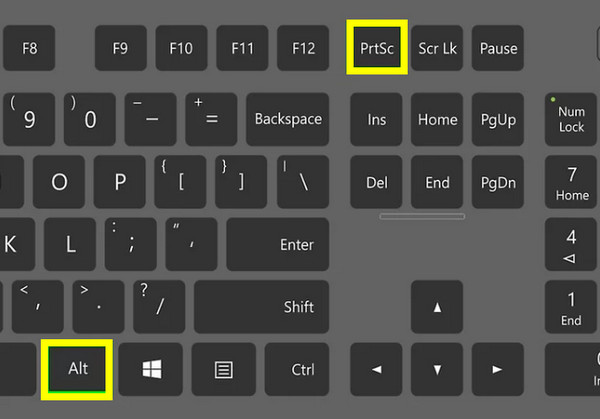
Take Sims 4 Screenshots on Windows:
- 1. While playing Sims 4, press the "PrtScn" key to copy the entire screen to the clipboard.
- 2. Now, you can paste it into any image editor available, ready to edit and share.

- 3. For the active Sims 4 window, only press the "Alt + PrtScn" keys.
- 4. Then, paste and save the image using any editor.
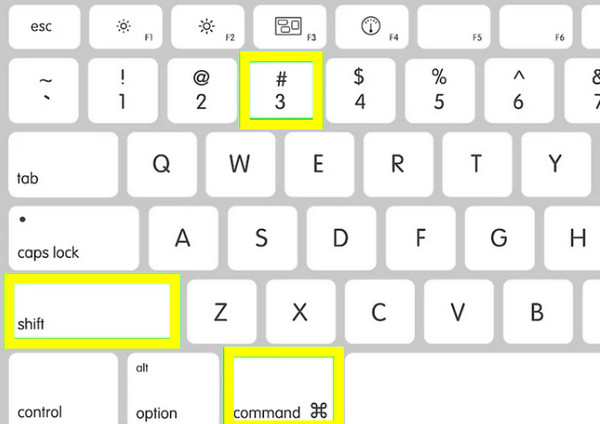
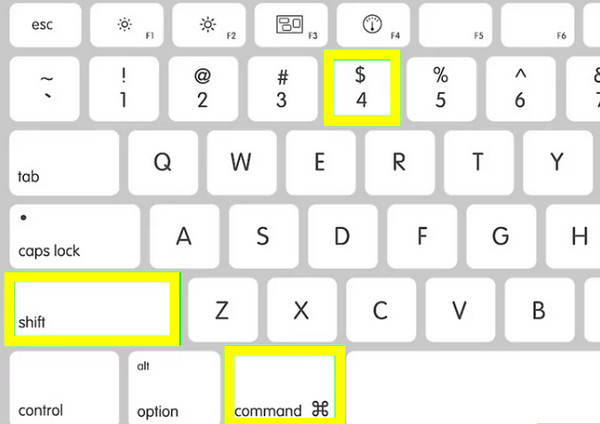
Take Sims 4 Screenshots on Mac:
- 1. After opening the Sims 4 and entering gameplay mode, press the "Shift + Command + 3" keys.
- 2. A screenshot of your entire Sims 4 screen will be taken.
- 3. Meanwhile, to capture a region, use the "Shift + Command + 4" keys, then click and drag to select the capture area.
- 4. You can see the screenshots stored on your desktop.
How to Take Screenshots on Sims 4 with Snipping Tool
If you want to opt for more control over the area of the screen you capture, such as only showing part of the Sims 4 game window, the Snipping Tool is a great option. Using this tool, you can manually select and capture any part of your Sims 4 screen with precision.
Here are the steps to follow to do Sims 4 screenshots with Snipping Tool on Windows 11/10:
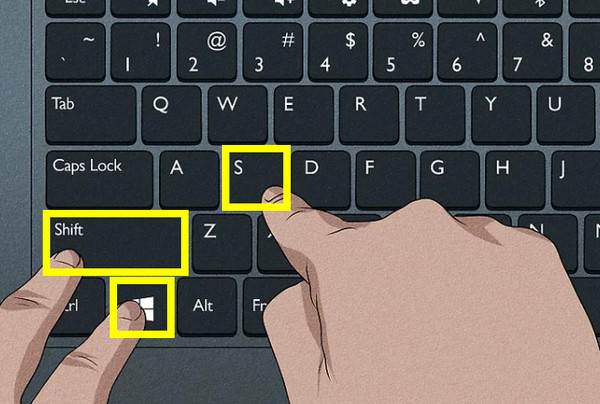
Step 1. Start The Sims 4 and pause at the moment you want to capture. On your keyboard, press the "Windows + Shift + S" keys to open the Snipping Tool; otherwise, search for it in the "Start menu".
Step 2. Your screen will dim, and your mouse cursor will change into a crosshair. You can click and drag it right away to select the part of the Sims 4 screen you want to capture. Or choose a snip mode from the dropdown menu.
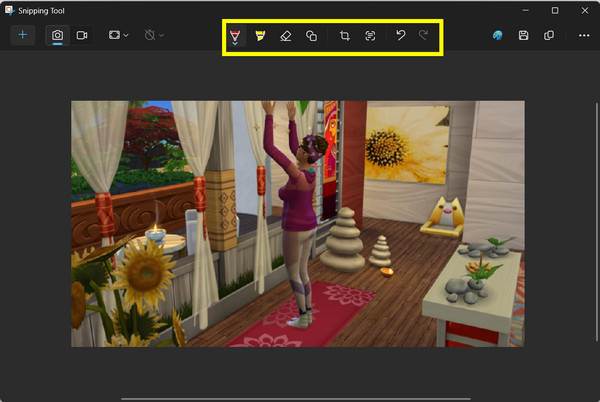
Step 3. Once you release the mouse, the screenshot will be taken and copied. You can click on the preview in the lower-right to edit it in the Snipping Tool window.
Useful Tips for High-quality In-Game Screenshots
Regardless of whether you’re showcasing your Sims' lives for storytelling, social media, or just personal collections, taking high-quality Sims 4 screenshots can make a huge difference. Beyond the basic tools, there are some tips and settings in The Sims 4 that can help.
Check out below the useful technique to improve the quality of your Sims 4 screenshots:
- 1. Hide the User Interface. Hiding the UI will create a cleaner image by pressing "Ctrl + Shift + C", then typing "hideHeadlineEffects" on.
- 2. Enter the Tab Mode. Activate the free camera mode to remove the UI and give you complete control of the camera.
- 3. Use Lightning Mode. Great lighting affects the mood and detail of the screenshot; adjust the in-game lighting by placing lights in the build mode.
- 4. Get ReShade. For advanced users, ReShade will add more post-processing effects like color correction, making the screenshots more cinematic.
- 5. Adjust Camera Settings. In the game settings, you can increase the quality and adjust the camera smoothing to make movement more natural.
- 6. Crop Out Unwanted Elements. You can use a photo editor to crop, straighten, or adjust the screenshot after capturing.
- 7. Take Screenshots in Build/Buy Mode. For design-focused images, use build/buy mode to have more control over lighting and object placement.
Conclusion
Capturing Sims 4 screenshots is a great way to preserve those memorable moments! From using the built-in UI camera tool and quick C key shortcut to flexible Windows and Mac shortcuts, each method offers its power, depending on your needs. But for everyone looking for more control and quality, use the dedicated tool AnyRec Screen Recorder. It not only lets you precisely capture the Sims 4 screen but also, with its editing features, customizable hotkeys, and image format support, takes your Sims 4 screenshots experience to the next level!
Secure Download
Secure Download