No More Storage? 5 Ways to Import Photos from iPhone to Mac
Your iPhone is home to thousands of selfies and video clips. Eventually, your storage shrinks, and you need these files to get moved, a problem everyone is facing. But the good news is that Apple has several ways to help you import photos from iPhone to Mac. Whether you're looking for a one-click sync or a manual way, the following part will show you ways to transfer photos from iPhone to Mac. Find the method that fits your media needs!
Guide List
Quickly Import Photos from iPhone to Mac without Data Loss Use Finder to Sync Photos from iPhone to Mac Import Photos from iPhone to Mac with Photos app AirDrop All Your Photos from iPhone to a Mac Import Photos from iPhone to Mac with Official iCloudQuickly Import Photos from iPhone to Mac without Data Loss
Managing a huge photo library needs a tool that is not only powerful but also precise, especially when you want to avoid any downsides of cloud syncing. So, to ensure all images, from high-res ProRAW files to Live Photos, are moved, use AnyRec PhoneMover. This tool provides a stable USB-based connection that is not dependent on your internet speed. And beyond just importing photos from iPhone to Mac at a fast speed, it serves as your all-in-one manager for your videos, music, contacts, and more across iOS. Therefore, if you wish for a reliable alternative to standard Apple methods, this tool works best.

Import pictures from iPhone to Mac in their original resolution.
Can convert HEIC images to JPG/PNG for better compatibility.
Find and remove duplicate photos easily to save storage space.
Preview images and select specific photos instead of syncing everything.
Secure Download
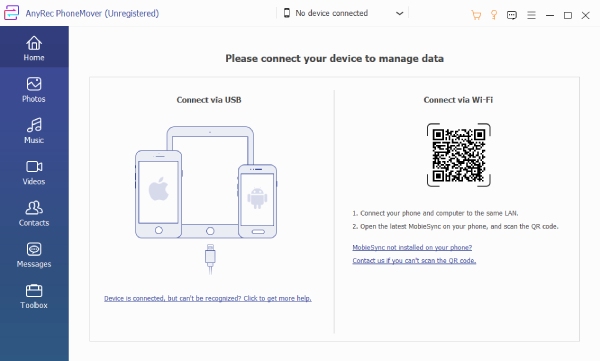
Step 1. Start AnyRec PhoneMover on your Mac, and pair your iPhone with it using a high-quality Lightning cable. Ensure to unlock your iPhone and tap on "Trust" to allow permission.
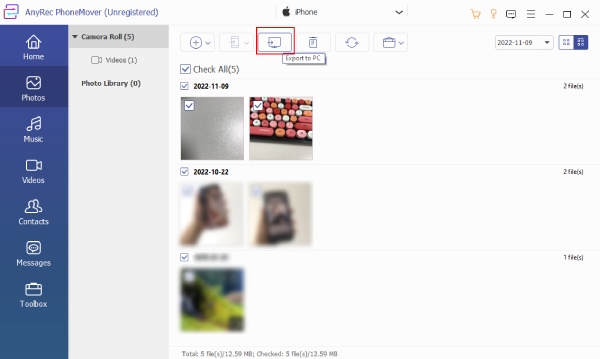
Step 2. Once your iPhone gets detected, click on the "Photos" category from the left sidebar to load your device's library. Browse through your albums and check all boxes for specific photos you want to move.
Step 3. Done choosing? Click the "Export to PC" button at the top, select your target folder on your Mac, and click the "Open" button to start the high-speed transfer.
Secure Download
Use Finder to Sync Photos from iPhone to Mac
Prefer sticking to native tools when importing photos from iPhone to Mac? Finder is the way to go! Since macOS Catalina, you can handle all heavy files for local device sync. While this method is more about syncing, it remains excellent for anyone who manages their media manually. Here's how to move photos from iPhone to Mac using Finder:
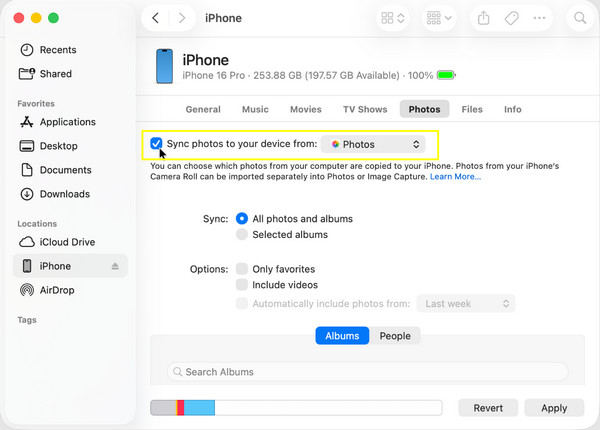
Step 1. First, connect your iPhone to your Mac with a Lightning cable. Then, launch a new "Finder" window, and click your iPhone's name from the "Locations" section.
Step 2. Navigate to the "Photos" tab, then check the "Sync photos to your device from" and select the folder where your images are saved.
Step 3. Click the "Apply" button to complete the synchronization process.
Import Photos from iPhone to Mac with Photos app
For a more visual experience that feels at home on your Mac, the Photos app offers an intuitive solution to copy photos from iPhone to Mac. It has a dedicated import screen where you can review all shots before they finally join your library. This approach is an ideal workflow if you want to use Mac's Photos app as your main organization and editing tool.
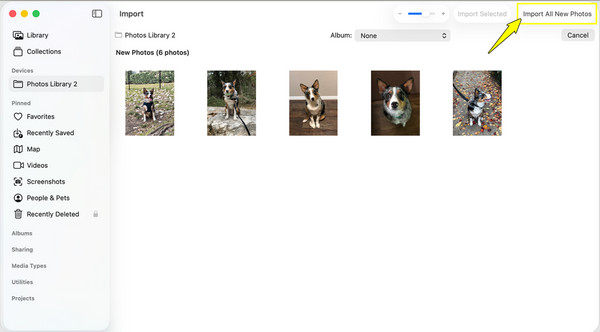
Step 1. Connect your iPhone to your Mac with a Lightning cable. Then, open the "Photos" app on your Mac, and click the "iPhone" icon from the "Devices" heading.
Step 2. After that, choose all the photos you want to move over or click the "Import All New Photos" option.
Step 3. Next, use the "Import to" dropdown to select a specific album where you want to store incoming pictures.
AirDrop All Your Photos from iPhone to a Mac
When you have a bunch of great shots from the iPhone you wish to move to your Mac, using a cable feels like overkill. Due to this, Apple offers the magic wireless solution called AirDrop, where you can export photos from iPhone to Mac via Bluetooth and Wi-Fi. It works very fast for small batches and needs no complex setup besides being nearby to your Mac. See steps below to AirDrop photos from iPhone to Mac.
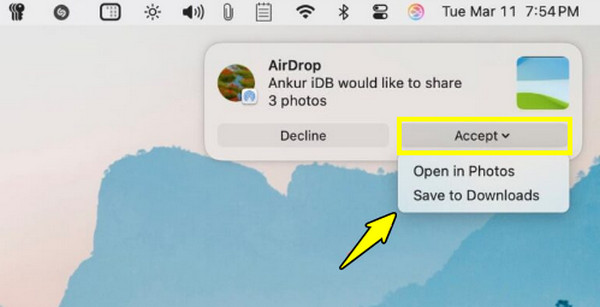
Step 1. On your iPhone, launch the "Photos" app and tap on "Select" to choose images to be shared.
Step 2. Tap the "Share" button, select the "AirDrop" button, and wait for your Mac's icon to appear in the list.
Step 3. Tap on your Mac's name to move all selected photos instantly. Now, on your Mac, click on the "Accept" button, and later, all photos will be directly in the "Downloads" folder.
Import Photos from iPhone to Mac with Official iCloud
If you want a hands-off approach to put photos from iPhone to Mac, iCloud Photos is the definitive solution. Using this cloud-based service, you can upload every photo to iCloud and sync it to your Mac over the internet. It creates a library where an edit made on your iPhone then shows up on your Mac seconds later.
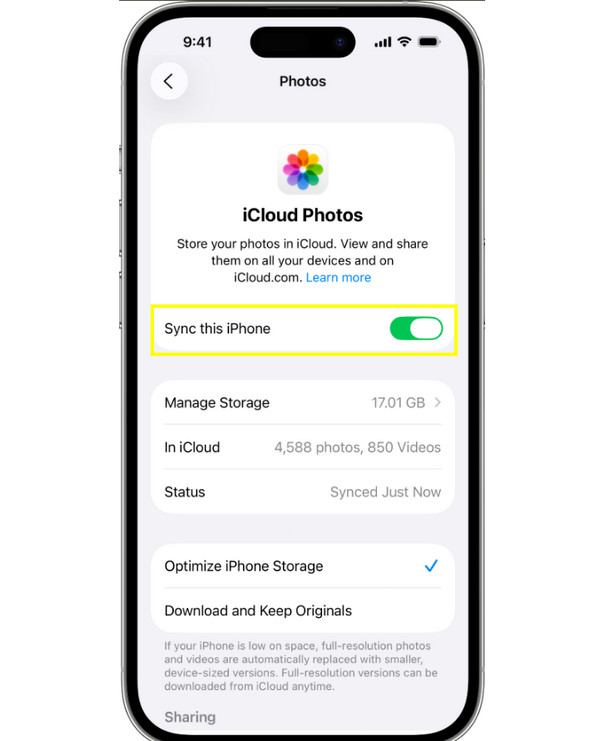
Step 1. Head to the "Settings" app, then go to "Photos" and make sure to toggle ON "iCloud Photos".
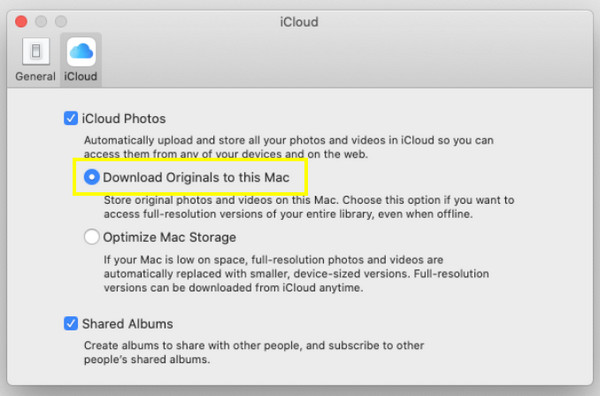
Step 2. Next, on your Mac, open "Photos", then click "Settings" to "iCloud", and there, check the "iCloud Photos" box. Choose "Download Originals to this Mac" for full-resolution copies.
Step 3. Kindly wait for it to sync; keep both iPhone and Mac connected to Wi-Fi. Later, open the "Photos" app on your Mac to check the latest iPhone pictures.
Conclusion
From a photographer to a casual user, there's no shortage when it comes to ways to send photos from iPhone to Mac. Choosing the right method depends on what speed you need and convenience you want. And out of all five ways to import photos, for the best of all worlds, AnyRec PhoneMover shines! This mover tool bypasses all sync errors and storage limits of native methods, giving you only a seamless, one-click transfer experience that keeps your high-resolution photos safe and sound.
Secure Download
Related Articles:
About Our Author