6 דרכים להקליט קול ב-Mac עם/בלי מיקרופון חיצוני
בזכות האפשרויות המובנות של אפל, הקלטת קול במק קל יותר מאי פעם! יש לכם תזכירי קול כדי ליצור פודקאסט, ללכוד הערות פגישה או להקליט מצגת. עם זאת, ייתכן שעדיין תרצו אפשרות חזקה יותר. לכן, פוסט זה כאן נותן לכם את הכלים הטובים ביותר להקלטת קול ב-Mac, מתוכנות פשוטות ועד תוכנות ברמה מקצועית.
רשימת מדריכים
מקליט מסך AnyRec - מקליט הכל באחד עם לכידה באיכות גבוהה נגן QuickTime - מקליט קול מובנה לצורכי שמע פשוטים GarageBand - מקליט ועורך אודיו ברמה מקצועית Audacity - כלי קוד פתוח להקלטת קול מרובת ערוצים WavePad - מקליט ועורך אודיו עשיר בתכונות כיצד להקליט תזכיר קולי עם אפליקציית תזכירי קולמקליט מסך AnyRec - מקליט הכל באחד עם לכידה באיכות גבוהה
תוכנה מקצועית אך ידידותית להקלטת קול במחשב מק, AnyRec Screen Recorder מאפשר לך להקליט קול, מסך, מצלמת רשת או את שלושתם בו זמנית. זה עובד בצורה מושלמת עבור יוצרי תוכן, פודקאסטים או כל מי שמעוניין בשליטה מדויקת על איכות ההקלטה. בין אם אתה לוכד צליל מערכת, קלט מיקרופון חיצוני או שניהם, התוכנה מספקת תוצאות צלולות כבדולח עם הגדרות שמע מתכווננות.

הקלט צליל מערכת וקלט מיקרופון בו זמנית מבלי לאבד איכות.
התאם את רמות השמע והגדרות הפלט לקבלת צלילות טובה יותר.
בצע ביטול רעשים ושיפור קול.
שמור הקלטות שמע בפורמטים MP3, AAC, M4A ועוד.
הורדה מאובטחת
הורדה מאובטחת
- יתרונות
- הקלט אודיו פנימי וחיצוני במחשב שלך מכל המקורות.
- גזור, דחוס, מיזוג וערוך מטא-דאטה של קובץ ההקלטה שלך.
- תזמן משימות הקלטה כך שיוכלו להתחיל ולהפסיק את ההקלטה באופן אוטומטי.
- חסרונות
- צריך לשדרג לגרסה המלאה כדי להקליט סרטונים במשך שעות.
שלב 1.
הפעל את "צליל מערכת" כדי לכלול את האודיו הפנימי של ה-Mac שלך, והפעל את "מיקרופון" כדי ללכוד את קולך. ניתן להגדיר באיזה מיקרופון להשתמש ולכוונן את שתי עוצמות הקול לפני ההקלטה.
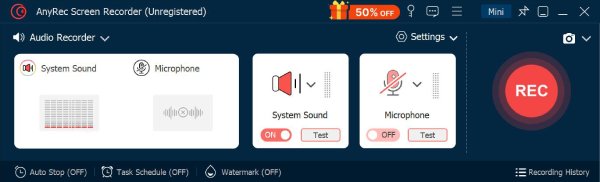
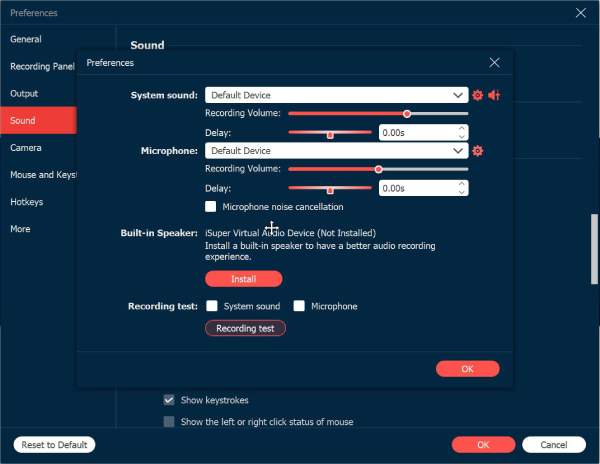
שלב 2.לפני שתתחילו, לחצו על כפתור "הגדרות" ועברו לכרטיסייה "צליל". משם, לחצו על התיבה "ביטול רעשים" כדי להפחית רעשי רקע. לחצו על כפתור "אישור" כדי להחיל ולחזור לחלון הראשי.
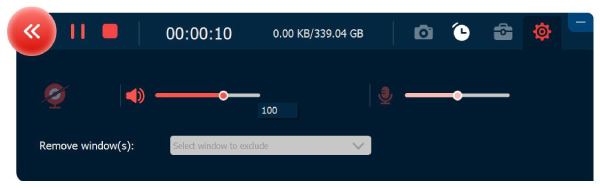
שלב 3.כאשר הכל מוכן, לחץ על כפתור "REC" כדי להתחיל להקליט את קולך. יוצג סרגל צף קטן. תוכל להשהות, לעצור ולכוונן את עוצמת הקול בזמן אמת תוך כדי דיבור.
שלב 4.לאחר שתסיים, לחץ על "עצור" כדי לסיים את הקלטת הקול. תוכל להשמיע אותה שוב באופן מיידי, לחתוך רעשים לא רצויים, ולאחר מכן ללחוץ על "שמור" כדי לייצא את קובץ השמע הנקי שלך ל-Mac.
הורדה מאובטחת
הורדה מאובטחת
נגן QuickTime - מקליט קול מובנה לצורכי שמע פשוטים
נגן QuickTime מותקן מראש בכל מק והוא פתרון פשוט להקלטת קול מהירה ב-Mac. הוא עובד בצורה אידיאלית עבור תזכירים קוליים, הערות או פודקאסטים קצרים ללא צורך בתוכנה נוספת. יתר על כן, ניתן... השתמש ב-QuickTime כדי להקליט וידאו מסך עם אודיו ב-Mac גם בחינם.
- יתרונות
- חינמי ומותקן מראש על מק.
- מגיע עם ממשק פשוט.
- טוב לתזכירים קוליים מהירים.
- חסרונות
- בעל תכונות מוגבלות לעריכת אודיו.
- זה לא לוכד בקלות אודיו פנימי.
שלב 1.הפעל את QuickTime Player. לחץ על תפריט "קובץ". לאחר מכן לחץ על "הקלטת שמע חדשה". לאחר מכן, בחר את התקן הקלט שלך מהחץ הנפתח.
שלב 2.לחץ על כפתור "הקלטה". כעת תוכל להתחיל בהקלטת קול ב-Mac. לאחר מכן, לחץ על כפתור "עצור" כדי לסיים. שמור את הקובץ במיקום המועדף עליך.
GarageBand - מקליט ועורך אודיו ברמה מקצועית
כלי רב עוצמה נוסף של אפל, GarageBand, נהדר לכל מי שרוצה הקלטת קול באיכות גבוהה לצד כלי עריכה מקצועיים. לא רק שניתן להקליט קול ב-Mac, אלא גם לשפר את הסאונד, וזה מושלם לפודקאסטרים, זמרים ומפיקי אודיו.
- יתרונות
- אפקטים מובנים, קומפרסורים ואיקוולייזרים.
- הקלטה מרובת ערוצים עם פקדי עריכה מתקדמים.
- תומך בייצוא לפורמטי אודיו מרובים.
- חסרונות
- זמין רק עבור מכשירי אפל.
- זה עשוי להיות מורכב עבור הקלטת קול פשוטה.
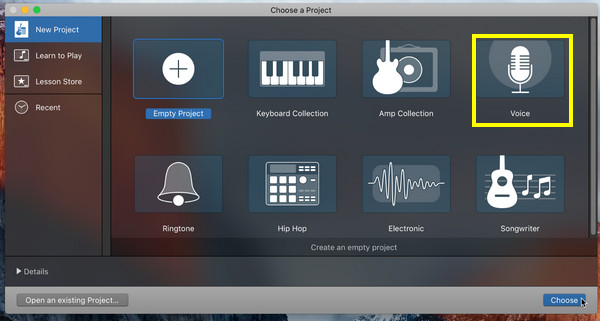
שלב 1.הפעילו את GarageBand במחשב ה-Mac שלכם, ובחרו באפשרות "פרויקט קול". קבעו את התקן הקלט שלכם דרך "העדפות", לאחר מכן דרך "שמע/MIDI".
שלב 2.לחץ על כפתור "הקלטה" כדי להתחיל. דבר לתוך המיקרופון שלך ולחץ על כפתור "עצור" כשתסיים. ערוך את האודיו ושמור אותו בפורמט הרצוי מאוחר יותר.
Audacity - כלי קוד פתוח להקלטת קול מרובת ערוצים
אחד הפופולריים ביותר מקליט קול חינמי למק הוא Audacity. הוא מציע איזון מצוין בין עוצמה לנגישות, תומך בתוספים ומאפשר לך ליצור שכבות, לערוך ולערבב הקלטות אודיו מרובות.
- יתרונות
- עובד בחינם ובקוד פתוח.
- מכסה פורמטים רבים עם אפקטים רבים.
- יש תמיכה קהילתית ומדריכים.
- חסרונות
- עריכה מרובת ערוצית מוגבלת.
- פחות מלוטש מתוכנות אחרות.
שלב 1.לאחר פתיחת Audacity במחשב Mac, הגדירו את כניסת המיקרופון שלכם. אם אתם מוכנים, לחצו על כפתור "הקלטה" כדי להתחיל להקליט את קולכם.
שלב 2.בהמשך, לחצו על כפתור "עצור" כדי לסיים את ההקלטה. ערכו את הרצועה שלכם כעת באמצעות כלים כמו חיתוך, מעבר וכו'. שמרו אותה דרך "קובץ" לאחר מכן "ייצוא" ובחרו "ייצוא כ-MP3" או פורמטים אחרים.

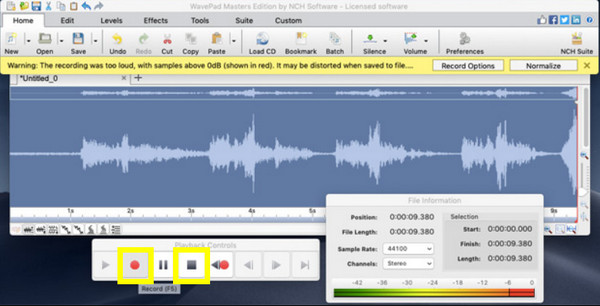
WavePad - מקליט ועורך אודיו עשיר בתכונות
לבסוף, WavePad פועל בעיקר כתוכנת הקלטת ועריכת אודיו מתקדמת עבור Mac, מושלמת עבור אלו המעוניינים בשליטה מפורטת על הצליל שלהם. מקליט קול זה עבור Mac תומך בניקוי אודיו, עיבוד אצווה והמון אפקטים.
- יתרונות
- קל לשימוש עם תכונות טובות.
- מושלם להקלטת קול ועריכת אודיו כללית.
- חסרונות
- פחות תכונות מתקדמות, כמו מיקס רב-ערוצי.
- לגרסה החינמית יש הרבה מגבלות.
שלב 1.פתחו את WavePad במחשב ה-Mac שלכם, והתחילו בלחיצה על "קבצים חדשים", לאחר מכן בחרו "הקלטה". בחרו את המיקרופון שלכם כמקור הקלט.
שלב 2.לחצו על כפתור "הקלטה" כעת, ולאחר מכן לחצו על כפתור "עצור" כדי לסיים. כעת תוכלו לערוך את האודיו שלכם באמצעות הכלים המסופקים.
כיצד להקליט תזכיר קולי עם אפליקציית תזכירי קול
בדרך כלל, אפליקציית Voice Memos היא זו ששימשה להקלטת שמע. בין אם אתם כאן כדי לשמור תזכורות מהירות או ללכוד הערות פגישה, כלי מובנה זה ב-Mac מאפשר לכם להקליט קבצי שמע בכמה לחיצות בלבד. בנוסף, הוא תומך בחיתוך והחלפה פשוטים של מקטעים מהתזכיר שלכם. התזכירים הקוליים שלכם יופקטו בפורמט M4A. אם אתם רוצים תאימות רבה יותר, תוכלו... המרת תזכירי קול ל-MP3.
אז, לפני סיום הפוסט הזה, הנה איך להקליט קול ב-Mac באמצעות תזכירי קול:
שלב 1.השתמשו ב"חיפוש זרקור" או ב"יישומים" כדי להפעיל את תזכירי הקול. לאחר הפתיחה, תוכלו לראות את כפתור "הקלטה" הגדול; לחצו עליו כדי להתחיל להקליט את קולכם.
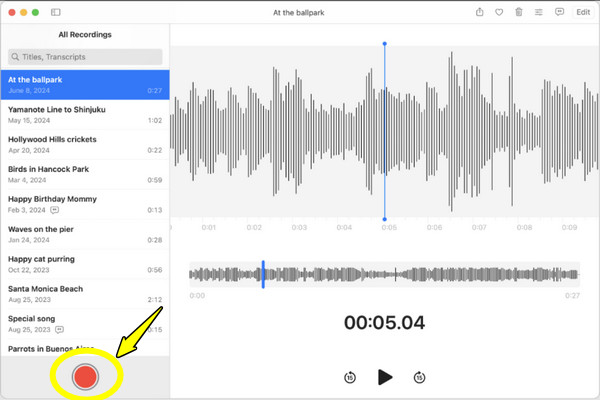
שלב 2.בכל עת, ניתן ללחוץ על כפתור "השהה" אם אתם זקוקים להפסקה, ולאחר מכן להמשיך את ההקלטה באמצעות כפתור "חידוש". לאחר מכן, לחצו על כפתור "סיום" כשתסיימו.
שלב 3.ההקלטה מופיעה בצד שמאל של האפליקציה. ניתן לשנות את שמה ואפילו לחתוך חלקים לא רצויים. לאחר שתסיים, לחץ לחיצה ימנית עליה כדי "לשתף" דרך AirDrop, Mail או Messages, או שמור אותה במיקום הרצוי.

סיכום
עם כל כך הרבה כלים זמינים, תוכלו למצוא בקלות אחד שמתאים לצורכי ההקלטה שלכם ב-Mac. החל מתזכירי קול פשוטים ועד לתכונות העוצמתיות של GarageBand, כל כלי שהוזכר מציע משהו ייחודי ל... הקלטת קול במיקרופון במק. AnyRec Screen Recorder היא הקלטת הקול הטובה ביותר עבור מק. היא לא רק לוכדת את קול המיקרופון שלך, אלא גם מציעה הפחתת רעשים, חיתוך והגדרות פלט מתכווננות. יתר על כן, ניתן להקליט שמע מערכת יחד עם קול המיקרופון בתוך התוכנה. בין אם להקלטות מקצועיות או אישיות, התוכנה מוכנה לכל מטרה.
הורדה מאובטחת
הורדה מאובטחת


