Record anything into MP4 and MP3 with high quality.
Introductions to Windows Steps Recorder: Features, Usage, and Alternatives
What is Windows Steps Recorder? Maybe you have heard of the default screen recorder - Game Bar on your Windows, so what can Windows Steps Recorder do for you? It is called Windows Problem Steps Recorder(PSR) which is also pre-installed on your computer. It can capture your computer screen as well, but the recording files are not saved as videos. Windows Steps Recorder only records all the steps you have done, so the recordings are saved in MHT format with texts and images. Thus, this recorder is mainly for troubleshooting your computer or showing how to use a certain function or software. Keep reading this article to learn how to use Windows PSR and get to know the best alternative to it.
Guide List
Part 1: A Brief Introduction to Windows Steps Recorder and its Usage Part 2: The Best Alternative to Windows Problem Steps Recorder Part 3: FAQs of Windows Steps RecorderPart 1: A Brief Introduction to Windows Steps Recorder and its Usage
Introduction to Windows Steps Recorder
As mentioned before, PSR is a built-in screen capture on your Windows 7/8/10. It can't record gameplay or any other content in videos, so what can Windows Problem Steps Recorder do?
1. Capture every click you do on your computer and make step records.
2. Take screenshots of the full-screen on your computer.
3. Automatically point out the important part with rectangle shapes.
How to use Steps Recorder on Windows 7/8/10
Whether you find there's a problem on your computer, or want to teach your friends to use the Windows computer, you can record all the steps through Windows Problem Steps Recorder. Since it is different from other screen recorders, you should learn about the detailed steps in the following:
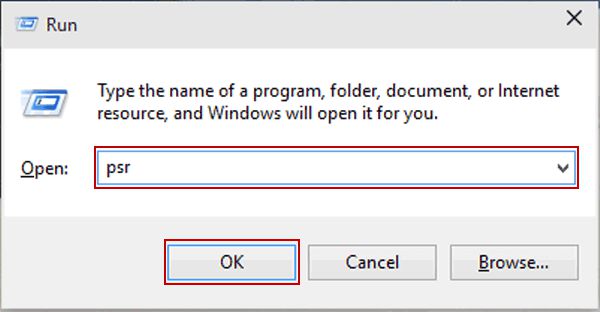
Step 1.Launch Windows Steps Recorder
It's difficult to find this software on your Windows computer. So you need to click the Windows menu at the left-bottom corner and search for it by using the searching tool. Or you can simply press the Win+R buttons on your keyboard to launch the Run program. Then input PSR and click the OK button to start Windows Steps Recorder.
Step 2.Adjust the Settings of Recording Steps
After you open PSR, you can click the Question mark and choose the Settings option. Then you can change the storage path. What's more important, you need to choose the maximum number to capture the screen. You'd better change it to more than 100 because one click means one capture. Then click the OK button to save the settings.

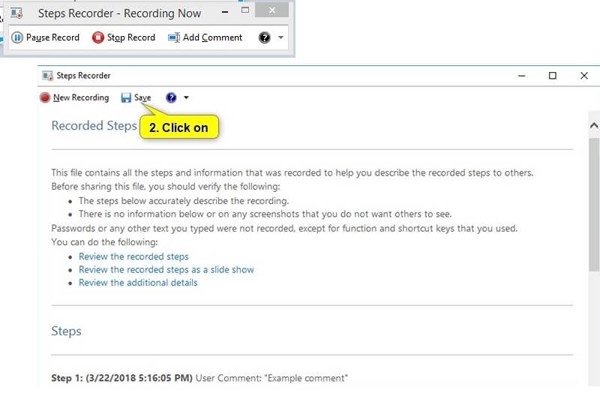
Step 3.Record and Save the Recording on Windows
Now, you can click the Start Record button to capture every step on your screen. Every click will be saved with texts and a picture. Even the operation is framed by a rectangle shape to point out the importance. Then you can click the Stop Record button to generate a step report. At last, click the Save button to store the recording in a ZIP file.
Part 2: The Best Alternative to Windows Problem Steps Recorder
Although Windows Steps Recorder can show all the steps in detail with image explanations, videos will be definitely clearer than graphic descriptions. Thus, you can use AnyRec Screen Recorder to record your screen to show your operation in more detail. With the audio recording, you can also explain it with your voice. Besides, it also provides editing functions to add annotations in real time. You can choose the desired method according to your need.

Record detailed steps of your screen on Windows/Mac easily.
Able to add sound explanation or text annotations to describe the problems.
Provide full-screen, selected regions, and certain windows to choose from.
Hotkeys to start/pause/stop the recordings at any time.
Secure Download
Secure Download
Step 1.Free download and launch AnyRec Screen Recorder on your Windows. Click the Video Recorder button on the main interface to start this alternative to Windows Steps Recorder.
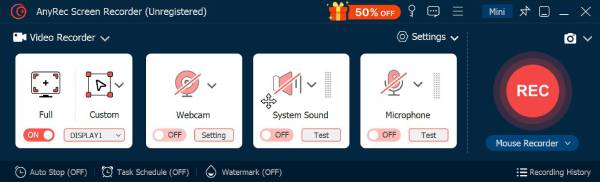
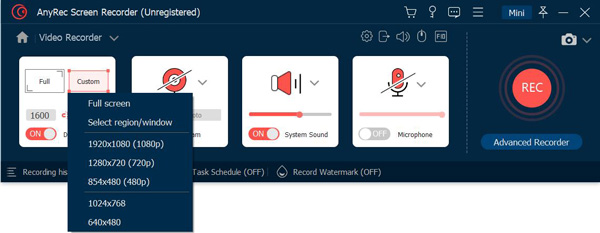
Step 2.Click the Full button to capture the full screen of your computer. If you only want to show how to use the software, you can also choose the Custom option and select the window of it. To record your voice for explaining, you can turn on the Microphone button with the desired volume.
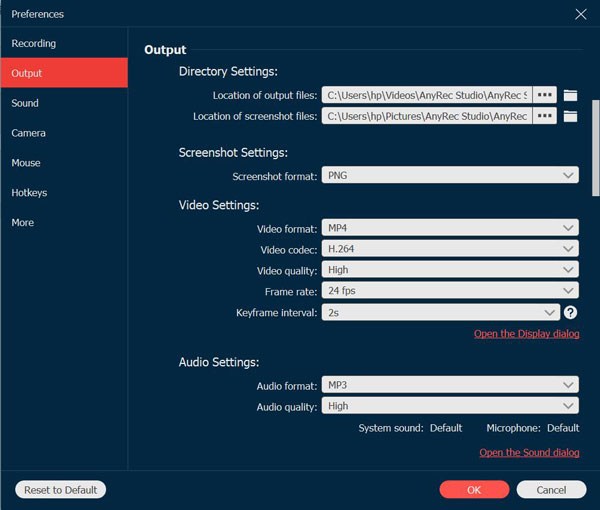
Step 3.Click the Record Settings icon and choose the Output option. In this way, you can change the video format, quality, and frame rate. To easily share your recordings on Microsoft or with friends to fix the problems, you'd better choose the MP4 format, which is good for spreading. Then click the OK button to save the settings and choose the REC option.
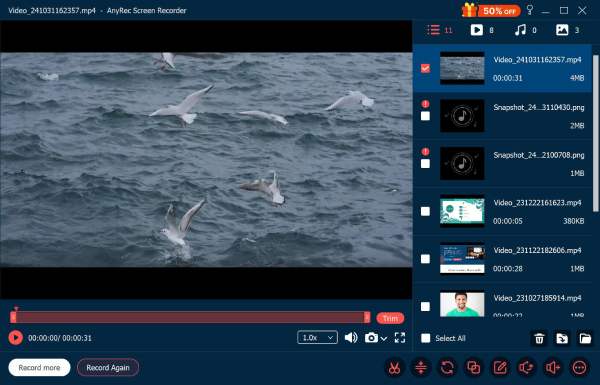
Step 4.After seeing a toolbox, you can use it to add annotations with multiple shapes, lines, callouts. You can also choose the thickness and color of them, which is better than Windows Steps Recorder. Then click the Stop icon to finish the recording. At last, you can click the Save button to store the recordings after clipping.
Part 3: FAQs of Windows Steps Recorder
-
1. What's the difference between Windows Steps Recorder and Game Bar?
Windows Steps Recorder can only record the steps as text and images. And the Game Bar is a built-in screen recorder to record gameplay or videos.
-
2. Can I edit the recording on Windows Problem Steps Recorder?
No, you can't. That's because the recordings of Windows PSR are saved in MHT format that can't be edited.
-
3. How to use Windows Steps Recorder to record gameplay?
Unfortunately, you can't use Windows Steps Recorder to record your gameplay as videos. To record gameplay with high quality, you should free download AnyRec Screen Recorder.
Conclusion
As this article introduced, Windows Steps Recorder can record all the steps you have done with detailed descriptions and images, which is convenient for troubleshooting. But to record all the operations on your screen, you can rely on AnyRec Screen Recorder, the best alternative to Windows Steps Recorder.


