How to Use the Built-in Game DVR on Windows 10 to Record Gameplay
As a Windows user, you must have heard the built-in game recorder - Game DVR on Windows 10 and Xbox. No matter you want to record the last 30 minutes of the gameplay or start recording your screen at any time, you can use Windows 10 Game DVR to help you. This article will introduce a complete guide on how to record your screen with Windows 10 Game DVR. It’s definitely an easy-to-use default screen recorder, but it will affect the game quality and cause stuck when playing games. Moreover, it only provides the full-screen recording mode without any additional settings. Thus, this article will also tell you the ultimate alternative to Game DVR on Windows 10.
Guide List
The Overall Review of Windows 10 Game DVR and How to Use it The Best Alternative Screen Recorder to Windows 10 Game DVR How to Disable Game DVR on Windows 10 to Improve Game Quality FAQs about Windows 10 Game DVRThe Overall Review of Windows 10 Game DVR and How to Use it
1.What is Windows 10 Game DVR?
The Game DVR function is originally a feature on Xbox to record gameplay automatically. Now, it is applied on Windows 10 with a Game DVR and a Game Bar to record any screen. The Game DVR on Windows 10 provides a background recording to capture gameplay automatically, and you can choose to save the last 30 seconds to 10 minutes. And the Game Bar is a default screen capture to record your gameplay at any time you want.
However, you should note that the Game DVR function on your Windows 10 will occupy large system resources, which will cause lags and crashes in the game. And the game bar is too simple to capture high-quality recordings with customized settings. Here is an intuitive list of pros and cons:
- Pros
- No need to download any software.
- Simple and user-friendly interface.
- Hotkeys to start recording at any time.
- Cons
- Cause lags when playing gameplay in high quality.
- Only capture the full-screen of the gameplay.
- Unable to record the webcam of yourself.
2.How to Use Windows 10 Game DVR to Record Gameplay?
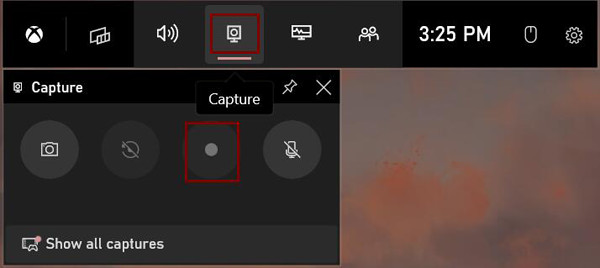
Step 1.When you want to record your gameplay with Windows 10 Game DVR, you can simply press the "Win + G" buttons to launch Game Bar on your computer. Then click the "Capture" button and click the "Record" button to start recording the current interface.
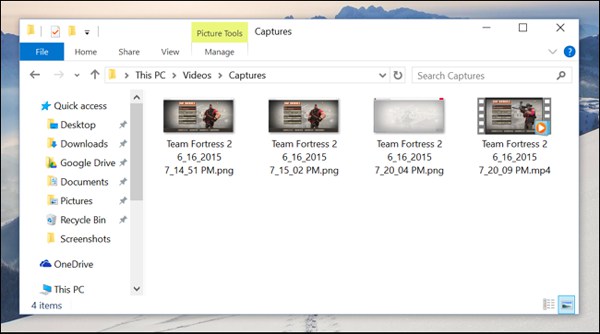
Step 2.To stop the recording, you just need to click the red "Stop" button. Then the recordings will be automatically saved. You can go to "This PC" and find the "Videos" file. Then open the "Captures" file to see all the recordings and screenshots.
The Best Alternative Screen Recorder to Windows 10 Game DVR
If you want to record your gameplay with different modes and adjusted parameters, AnyRec Screen Recorder will be the best alternative to Game DVR on Windows 10. It provides many recording settings and editing functions to help you record gameplay with high quality. In this way, you can also avoid Windows 10 Game DVR not working problem.

Record your screen with the full-screen, selected regions, or a certain window.
A designed game recorder to capture gameplay with high quality.
Able to adjust the video frame rate to record the gameplay without lags.
Edit and clip the recordings freely before exporting.
Secure Download
Secure Download
How to use the alternative to Game DVR on Windows 10:
Step 1.Free download and launch AnyRec Screen Recorder on your computer. Click the "Video Recorder" or "Game Recorder" button on the main interface according to your need.

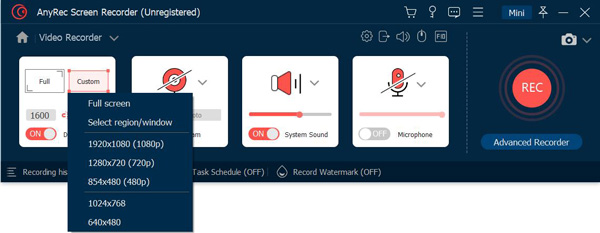
Step 2.Click the "Full" button to capture the whole screen or click the "Custom" button and select the desired region. You can also turn on the microphone and system sound with separate volumes. Then click the "REC" button to start recording without Windows 10 Game DVR.
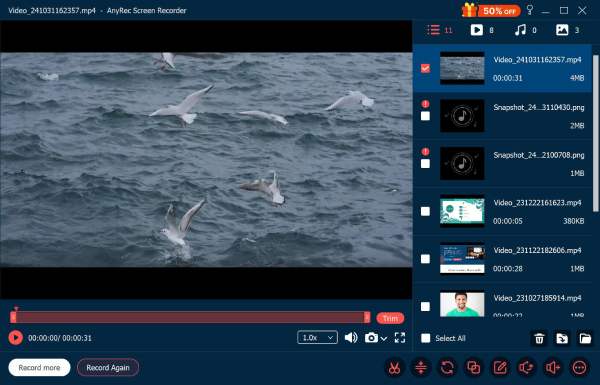
Step 3.At last, you can click the "Stop" button at any time to finish the recording. And you can clip the extra part at the beginning and the end. Then click the "Save" button to choose the storage path and save them.
How to Disable Game DVR on Windows 10 to Improve Game Quality
As mentioned before, the Game DVR on Windows 10 will slow the in-game performance and lower the FPS and graphic quality of the gameplay. Thus, if you choose to use professional screen recorders to record LoL, CSGO, and any gameplay, you can directly turn off and disable Game DVR on Windows 10.
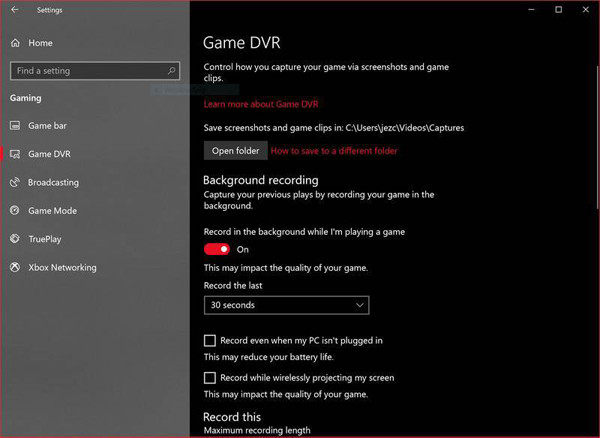
Step 1.Click the "Windows" button and click the "Settings" button on your Windows 10. Then click the "Gaming" button and choose the Game DVR pane.
Step 2.Here you can adjust the automatic recording length and disable this function. Just turn off the button below the "Record in the background while I’m playing a game".
FAQs about Windows 10 Game DVR
-
1.How to record the last 10 minutes through Windows 10 Game DVR?
Go to the settings app and choose the gaming option. Then choose the Game DVR and turn on the function. You can choose to record the last 10 minutes when you are playing any gameplay.
-
2.Can I record gameplay with a high frame rate through Game DVR on Windows 10?
Yes, you can. Windows 10 Game DVR provides the maximum 60 fps frame rate to capture the gameplay. But the large CPU occupation will cause lags. Thus, you’d better rely on professional screen recorders like AnyRec Screen Recorder.
-
3.Where are the recordings captured by Game DVR saved?
The default recordings will be automatically saved on your computer. Navigate to the Video folder on This PC, and find the Captures file. Then you can choose to play and delete the recordings.
Conclusion
After reading this article, you must have known more about Game DVR on Windows 10. You can follow the detailed steps to record any gameplay. However, if you want to reduce the lags, you should choose AnyRec Screen Recorder and disable Windows 10 Game DVR. It is your best game recording software for low-end PC and Mac. Have more questions? Contact us now.


