6 Ways to Screenshot on Chromebook You Should Know and More
For a funny meme, important information, or a favorite scene, taking a screenshot is a way to share it with your friend. If you’re a Chromebook user, the process is super quick! With the right keyboard shortcuts, you can screenshot on a Chromebook easily. In this post, you’ll see six different ways how to screen capture on Chromebook, from keyboard combinations to built-in tools. Find the method that works best today!
Guide List
How to Use Chromebook Screenshot Keyboard Shortcuts How to Take a Screenshot on Chromebook without Windows Key How to Screenshot on Chromebook Tablet Mode More Chromebook Screenshot Extensions You Can Use Best Screenshot Software for Other LaptopsHow to Use Chromebook Screenshot Keyboard Shortcuts
Taking a screenshot on Chromebook is a quick operation, thanks to its built-in keyboard shortcuts. Do you want to capture the entire screen? Perhaps a specific window or just a portion of your Chromebook display. With these keyboard shortcuts, you can get the job done.
Since these combinations work differently with the built-in keyboard or external keyboard, here’s which set of keys to use depending on what you need:
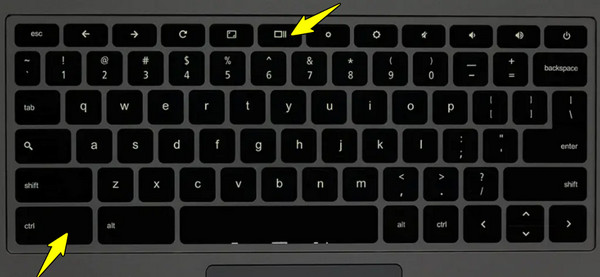
How to Screenshot on Chromebook in Full Screen
The most common screenshot method instantly captures everything visible on your screen, which is useful for tutorials and demonstrations.
- 1. Go to the screen you wish to capture, then press the "Ctrl + Show Windows" keys. Your Chromebook screen will briefly flash to take a screenshot.
- 2. On an external keyboard, you can use the combination "Ctrl + F5" keys.
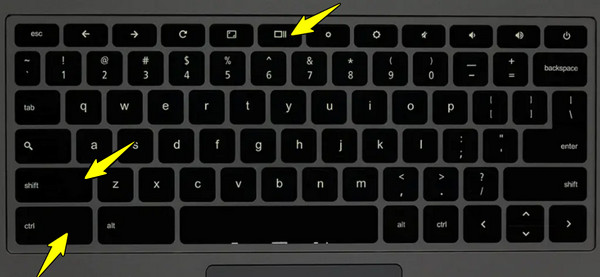
How to Take a Screenshot on Chromebook Partially
This screenshot option is beneficial when you only want to share or save a particular part of your screen.
- 1. Press "Ctrl + Shift + Show Windows" to transform your cursor into a crosshair.
- 2. Click and drag your mouse to choose a region you want to capture. Upon releasing the mouse, the screen will be captured.
- 3. For the external keyboard, press the "Ctrl + Shift + F5" keys.
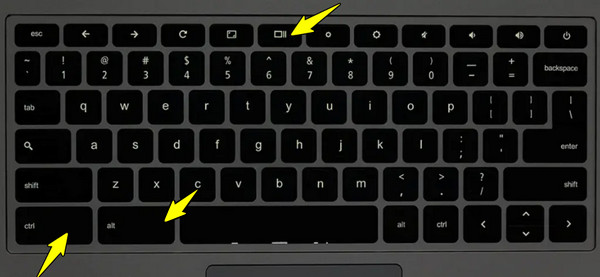
How to Screenshot on Chromebook Windows Only
Useful for multitasking users who aim to capture one app window only without any clutter in the background.
- 1. To capture a specific window, use the "Ctrl + Alt + Show Windows" keys, and your screen will dim slightly and show window outlines.
- 2. Determine the window page you want to capture. Meanwhile, using an external keyboard, use the shortcut "Ctrl + Alt + F5".
Where to Find Chromebook Screenshots:
- 1. After you have captured what you need on your Chromebook screen, you can click the "Launcher" at the bottom left.
- 2. Then open the "Files" app and select the "Downloads" folder.
How to Take a Screenshot on Chromebook without Windows Key
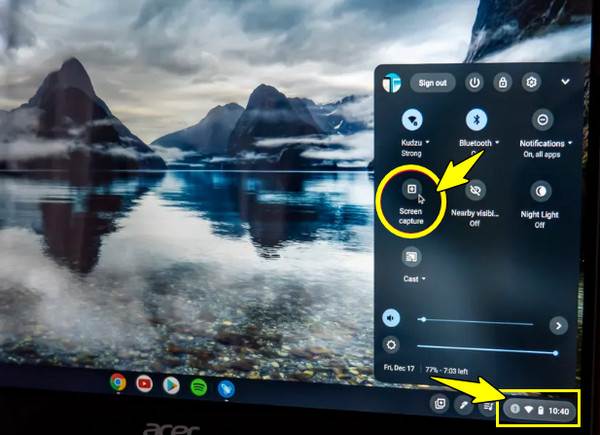
What if your Chromebook does not have a Show Windows Key or you’re using an external keyboard without that function? Don’t worry, since Chrome OS has a built-in Screen Capture that allows you to capture your full screen, partial, or specific windows with your mouse. This tool is great for touchscreen devices or users who want a visual interface over shortcuts.
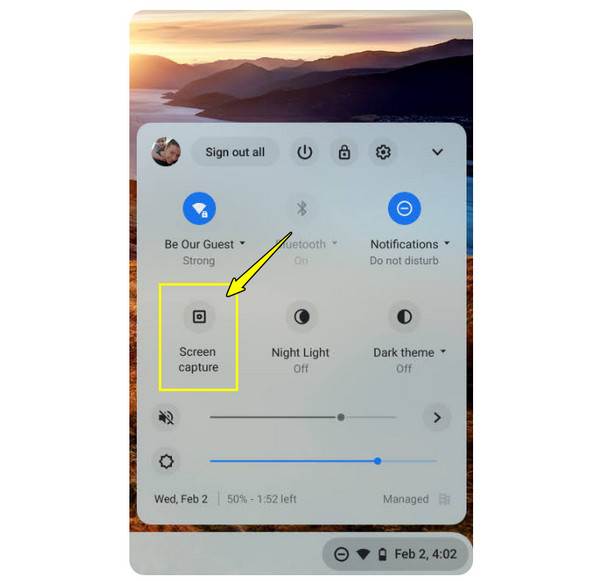
Step 1. Navigate to the "Time" in the bottom right corner of your screen and select "Screen Capture"; it will then appear at the bottom of your screen.
Step 2. Proceed to select your screenshot type, such as Full screen, Partial, or Window. Once you've picked, click the "Capture" button to take the screenshot. The screen is automatically saved in the "Downloads" folder.
You can see a preview of it in the bottom right corner of your Chromebook screen.
How to Screenshot on Chromebook Tablet Mode
When your Chromebook is in tablet mode, you won’t be able to use the traditional keyboard shortcuts. For this, Chromebook offers an intuitive touch-based method for capturing screenshots. These options are similar to taking a screenshot on Android smartphones or tablets. Here are the different steps to screenshot on Chromebook in Tablet Mode:
- 1. Press the "Power" and the "Volume Down" buttons at the same time to take a full-screen Chromebook screenshots. You will see a brief dim or hear a shutter sound, indicating a screenshot has been taken.

- 2. Open the "Quick Settings" panel by swiping down from the top of your screen. Tap the "Screen capture" button (Camera icon) to take a full-screen, partial, or windowed screenshot.
- 3. If your Chromebook tablet covers a stylus, tap the "Stylus" icon in the taskbar to open more tools. From there, choose "Capture Screen" for an entire screenshot or "Capture Region" to determine the area you want to capture.
More Chromebook Screenshot Extensions You Can Use
While those Chromebook shortcuts and tools work excellently for basic screenshots, browser extensions can have more advanced features such as editing, annotation, scrolling capture, and more. Below are three popular extensions you can add to your Chromebook, each offering unique capabilities that go beyond the built-in tools.
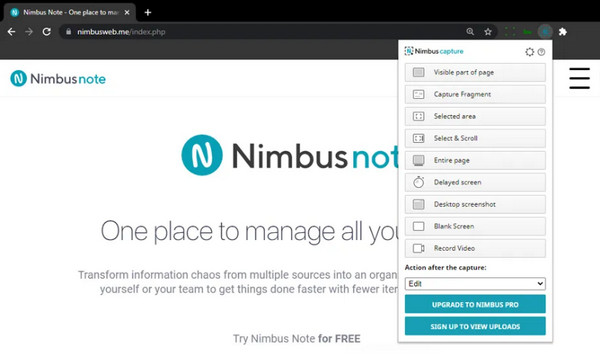
1.Nimbus Screenshot
Known as a powerful and versatile extension for capturing both screenshots and recordings, Nimbus lets you take full-page, selected area, or entire window screenshots on Chromebook. One of its standout features is its built-in editing tools, letting you annotate, blur sensitive data, add arrows, and more. Additionally, this Chromebook extension allows you to save files locally or upload them to the cloud or storage services like Google Drive for quick sharing.
2.Awesome Screenshot
Living up to its name, Awesome Screenshot offers a rich set of tools in one convenient package. It covers capturing what can be seen on your screen, selected areas, or entire pages, making it perfect for content like articles. What’s more, beyond doing Chromebook screenshots, this extension has a screen recording with webcam and audio capture support, which is great for presentations, all of which can be done right on your browser.
3.FireShot
Fireshot is a famous Chrome screenshot extension for its superb full-page capturing capabilities, even on pages that scroll. It is ideal for everyone who opts for capturing the entire web page, including content beyond the screen. Once captured, FireShot saves the screenshot in multiple formats, including JPEG, PDF, and PNG, and even shares them directly via email. To get a simple yet efficient solution to screenshot on Google Chromebook, favored by professionals who need high-quality visuals.
Best Screenshot Software for Other Laptops
Looking for powerful software to meet everything you need, whether you’re a student, a professional, or a gamer? One excellent all-in-one solution is AnyRec Screen Recorder, giving you advanced screenshot features alongside recording capabilities. With this program, you can select the entire screen or customize an area to be captured with just a few clicks. It also includes editing tools, letting you add text, arrows, lines, highlights, and more. What sets it apart from other tools for screenshotting on Chromebook is its screenshot, screen capture, webcam overlay, and audio recording in one platform. Whatever you do with this program, it delivers the performance and quality needed for professional results.

Full-screen and partial recording and screenshot of your laptop/desktop.
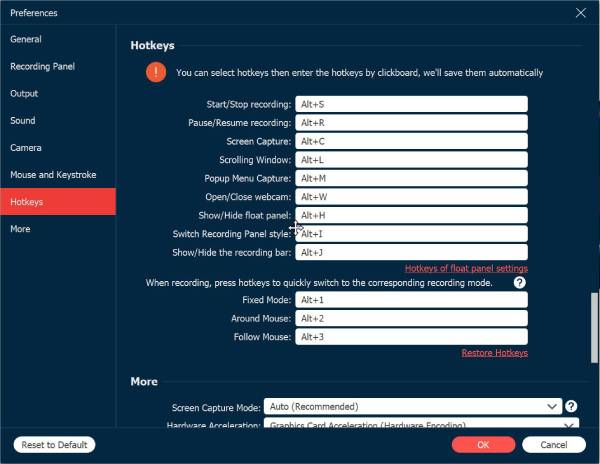
Customize keyboard shortcuts for quicker screenshots or recordings.
Can save screenshots in high quality, with options to set the settings yourself.
Export screenshots in formats like JPEG, PNG, BMP, GIF, etc.
Secure Download
Secure Download
Step 1. Open AnyRec Screen Recorder and find the "Screen Capture" feature on the primary recording dropdown menu. Once selected, your mouse cursor will transform into a crosshair, letting you click and drag over the area you want to capture.
Step 2. As soon as you determine the area or window, the screenshot will be taken. You’ll then be redirected straight to the built-in editor where you can fine-tune the image. From there, add text, lines, callouts, and do more, which is great for your reports and quick notes.

Step 3. Once you’re happy with your edits, click the "Save" button (Floppy Disk icon). Pick where you want the image to be saved and select from several formats, such as PNG or JPEG. That’s how easy it is to screenshot on your laptop!
Conclusion
As you see, taking a screenshot on Chromebook is simple once you know the right combinations and tools. Chromebook has a lot of ways to capture full-screen, partial, or window, whether it is a built-in keyboard, an external one, or in tablet mode. For more, Chrome screenshot extensions are available, too. If you’re using a Windows or Mac laptop, you’ll find that the built-in tools fall short sometimes. So, the recommended tool is the AnyRec Screen Recorder. It offers all-in-one screenshot and recording methods, complete with editing tools and high-quality output. Whatever tasks you’re working on right now, you can ensure a smooth process with AnyRec Screen Recorder.
Secure Download
Secure Download