
How to Record Screen with VLC? And An Alternative If It Fails

The trusty, orange-coned VLC plays any video file format you throw at it. But surprisingly, behind that playback power, you can record screen with VLC! You can use it for your quick tutorial, streaming video, or save a video clip. But the setup needs you to know exactly which menus to dig into. So, to help you, three different ways to capture screen video with VLC are shared here! Following that, you'll get to know a seamless alternative that gets the job done within clicks.
Guide List
How to Record Screen with Audio in VLC How to Record Audio with VLC How to Record Webcam with VLC VLC's Real Limitations for Screen Recording Better VLC Alternative for Screen RecordingHow to Record Screen with Audio in VLC
Ever tried to record a quick game \play clip using VLC? If so, you might have noticed that by default, its screen capture mode is silent. Fortunately, there's a way to use VLC for screen recording, both desktop and audio at once. While it takes an extra step, you can record screen with VLC without needing any extra software.
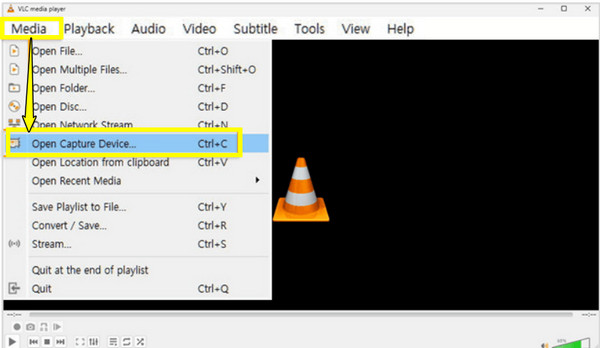
Step 1.Start VLC. Click on the "Media" tab in the top menu and choose "Open Capture Device". From this window, set the "Capture mode" dropdown to "Desktop", and set your desired frame rate.
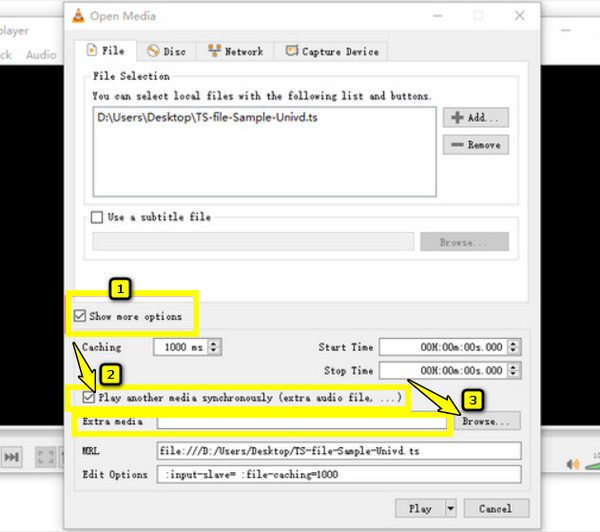
Step 2.Next, check the "Show more options" box to expand the menu. Then, check the "Play another media synchronously (extra audio file…) box. Click the "Extra media" button, then click "Add" and pick your mic or system audio input device.
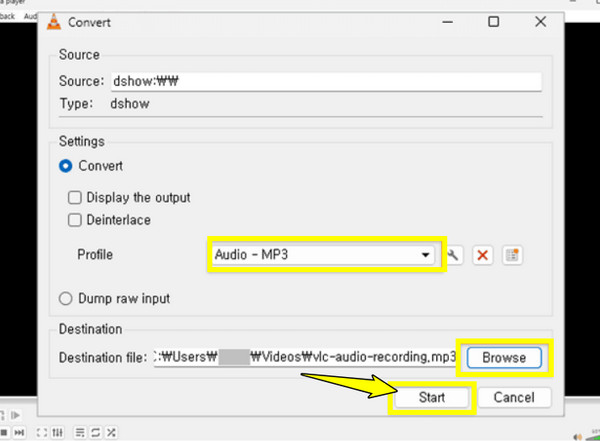
Step 3.After that, click the "Convert" button below. Choose your location and video profile, then click the "Start" button to start recording.
How to Record Audio with VLC
Sometimes, you don't need your screen at all. You may want to record using VLC for voiceovers, a podcast episode, or just a quick voice memo. With VLC, you can skip the video encoding and focus on recording sound directly from your microphone or system input.
Step 1.Open VLC, click the "Media" tab, and choose "Open Capture Device". Change the "Capture mode" to your system audio capture driver.
Step 2.Now, from the device selection, set the Video device name to "None". For audio, select your active microphone or system audio input.
Step 3.Later, click the dropdown arrow next to Play and choose "Convert". Select an audio-only format profile, then a destination folder, and click the "Start" button to end up VLC screen recording.
How to Record Webcam with VLC
Now, what if you wish to add yourself to the frame? VLC can tap directly into your computer's webcam, perfect for a video greeting or a video presentation. This VLC recording method takes the live feed from your webcam and turns it into a shareable MP4 file. Here's how you can get your webcam up and rolling in VLC player:
Step 1.Once VLC is launched, navigate to the "Media" tab (File tab) and select "Open Capture Device". Make sure to set your "Capture mode" to "DirectShow " or the same camera settings on your Mac.
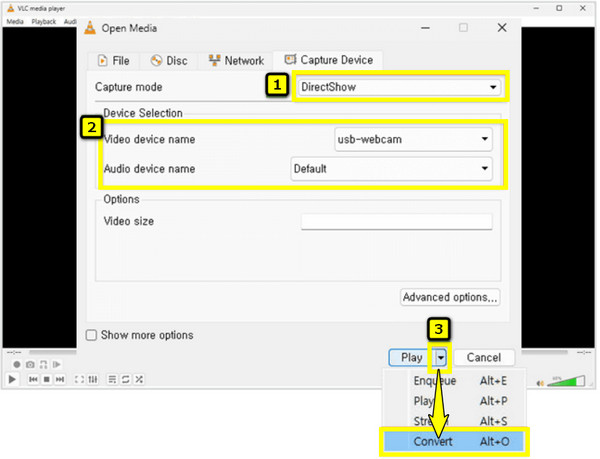
Step 2.Then, select the webcam and microphone you want to pair with your camera feed. If your camera output looks choppy, click "Advanced options" and set your aspect ratio, frame rate, or video standard, then click the "OK" button.
Step 3.Click the arrow next to Play and pick "Convert". Choose your profile, destination path, and click the "Start" button to record webcam with VLC.
VLC's Real Limitations for Screen Recording
While you can use VLC to record screen with audio, and it is a fantastic trick to have in your toolkit, it's important to know that VLC is a media player. Since it wasn't built for recording screens, trying to use it for all your content may reveal some frustrating limitations.
- • No Recording Indicator. Once you hit Start, VLC gives you zero visual confirmation on your screen that the recording starts.
- • No Webcam Overlay. While you can record desktop or webcam, VLC cannot handle both at the same time to place your camera feed in the corner of your screen.
- • No Pause or Resume. You cannot pause your recording to collect your thoughts or skip a loading screen. You need to stop the recording completely and start a brand-new recording.
- • No Annotation Tools. If you wish to draw on your screen, highlight your cursor; unfortunately, VLC has no interactive tools.
- • Complex Audio Capture on Mac. Since Apple has tight security, connecting system audio into VLC on macOS needs third-party virtual audio cables and dives into complex MIDI settings.
- • Clunky Controls. Going through submenus and manually setting frame rates can feel very outdated compared to modern tools today.
Better VLC Alternative for Screen Recording
With all those VLC recording limitations, you'll be happy to know about a dedicated and lightweight tool named AnyRec Screen Recorder. This seamless alternative is designed to let you capture your screen, microphone, system sound, and webcam simultaneously with just a click! You don't need to worry about complex menu configurations, audio lag, or missing recording indicators anymore. Using this recording software, you can have a smooth, stress-free bridge between your on-screen activities and a polished video file.
All-in-one capture, recording your screen, webcam, and audio without complex menus.
Add picture-in-picture webcam feed to your screen recordings.
Real-time annotation to draw, write, and highlight your mouse cursor during the session.
Quickly preview and edit any unwanted clips before saving them.
Secure Download
Secure Download
Step 1.First things first, open AnyRec Screen Recorder. Select "Video Recorder" from the main dashboard. From here, select "Full" to capture the entire desktop or "Custom" to select the recording frame.
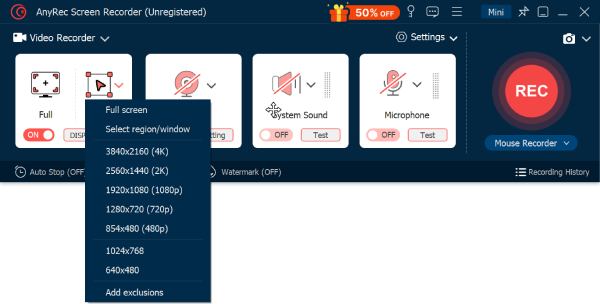
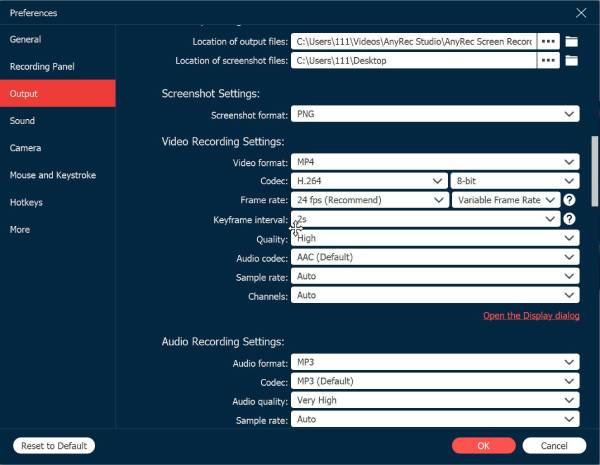
Before moving forward, you can click on "Settings" and head over to the "Output" tab, then pick your desired frame rate, resolution, and others for your project.
Step 2.Moving on, decide whether to record computer sound by toggling "System Sound", and layer your voice over by turning on the "Microphone" switch. Be sure to get the balanced mix of audio sources.
Step 3.Once you're happy with everything, click the "REC" button to begin the countdown. You can use the handy toolbar that floats on your screen to pause, resume, annotate, or snap a quick screenshot in real-time.
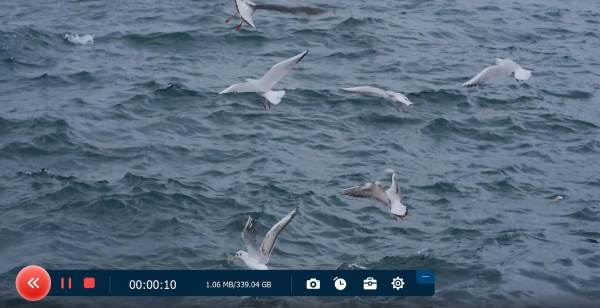
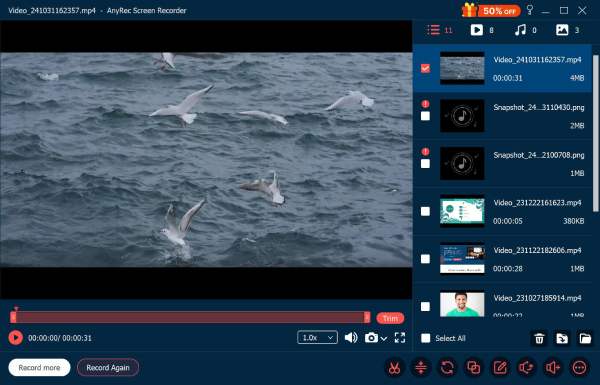
Step 4.Just click the "Stop" button when you have captured everything you need. The player will then open a preview window that lets you watch your video and see if trimmings are needed. Click the "Save" button to export your recording.
Conclusion
There's no denying that VLC is a legend. It is free, reliable for playback, and works fine if you need a quick record of your screen. Besides the steps for VLC screen recording, you've seen its limitations, and you know you don't have to settle. Instead of recording the screen with VLC, start recording with AnyRec Screen Recorder. Enjoy a smooth, one-click experience to capture your screen, webcam, and audio at once, completely stress-free.
Secure Download
Secure Download
Related Articles
About Our Author