How to Set Up iPhone as a New iPhone: Easy Step-by-Step Guide
You are probably searching around, looking for a guide that can teach you how to set up an iPhone as new iPhone. If you do, then you likely just want to start fresh; maybe your phone's been lagging lately, you don't want to bring over old files and problems, or you're setting up a used device. Whatever the reason behind it, thankfully, you found this post. So, dive in to activate and set up your new iPhone.
Guide List
Transfer All Data Before Setting Up iPhone As a New One Detailed Steps to Set Up Your iPhone As a New One How to Set Up Your Reset New iPhone 17Transfer All Data Before Setting Up iPhone As a New One
A clean iPhone setup erases everything, so it's best to move your photos, messages, and other files to a secure place first. A straightforward way to do that is by using AnyRec PhoneMover, which helps you transfer all or custom data from old iPhone to new iPhone. This iPhone transfer software enables you to transfer all data types on your iPhone, including photos, videos, contacts, messages, and 20+ other file types. You can transfer that data from your iPhone to another iPhone, Android, or PC in any direction. It also provides you with management capability, which enables you to select which one to transfer, delete specific files, merge those that are identical, and more. It is easy to use and offers fast file transferring operations without relying on the internet.

Scan your iPhone and organize the data so you can choose what to transfer.
Allows you to transfer all data without wiping your existing device data.
Ability to transfer a massive amount of data in minutes with no delay or buffering.
Enables you to do a complete device migration without a full phone backup.
Secure Download
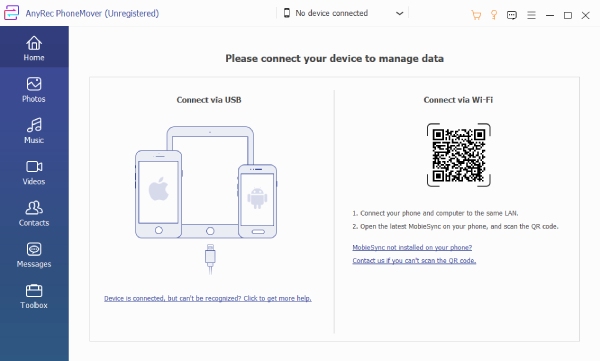
Step 1. Install the AnyRec PhoneMover on your computer and launch it afterward. Next, to transfer your iPhone's data to another iPhone or Android device, connect both devices to the computer using a USB cable. Or, scan the QR code using the target device for connection.
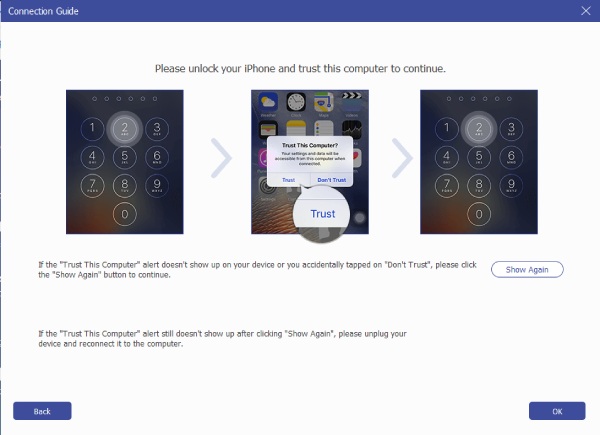
Step 2. After that, a pop-up will appear on your iPhone. Follow the on-screen instructions on the tool's interface to let your iPhone trust the computer. Now, suppose you wish to transfer photos first, click "Photos" on the left side to view your iPhone's photos.
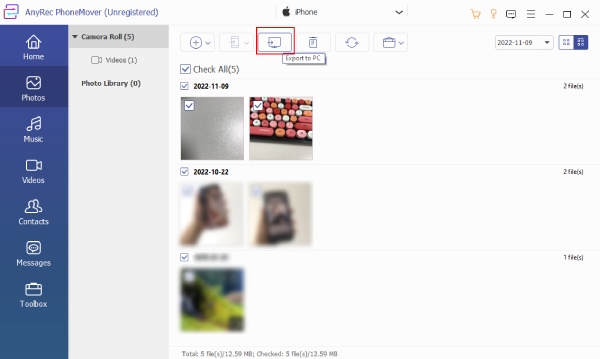
Step 3. Then, select all the photos you wish to transfer by ticking their corresponding checkboxes. After that, click "Export to Device" above to transfer your iPhone photos to another iPhone/Android.
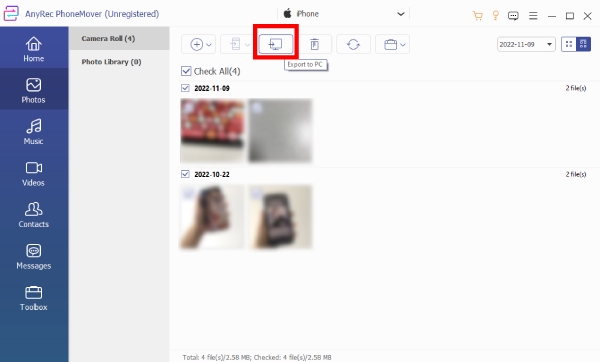
Step 4. Otherwise, if you are planning to transfer the photos to your computer, just click the "Transfer to PC" button, choose a specific file destination, confirm your selection, and wait until all of the photos are transferred to your computer.
Secure Download
Detailed Steps to Set Up Your iPhone As a New One
Now that you've safely transferred all your essential files, it's time to set iPhone up as new. If your iPhone already has data or previous settings, the first step is to erase everything and restore it to its original settings. This gives your smartphone a fresh start, without carrying over old files or configurations. For a brand-new iPhone, you can skip this step and proceed directly to the setup process. So, how to set up a new iPhone from your old iPhone ? Follow these steps:
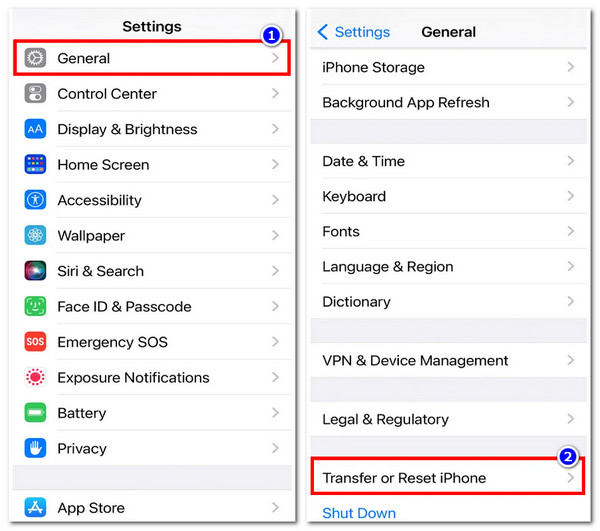
Step 1. On your iPhone's "Settings" application, tap the "General" button and select the "Transfer or Reset iPhone" option.
Step 2. Afterwards, tap the "Erase All Content and Settings" button and confirm the action by tapping the "Continue" button. Then, enter your passcode.
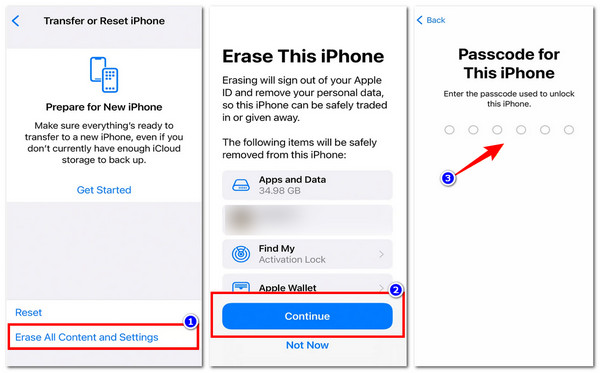
Step 3. At this point, your iPhone will try to back up to the cloud. If it works, you'll be allowed by your phone to continue. Otherwise, you will be prompted to "Erase Anyway".
How to Set Up Your Reset New iPhone 17
There you have it! That's how you reset your iPhone. Now that you have reset your device, you can proceed to set up iPhone as a new device. This will help and guide you through the initial setup screens, security settings, and personalization options so your iPhone is ready to use like a brand-new device. So, without any further ado, start exploring the steps below:
Step 1. Turn on your iPhone
Press and hold the power button until the Apple logo appears. When the "Hello" screen appears, swipe or follow prompts to start. You'll then choose your language and region. This affects how your date, time, and other information are displayed.
Step 2. Use Quick Start (if you have another iPhone)
If you have another iPhone running iOS 11 or later, bring it close to your new device. Quick Start will automatically help transfer settings and accounts. If not, tap "Set Up Manually". (Troubleshoot transfer directly from iPhone not working.)
Step 3. Activate your iPhone
Connect to Wi-Fi or a cellular network (data connection) to activate your device. For some iPhones, you may need to insert your SIM card first.
Step 4. Set up Face ID, Touch ID, and passcode
Go after the on-screen instructions on your iPhone to register your face or fingerprint. Then create a six-digit passcode to secure your iPhone. Alternatively, you can also choose a four-digit passcode, a customized passcode, or skip for now, but it's recommended to set one.
Step 5. Decide whether to transfer or restore data
Since you're starting fresh, select "Don't Transfer Apps & Data". This ensures your iPhone starts clean without bringing in old files. Now, if you wish to restore the data you transferred using AnyRec PhoneMover, you can use the same tool as well for restoration later, after the setup process. It can transfer text messages to new iPhone without data loss, as well as contacts, photos, and other files.
Step 6. Sign in with your Apple ID
Provide your Apple ID and password. If you don't have one, you can create it now or skip and set it up later. This is needed to access iCloud, App Store, Apple Pay, and other Apple services.
Step 7. Turn on Automatic Updates
Choose whether you want iOS to update automatically. This keeps your iPhone secure and up to date.
Step 8. Set up Siri and other Apple services
Follow prompts to set up Siri and speak a few phrases to make Siri recognizes your voice. You can also configure Apple Pay, iCloud Keychain, and other Apple services during this stage.
Step 9. Set up Screen Time and display options
Screen Time helps you monitor device usage and set app limits. You can also enable "True Tone" or "Display Zoom" if your iPhone supports them.
Step 10. Finish setup
Once all steps are complete, tap "Get Started" to reach the "Home screen". Your iPhone is now ready to use as if it's brand new.
Conclusion
That's it! That's the complete guide to set up iPhone as a new iPhone with or without an old phone. Through that guide, you can initiate a fresh start and overcome a specific reason behind it; it may be that your phone has been lagging, you don't want to bring over old files and problems, or you're setting up a used device. Now, as mentioned earlier, a clean setup erases everything, so it's best to move your photos, messages, and other files to a secure place first. And the best tool to do that is the AnyRec PhoneMover! Start transferring your iPhone files with this tool today!
Secure Download


