פופולרי

AnyRec Screen Recorder
צילום מסך ב-Windows במסך מלא, גלילה ואזור מותאם אישית.
הורדה מאובטחת
כיצד לצלם צילומי מסך מלאים/חלקיים/ארוכים ב-Windows 11
למד את 6 הדרכים היעילות הבאות לצלם צילומי מסך ב-Windows 11. לא משנה אם תרצה לצלם את המסך המלא, האזור החלקי או דפי גלילה, תוכל למצוא את הדרכים המתאימות:
- מקליט מסך AnyRec: צלם כל מיני צילומי מסך ב-Windows באיכות גבוהה.
- Windows + Shift + S: צלם צילומי מסך ללוח הקליפ ובצע עוד עריכות.
- PrtSc: פשוט צלם את צילומי המסך ב-Windows 11 במסך מלא.
- Alt + PrtSc: ללכוד במהירות את החלון הנוכחי ללא תכונות עריכה.
- Ctrl + Alt + PrintScreen: מסוגל לצלם צילומי מסך גלילה של דפי אינטרנט ב-Windows 11.
- כלי חיתוך: תוכנית צילום ברירת מחדל ב-Windows 11 לצילום מסך עם 3 מצבים.
הורדה מאובטחת
הורדה מאובטחת
לפעמים, אולי תרצה צלם צילומי מסך ב-Windows 11 שלך של שורת סרטים מועדפת, מילים, שיחה, וידאו צ'אט, מם ועוד. למרבה המזל, זה ממש קל עם לכידת מסך ברירת המחדל. תוכל לצלם אותם במסך מלא, במסך חלון או באזור מסוים. המשך לקרוא כדי ללמוד את 6 הדרכים היעילות לצלם צילומי מסך ב-Windows 11 עם שלבים מפורטים.
רשימת מדריכים
הדרך הטובה ביותר לצלם צילומי מסך ב-Windows 11 של האזור הרצוי 4 דרכים לצלם צילומי מסך ב-Windows 11 באמצעות קיצורי דרך השתמש בכלי החיתוך כדי לצלם צילומי מסך ב-Windows 11 שאלות נפוצות לגבי צילום מסך ב-Windows 11הדרך הטובה ביותר לצלם צילומי מסך ב-Windows 11 של האזור הרצוי
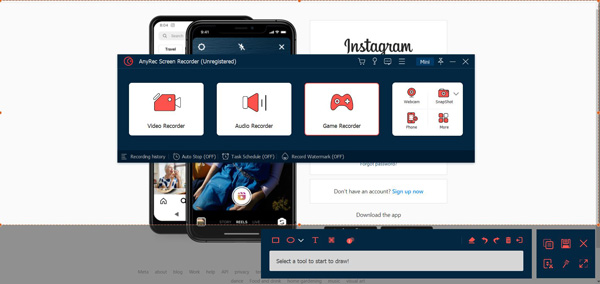
נניח שאתה מחפש כלי שיעזור לך לצלם צילום מסך במערכת ההפעלה Windows 11 במסך מלא, מסך חלון או חלק מהמסך שלך. במקרה הזה, AnyRec Screen Recorder היא האפליקציה המומלצת ביותר עבורך. יתר על כן, אתה יכול להוסיף ציורים, טקסטים, חיצים וקווים לצילומי המסך שלך אם תרצה בכך. אינך צריך לדאוג לגבי איכות צילומי המסך, מכיוון שהוא מספק גם הגדרות יציבות הניתנות להתאמה אישית.
צלם צילום מסך ב-Windows 11 במסך מלא, חלון או חלק מהמסך.
שמור צילומי מסך בפורמטים שונים, כגון JPG, BMP, GIF, PNG או TIFF.
הוסף ציורים, חיצים, טקסטים, קווים, צורות ועוד לצילומי המסך שלך.
ספק מקשי קיצור מותאמים אישית לצילום מסך ב-Windows 11/10/8/7 במהירות.
הורדה מאובטחת
הורדה מאובטחת
שלב 1.כדי להתחיל עם, הפעל את AnyRec Screen Recorder ב-Windows 11 שלך. לאחר מכן, לחץ על כפתור "SnapShot" בממשק הראשי.
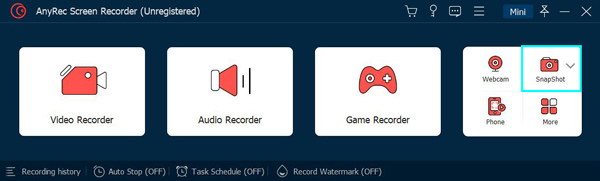
שלב 2.פשוט הזז את העכבר למקום שבו ברצונך לצלם צילום מסך ב-Windows 11, ולאחר מכן לחץ עליו באמצעות לחצן העכבר השמאלי כדי לצלם צילום מסך. אתה יכול לצלם את המסך המלא או א אזור נבחר.
שלב 3.לאחר לחיצה, תוכל להגדיר עוד את אזור הצילום ולבצע עריכות נוספות. לבסוף, לחץ על כפתור "שמור" כדי לשמור אותו בתיקייה המקומית.

הורדה מאובטחת
הורדה מאובטחת
3 דרכים לצלם צילומי מסך ב-Windows 11 באמצעות קיצורי דרך
האם אתה יודע שיש גם קיצורי ברירת מחדל עבורך לצלם צילומי מסך ב-Windows 11? אבל כדאי לשים לב שכלים אלה יכולים ללכוד רק את המסך הקבוע של המחשב ללא תכונות עריכה מתקדמות. אנא המשיכו לקרוא ולדעת עוד.
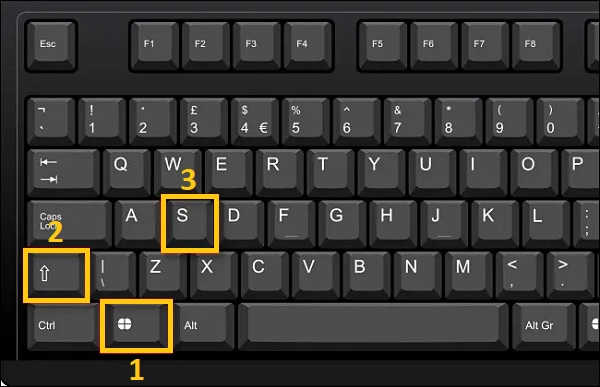
1. הקש Windows + Shift + S
קיצור הדרך הראשון בצילום מסך ב-Windows 11 שאתה חייב לדעת הוא "Windows + Shift + S". שיטה זו תאפשר לך לצלם צילומי מסך ב-Windows 11 על ידי אחיזה במסך בעזרת העכבר שלך בתור הסמן. אתה יכול גם לצלם צילום מסך ב-Freeform Snip, Window Snip ו-Snip מסך מלא.
צילומי המסך יישמרו בלוח, ותוכלו לפתוח כלים כמו Paint כדי להעתיק אותם. אתה יכול גם לשלוח את צילומי המסך לחברים שלך דרך אפליקציות חברתיות ישירות.
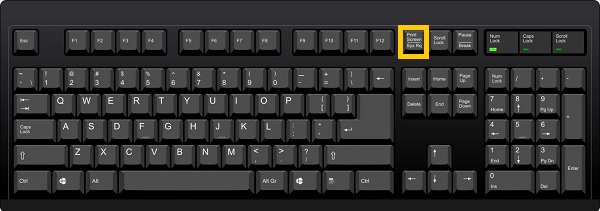
2. הקש PrintScreen (PrtSc)
אחת השיטות המהירות ביותר בצילום מסך היא לחיצה על "PrintScreen (PrtSc)" במקלדת. זה מאפשר לך לצלם מסך ב- Windows 11 עם כל המסך. עם זאת, לא תוכל לבחור חלק מהמסך אלא אם תערוך ותחתוך אותו. אבל לאן עוברים צילומי מסך ב-Windows? בדרך זו, אתה יכול למצוא אותם רק בלוח ולאחר מכן לבחור לשמור אותם.
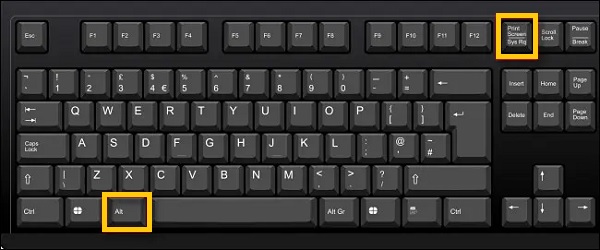
3. הקש Alt + PrintScreen (PrtSc)
כאשר אתה לוחץ על "Alt + PrintScreen" (PrtSc) במקלדת שלך, זה יאפשר לך לצלם צילום מסך ב-Windows 11 של החלון הנוכחי שלך. לכן, שיטה זו מושלמת עבור אלה שפותחים חלונות רבים ורוצים דרך מהירה ללכוד את החלון הנוכחי שלהם.
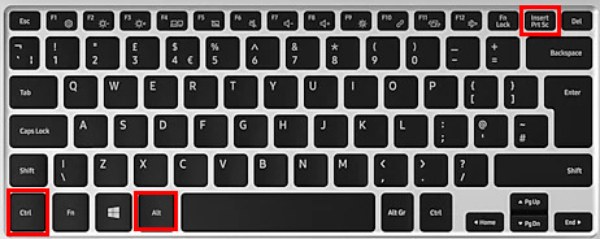
4. הקש Ctrl + Alt + PrintScreen (PrtSc)
אתה יכול גם לצלם את צילומי המסך הגלילה של דפי אינטרנט ב-Windows 11. פשוט לחץ והחזק את כפתורי "Ctrl + Alt", ולאחר מכן לחץ על כפתור "PrtSn" כדי להיכנס למסך המלא. כעת, אתה יכול להחזיק את העכבר השמאלי כדי לצלם צילומי מסך ארוכים.
פתק: לאחר צילום מסך ב-Windows 11, צילומי המסך יישמרו אוטומטית במחשב האישי שלך. פשוט מצא אותם מהתיקייה "מחשב זה", "תמונות", ולאחר מכן "צילומי מסך".
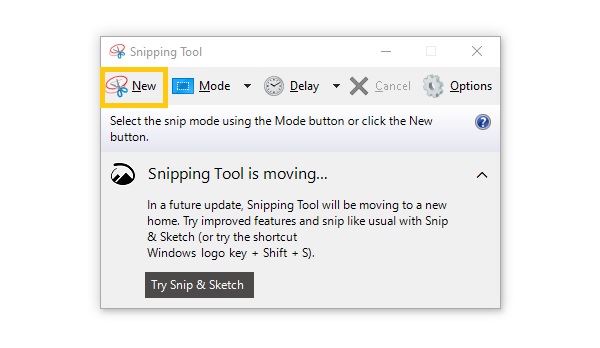
שלבים מפורטים לצילום מסך ב-Windows 11 עם כלי החיתוך
כלי חיתוך היא אפליקציית צילום מסך מובנית ב-Windows 11. כלי זה יאפשר לך לצלם צילומי מסך באמצעות חיתוך חופשי, חיתוך מלבני, חיתוך חלון או חיתוך מסך מלא. יש לו גם תכונת השהייה שמצלמת אוטומטית צילומי מסך ב-Windows 11 לאחר הטיימר. אז, ללא עיכובים נוספים, בצע את השלבים הבאים.
שלבים לביצוע:
שלב 1.ראשית, חפש כלי חיתוך ב-Windows 11. לאחר מכן, פתח את הכלי ולחץ על הלחצן "חדש". או שאתה יכול להשתמש קיצורי דרך של כלי החיתוך של Windows גם כן
שלב 2.לאחר מכן, בחר את המסך הרצוי חתוך צילום מסך של Windows 11. לאחר מכן, תוכל לבחור להוסיף לו ציורים.
שלב 3.לבסוף, כשתסיים לערוך את התמונה, כעת תוכל לעבור לקטע "קובץ" ולבחור בלחצן "שמור בשם" כדי לשמור אותה בקבצים שלך.

הורדה מאובטחת
הורדה מאובטחת
לקריאה נוספת
שאלות נפוצות לגבי צילום מסך ב-Windows 11
-
1. כיצד לצלם מסך ב-Windows 11 באמצעות Xbox Game Bar?
Xbox Game Bar הוא כלי נוסף של צילום מסך מובנה במערכת ההפעלה Windows 11 שנוצר במיוחד כדי ללכוד משחק. אבל אתה יכול גם להשתמש בו בצילום כל חלק במסך שלך. כדי להשתמש בו, אתה יכול לחפש את Xbox Game Bar ב-Windows שלך או פשוט ללחוץ על Windows + G במקלדת שלך. לאחר מכן, לחץ על כפתור המצלמה כדי לצלם צילום מסך ב-Windows 11 שלך.
-
2. איך לחתוך צילומי מסך ב-Windows 11/10/8/7?
אם תלחץ על כפתור PrtSc המובנה במקלדת שלך כדי לצלם צילומי מסך ב-Windows 11/10/8/7 שלך, צילומי המסך יהיו במסך מלא. מאז שאתה לא מוצא את צילום המסך בתיקייה המקומית, עליך לפתוח את אפליקציית Paint ולהדביק אותה כדי להתחיל לחתוך לגודל הרצוי.
-
2. איך לצלם צילומי מסך במחשב נייד Windows 11?
למרבה המזל, למחשבים ולניידים של Windows 11 יש את אותה דרך לכידת מסכים. אז אתה יכול פשוט לעקוב אחר השלבים המתוארים לעיל כיצד לצלם צילומי מסך ב- Windows 11 כדי לעזור לך לצלם את המחשב הנייד שלך.
סיכום
הנה לך! זה הכל לדיון שלנו על איך לצלם מסך ב-Windows 11. אתה יכול להשתמש ישירות בקיצורי ברירת המחדל או בכלי החיתוך כדי ללכוד את המסך שלך בקלות. אבל רובם לא מספקים הרבה פונקציות עריכה, אפילו האזור שנבחר. במקרה זה, כדאי להסתמך על AnyRec Screen Recorder והשתמש בו כדי לצלם צילומי מסך ב-Windows 11/10/8/7. אם עדיין יש לך שאלות, אנו ממליצים לך לשלוח לנו את הודעתך.
הורדה מאובטחת
הורדה מאובטחת


