פופולרי
AnyRec Screen Recorder
תעדו כל רגע. צלמו כמו מקצוענים.
הורדה מאובטחת
צילום מסך חלקי ב-Windows: 5 הכלים הטובים ביותר במחשב שולחני/אינטרנט
צילום מסך של שולחן העבודה שלך הוא הדרך הטובה ביותר לשתף מידע באינטרנט. אבל מה אם אתה רק רוצה קטע קטן ממתכון, או פרט קטן ממאמר ארוך? צילום... צילום מסך חלקי ב-Windows הופך את התמונה להרבה יותר נקייה! למרבה המזל, למשתמשי Windows יש דרכים רבות ללכוד בדיוק את מה שהם רוצים. הנה 5 הכלים היעילים ביותר לצילום מסך חלקי של Windows, כדי להבטיח שהתוצאות הסופיות תמיד יהיו נקיות מעומס.
רשימת מדריכים
מקליט מסך AnyRec - צילום מסך חלקי ועריכה מותאמת אישית כלי חיתוך - כלי צילום מסך מובנה ב-Windows ShareX - אוטומציה של תהליכי עבודה עוצמתיים וקוד פתוח צילום מסך מדהים - דף אינטרנט מקוון וגלילה PineTools - צילום מסך מהיר מבוסס אינטרנטמקליט מסך AnyRec - צילום מסך חלקי ועריכה מותאמת אישית
עבור פתרון מולטימדיה מקיף שמעבר לצילום מסך חלקי פשוט ב-Windows, AnyRec Screen Recorder מספק גם חבילות מקצועיות להקלטה ועריכה. כאן, תוכלו ללכוד אזורים ספציפיים בדיוק מושלם לפיקסלים באמצעות תכונת Snapshot הייעודית. יתר על כן, התוכנה תומכת בשמירת הצילומים החלקיים שלכם במספר פורמטים כגון PNG, JPG ו-MP, מה שמבטיח תאימות לכל פרויקט. אך לפני שמירת התמונה הסופית, תוכלו ליהנות מעריכה שלה עם תכונות ההערות שלה, כגון רישומים, קווים, טקסט, הדגשות ועוד.

צלם אזורים חלקיים, ספציפיים, חלונות פעילים או צילום מסך שלם.
שמור במהירות קבצי תמונה בפורמטים פופולריים כמו PNG ו-JPG.
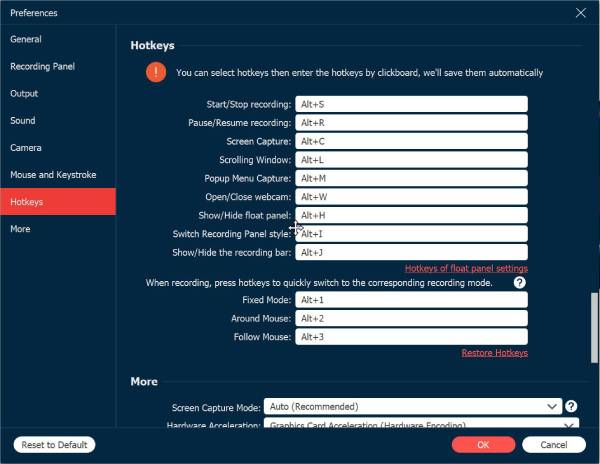
הגדר מקשי קיצור משלך כדי לפתוח לכידות חלקיות באופן מיידי.
צפה בתצוגה מקדימה של הצילום שלך באופן מיידי והפעל את העריכות הנדרשות.
הורדה מאובטחת
הורדה מאובטחת
שלב 1.הפעילו את AnyRec Screen Recorder במחשב שלכם. שם, אתרו את כפתור "Snapshot", ועם הלחיצה, העכבר שלכם יהפוך לכוונת. פשוט לחצו והחזיקו כדי לגרור בחירה סביב האזור שברצונכם לשמור.
טיפים
כדי לעבוד אפילו מהר יותר, עקפו את הממשק הראשי באמצעות מקשי הקיצור המותאמים אישית כדי לגשת לכלי הבחירה.
שלב 2.לאחר שתשחררו את לחצן העכבר, הבחירה שלכם תיפתח בעורך המובנה. מכאן תוכלו להוסיף חצים, צורות או טקסט, המושלמים להדגשת פרטים ספציפיים.

שלב 3.כאשר אתם מרוצים מהעריכות, לחצו על כפתור "שמור" בסרגל הכלים הצף. בחרו את תיקיית היעד וסוג הקובץ הרצויים, ולאחר מכן אשרו. הורידו את תמונת המסך החלקית שלכם כעת למחשב שלכם.
הורדה מאובטחת
הורדה מאובטחת
כלי חיתוך - כלי צילום מסך מובנה ב-Windows
כלי החיתוך הוא פתרון צילום מסך מקורי ל-Windows שאינו דורש התקנות נוספות כדי לפעול. יש לו ארבעה מצבי צילום שונים, כולל חיתוכים חופשיים וחיתוכים מלבניים, המאפשרים לך לצלם מסך של אזור מסוים בלבד ב-Windows במהירות. לאחר צילום התמונה, תוכל פשוט לשפר את התמונה על ידי חיתוך או הדגשת מידע מרכזי.
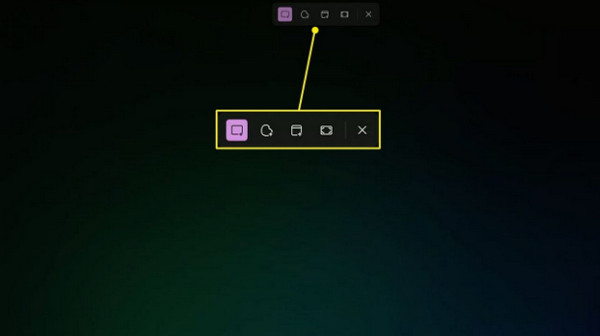
שלב 1.לחץ על המקשים "Windows + Shift + S", ומסך Windows שלך יהפוך מעט לעמום ויפתח את תפריט הבחירה.
שלב 2.משם, בחר באפשרות "חיתוך מלבני", ולאחר מכן גרור את הסמן מעל האזור שברצונך ללכוד.
שלב 3.צילום המסך החלקי של Windows נשמר בלוח; לחץ עליו כדי לשמור או לערוך אותו במידת הצורך.
ShareX - אוטומציה של תהליכי עבודה עוצמתיים וקוד פתוח
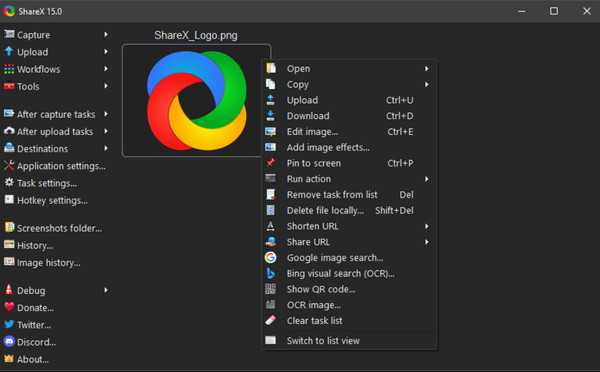
הבא בתור הוא ShareX. כלי צילום מסך זה הוא כלי קוד פתוח שמתמחה באוטומציה של מה שקורה לאחר צילום מסך חלקי ב-Windows. הוא מאפשר לך לבחור אזור ולהעלות אותו לשירות ענן באופן אוטומטי, להוסיף סימן מים או אפילו להפוך אותו לקובץ GIF. אם אתה משתמש מתקדם שבוחר באפליקציה קלת משקל עם פונקציונליות נוספת, ShareX יכול להיות הבחירה המועדפת עליך.
שלב 1.הפעל את ShareX ולחץ על המקשים "Ctrl + Print Screen".
שלב 2.בחר את אזור הצילום על ידי גרירת הכוונת על פני החלק הרצוי במסך Windows.
שלב 3.לאחר מכן, שחררו את לחצן העכבר כדי ללכוד את האזור שנבחר.
שלב 4.התמונה נשמרת בתיקייה "צילומי מסך" או מועלית בהתאם להגדרות שלך.
צילום מסך מדהים - דף אינטרנט מקוון וגלילה
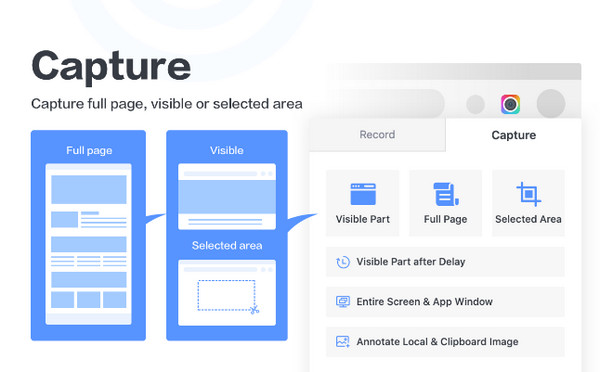
Awesome Screenshot פועל בעיקר כתוסף דפדפן שמצטיין בצילום מסך חלקי ב-Windows, במיוחד דפי אינטרנט מבלי לצאת מהדפדפן. הוא כולל כלי לבחירת אזור המאפשר לך לגרור תיבה מעל כל חלק מתוכן האינטרנט ולערוך אותו באופן מיידי. מלבד תמונות סטטיות, הוא יכול גם לצלם תמונות גלילה, שהן אידיאליות לדפי אינטרנט או מאמרים ארוכים.
שלב 1.בסרגל התוספים של הדפדפן שלך, לחץ על כפתור "צילום מסך מדהים".
שלב 2.בחר באפשרות "לכידת אזור נבחר" בתפריט הנפתח.
שלב 3.לאחר מכן, גררו את העכבר כדי לסמן את החלק הספציפי בדף האינטרנט.
שלב 4.לחצו על "לכידה" ולאחר מכן לחצו על כפתור "סיום" כדי לשמור או לשתף את התוצאה הסופית.
PineTools - צילום מסך מהיר מבוסס אינטרנט
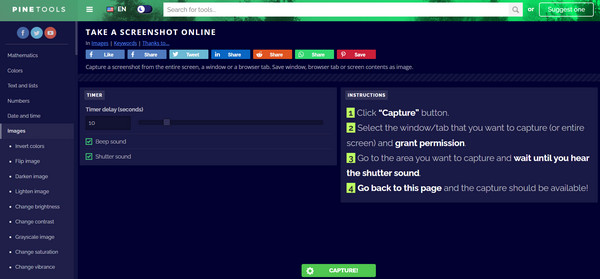
לבסוף, PineTool הוא פתרון מבוסס אינטרנט לחלוטין לכל מי שלא יכול או לא מעדיף להתקין דבר על המערכת שלו. באמצעות ממשק ה-API לשיתוף מסך המובנה של הדפדפן, תוכלו... בחר רק את החלק שברצונך לצלם מסך, ספציפית חלון או לשונית. למרות שהוא פועל ככלי מקוון, יש לו פרטיות מקומית שמעבדת את התמונה ישירות בדפדפן שלך. זוהי אפשרות חירום מושלמת אם אתה רק צריך חיתוך מהיר במחשב Windows שלך.
שלב 1.עבור לדף הרשמי של "PineTools Take a screenshot online". לאחר מכן, לחץ על כפתור "Capture" הירוק.
שלב 2.בחלון הקופץ של הדפדפן, בחר את החלון או הכרטיסייה שברצונך ללכוד ולאחר מכן לחץ על כפתור "שתף".
שלב 3.לאחר הופעת התצוגה המקדימה, תוכלו חיתוך צילום מסך ב-Windows לפני שמירתו.
סיכום
כפי שראיתם היום, לצילום מסך חלקי מהיר ב-Windows, יש כלי צילום מסך מובנה שהופך אותו ליעיל. בנוסף, ישנם פתרונות של צד שלישי שיכולים לעזור לכם ללכוד דפי אינטרנט ולהוסיף הערות לתמונות. אם אתם מחפשים את חוויית המשתמש הידידותית ביותר, השתמשו... AnyRec Screen Recorderזה אידיאלי לכל מי שרוצה צלם צילום מסך של חלק מהדף בלבד ורוצה את הגמישות להוסיף צורות, טקסט ותכונות מרגשות נוספות. קבלו את צילומי המסך שלכם בכמה לחיצות בלבד כאן!
הורדה מאובטחת
הורדה מאובטחת
מאמר קשור
אודות המחבר שלנו


