Suosittu
AnyRec Screen Recorder
Tallenna jokainen hetki. Tallenna kuin ammattilainen.
Suojattu lataus
[Ratkaistu] Pikakuvakaappaukset eivät tallennu Macissa automaattisesti
Hanki 6 ratkaisua korjataksesi Mac-kuvakaappaukset, jotka eivät tallennu:
- 1. Käytä vaihtoehtona ammattimaista AnyRec Screen Recorderia.
- 2. Varmista, että pikakuvakkeet kuvakaappausten ottamiseksi ovat toimivia.
- 3. Tarkista, että kuvakaappauksen tallennuspolku on mitä tarvitset.
- 4. Päivitä Macisi uusimpaan Sonoma-järjestelmäversioon.
- 5. Suorita NVRAM-muistin nollaus määritysvirheiden välttämiseksi.
- 6. Avaa kuvakaappaukset helposti avaamalla kuvakaappauskansion lukitus.
Suojattu lataus
Suojattu lataus
Löydä sinut Mac-kuvakaappauksia ei tallenneta automaattisesti Mac Catalinan päivityksen jälkeen? Se voi johtua monista syistä, kuten vääristä pikakuvakeasetuksista, muuttuneesta tallennuspolusta ja muusta. Vaikka Macin sisäänrakennetut pikakuvakkeet ovat helppo ja nopea tapa ottaa kuvakaappauksia, voit myös kokeilla muita ammattityökaluja säästämisongelmien välttämiseksi. Lue lisää Mac-kuvakaappausten ratkaisemiseksi ilman tallennusongelmaa kuudella tehokkaalla tavalla.
Paras Macin vaihtoehtoinen kuvakaappaussovellus 5 tapaa korjata Mac-kuvakaappaukset, jotka eivät tallenna ongelmia- 2.1 Tarkista Macin näyttökuvan pikakuvakeasetukset
- 2.2 Tarkista oletuskuvakaappauksen tallennuspolku
- 2.3 Päivitä Macisi uusimpaan järjestelmäversioon
- 2.4 Suorita NVRAM-nollaus
- 2.5 Avaa Screenshot-kansion lukitus
Paras Macin vaihtoehtoinen kuvakaappaussovellus
Riippumatta siitä, miksi Mac-kuvakaappaukset eivät tallennu, voit kääntyä suoraan ammattilaisen puoleen AnyRec Screen Recorder Macille/Windowsille. Se ei ole vain tehokas kuvakaappaustyökalusarja, vaan siinä on myös tehokkaita muokkausominaisuuksia. Se tarjoaa myös mukautettavat pikakuvakkeet kuvakaappausten kaappaamiseen ja videoiden tallentamiseen Macissa. Jos et löydä tallennettavia kuvakaappauksia Macissa, voit muuttaa kohdepolun joka kerta tarpeidesi mukaan.

Ota helposti koko näytön kokoisia, ikkunoituja ja mukautettuja alueellisia kuvakaappauksia.
Tehokkaat kuvakaappausten muokkaustyökalut huomautusten lisäämiseen ja säätöjen tekemiseen.
Vie kaikkiin suosittuihin kuvamuotoihin, kuten PNG, JPG/JPEG, BMP ja GIF.
Aseta mukautetut pikanäppäimet ja määränpään polku tallentaaksesi kuvakaappauksia helposti.
Suojattu lataus
Suojattu lataus
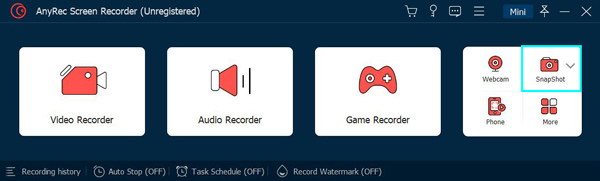
Vaihe 1.Lataa ja asenna paras Mac-vaihtoehtoinen kuvakaappaussovellus verkkosivustolta. Napsauta "Snapshot"-painiketta ikkunan oikeassa yläkulmassa.
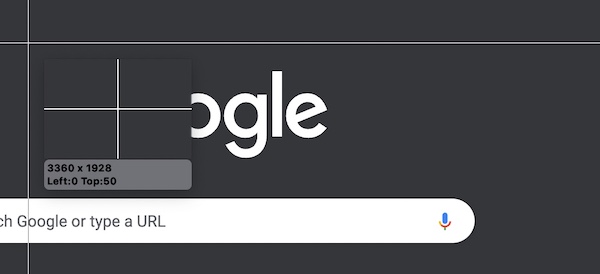
Vaihe 2.Valitse näytön alue vetämällä hiiren osoitinta, vapauta hiiren painike, niin kuvakaappaus otetaan automaattisesti puolestasi.
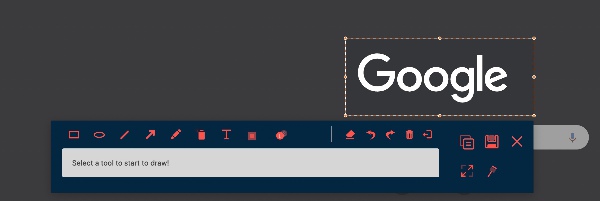
Vaihe 3.Kuvakaappauksen alle ilmestyy työkalupalkki, joka tarjoaa edistyneitä muokkausominaisuuksia. Kun muokkaus on valmis, napsauta "Tallenna" -painiketta, kun muokkaus on valmis.
merkintä: Jos olet ongelmia näytön apuohjelmien kanssa Windows PC:ssä, tai yrittää ottaa iPhonen kuvakaappauksia Facetimeen, meillä on myös täydelliset oppaat auttamaan sinua.
5 tapaa korjata Mac-kuvakaappaukset, jotka eivät tallenna ongelmia
2.1 Tarkista Macin näyttökuvan pikakuvakeasetukset
On mahdollista, että Mac-kuvakaappausapuohjelmasi oli käynnissä, mutta painat vain asiaankuulumatonta näppäinyhdistelmää ja tietysti huomasit, ettei kuvakaappausta tallennettu. Nollaa kuvakaappauksen pikanäppäimet noudattamalla alla olevia ohjeita.
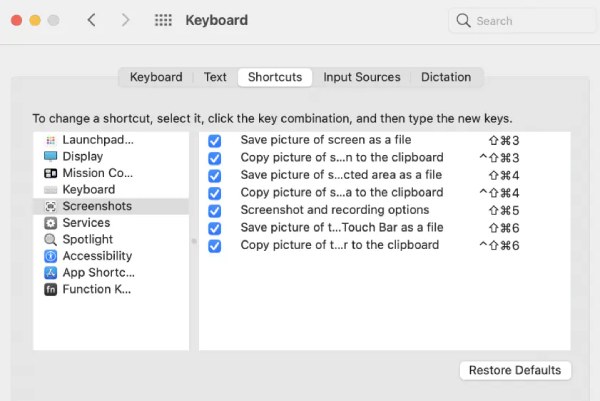
Vaihe 1.Avaa "Asetukset" -sovellus ja etsi "Järjestelmäasetukset". Siirry sitten "Näppäimistö"-vaihtoehtoon ja napsauta "Pikanäppäimet"-painiketta.
Vaihe 2.Napsauta "Kuvakaappaukset" -painiketta vasemmassa paneelissa. Varmista paneelin oikealla puolella, että kuvakaappaustoiminnot ovat käytössä.
Vaihe 3.Napsauta "Palauta oletukset" -painiketta palauttaaksesi kaikki pikanäppäimet oletusasetuksiin. Tarkista sitten, voidaanko Mac-kuvakaappaus tallentaa pikanäppäimillä.
2.2 Tarkista oletuskuvakaappauksen tallennuspolku
Voit vaihtaa oletuskuvakaappauskansion toiseen kuin Työpöytäkansioon, jolloin kuvakaappaukset eivät näy työpöydällä. Siksi saatat ajatella, että mac-kuvakaappauksia ei tallenneta ollenkaan. Muuta otettujen kuvakaappausten kohdepolkua noudattamalla ohjeita.
Vaihe 1.Paina missä tahansa näytössä "Shift + Cmd + 5" -näppäinyhdistelmiä.

Vaihe 2.Napsauta työkalupalkin "Asetukset"-painiketta. Napsauta "Tallenna kohteeseen" -valinnoista "Työpöytä" -painiketta.
2.3 Päivitä Macisi uusimpaan järjestelmäversioon
Toinen mahdollinen syy on se, että Mac OSX -järjestelmäsi on päivitetty tai se on korjattava. Olisi ihanteellista, jos sinulla olisi jo varmuuskopio järjestelmästäsi. Jos ei, katso yksityiskohtaiset vaiheet alla:
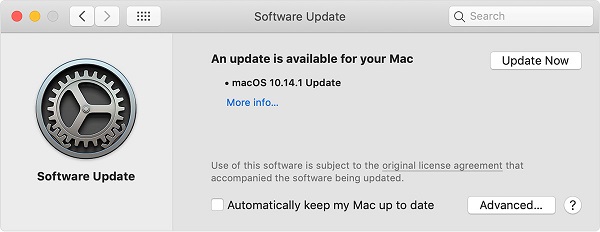
Vaihe 1.Avaa "Järjestelmäasetukset"-sovellus. Napsauta "Ohjelmiston päivitys" -painiketta.
Vaihe 2.Saatat saada ilmoituksen, jossa kerrotaan, että Mac-tietokoneellesi on saatavilla päivitys. Napsauta "Päivitä nyt" -painiketta ja seuraa ohjeita.
2.4 Suorita NVRAM-nollaus
Toinen yleinen ongelma, jonka Mac saattaa kohdata, on NVRAM-määrityksen virhe. Joskus Mac OSX -järjestelmän ongelmia ei voitu korjata ennen kuin suoritat NVRAM-nollauksen.
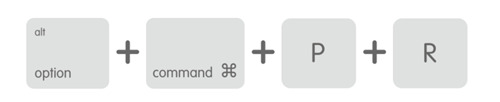
Vaihe 1.Käynnistä Mac uudelleen. Kun kuulet käynnistysäänen, paina "Cmd + Optio + P + R" -näppäinyhdistelmää välittömästi.
Vaihe 2.Pidä painikkeita painettuna noin 20 sekuntia. Mac saattaa näyttää käynnistyvän uudelleen useita kertoja.
Vaihe 3.Vapauta painikkeet jälkeenpäin ja käynnistä järjestelmäsi normaalisti.
2.5 Avaa Screenshot-kansion lukitus
Toinen mahdollinen syy, miksi Mac-kuvakaappaukset eivät tallennu Maciin, on lukittu kansio. Vaikka olet vaihtanut tallennuskansion oletustyöpöydäksi, järjestelmä saattaa olla lukinnut sen ja estää sen avaamisen. Hanki yksityiskohtaiset vaiheet sen ratkaisemiseksi:
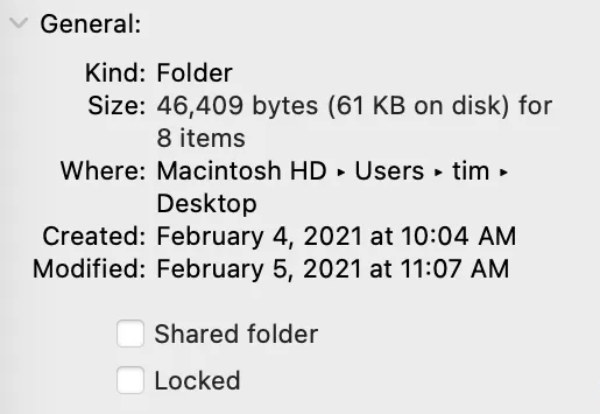
Vaihe 1.Siirry asetettuun tallennuskansioon. Oletusasetus on työpöytä.
Vaihe 2.Napsauta kansiota hiiren kakkospainikkeella ja napsauta "Hae tiedot" -painiketta avattavasta luettelosta.
Vaihe 3.Varmista "Yleiset"-osiossa, että "Lukittu"-valintaruutu ei ole valittuna.
Usein kysyttyä Mac-kuvakaappauksista
-
Korjausohje: Sinulla ei ole lupaa tallentaa tähän sijaintiin Macissa?
Avaa "Finder"-sovellus ja siirry "Home"-kansioosi. Siirry valikkorivillä kohtaan "Tiedosto > Hanki tietoja" ja etsi "Jakaminen ja käyttöoikeudet" -osio. Varmista, että "Etuoikeus"-vaihtoehdossa näkyy "Lue ja kirjoita".
-
Miten vaihdan Macin kuvakaappausmuodot png:stä jpg:ksi?
Jos haluat muuttaa kuvakaappausmuotoja, avaa pääteikkuna ja anna seuraavat komennot: "defaults write com.apple.screencapture type JPG." Ota muutokset käyttöön painamalla Enter-näppäintä.
-
Miksi en voi ottaa kuvakaappauksia Macilla Apple TV -sovelluksella?
Macin oletuskuvakaappausapuohjelma poistetaan automaattisesti käytöstä Apple TV -sovelluksella. Voit käyttää sen sijaan kolmannen osapuolen näytön tilannekuvasovellusta.
Johtopäätös
Kuten olemme keskustelleet artikkelissa, nämä ovat 6 parasta mahdollista ratkaisua Mac-kuvakaappaukset eivät tallennu työpöydällesi. Vaikka syyt vaihtelevat, suosittelemme, että käytät parasta kuvakaappausta - AnyRec Screen Recorder All-in-one-ratkaisuna Mac-näytön tallennustehtäviin.
Aiheeseen liittyvä artikkeli
Tietoja kirjoittajastamme


