6 طرق لتسجيل الصوت على جهاز Mac باستخدام/بدون ميكروفون خارجي
بفضل الخيارات المضمنة في Apple، تسجيل الصوت على جهاز Mac أسهل من أي وقت مضى! لديك مذكرات صوتية لإنشاء بودكاست، أو تسجيل ملاحظات الاجتماعات، أو سرد عرض تقديمي. ومع ذلك، قد ترغب في خيار أكثر فعالية. لذلك، يقدم لك هذا المنشور أفضل الأدوات لتسجيل الصوت على أجهزة ماك، من البرامج البسيطة إلى البرامج الاحترافية.
قائمة الدليل
مسجل الشاشة AnyRec - مسجل شامل مع التقاط عالي الجودة QuickTime Player - مسجل صوت مدمج لتلبية احتياجات الصوت البسيطة GarageBand - مسجل ومحرر صوتي احترافي Audacity - أداة مفتوحة المصدر لتسجيل الصوت متعدد المسارات WavePad - مسجل ومحرر صوتي غني بالميزات كيفية تسجيل مذكرة صوتية باستخدام تطبيق Voice Memosمسجل الشاشة AnyRec - مسجل شامل مع التقاط عالي الجودة
برنامج احترافي وسهل الاستخدام لتسجيل الصوت على نظام Mac، AnyRec Screen Recorder يتيح لك تسجيل الصوت، أو الشاشة، أو كاميرا الويب، أو الثلاثة معًا في آنٍ واحد. وهو مثالي لمنشئي المحتوى، أو مُنشئي البودكاست، أو أي شخص يرغب في التحكم الدقيق في جودة التسجيل. سواء كنت تلتقط صوت النظام، أو صوت مدخل الميكروفون الخارجي، أو كليهما، يُقدم البرنامج نتائج فائقة الوضوح مع إعدادات صوت قابلة للتعديل.

قم بتسجيل صوت النظام ومدخلات الميكروفون في وقت واحد دون فقدان الجودة.
ضبط مستويات الصوت وإعدادات الإخراج للحصول على وضوح أفضل.
قم بإلغاء الضوضاء وتعزيز الصوت.
احفظ التسجيلات الصوتية بتنسيقات MP3 وAAC وM4A والمزيد من تنسيقات الصوت.
تحميل آمن
تحميل آمن
- الايجابيات
- قم بتسجيل الصوت الداخلي والخارجي على جهاز الكمبيوتر الخاص بك من جميع المصادر.
- قم بقص وضغط ودمج وتحرير البيانات الوصفية لملف التسجيل الخاص بك.
- جدولة مهام التسجيل لبدء وإيقاف التسجيل تلقائيًا.
- سلبيات
- يجب عليك الترقية إلى الإصدار الكامل لتسجيل مقاطع فيديو لساعات.
الخطوة 1.
شغّل "صوت النظام" لتشغيل الصوت الداخلي لجهاز ماك، ثم شغّل "الميكروفون" لتسجيل صوتك. يمكنك تحديد الميكروفون المُراد استخدامه وضبط مستوى الصوت قبل التسجيل.
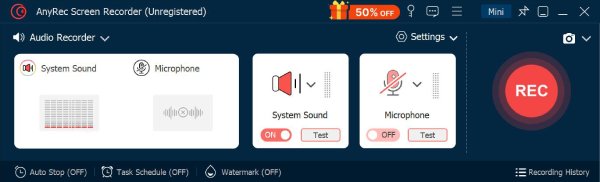
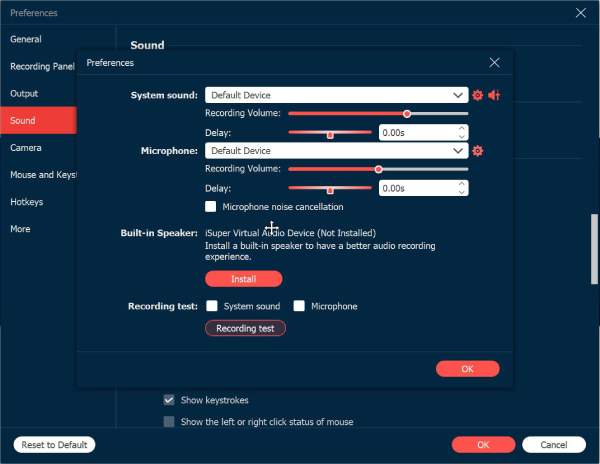
الخطوة 2.قبل البدء، انقر على زر "الإعدادات" وانتقل إلى تبويب "الصوت". من هناك، انقر على مربع "إلغاء الضوضاء" لتقليل ضوضاء الخلفية. انقر على زر "موافق" للتطبيق والعودة إلى النافذة الرئيسية.
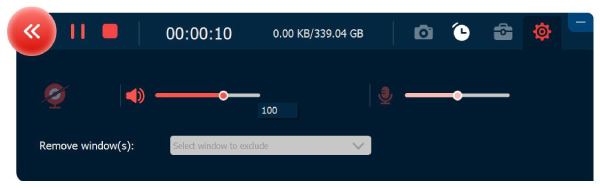
الخطوه 3.بعد إعداد كل شيء، انقر على زر "تسجيل" لبدء تسجيل صوتك. سيظهر شريط صغير عائم. يمكنك إيقافه مؤقتًا وإيقافه مؤقتًا وضبط مستوى الصوت فورًا أثناء التحدث.
الخطوة 4.بعد الانتهاء، انقر على "إيقاف" لإنهاء التسجيل الصوتي. يمكنك إعادة تشغيله فورًا، وإزالة الضوضاء غير المرغوب فيها، ثم انقر على "حفظ" لتصدير ملف الصوت النقي إلى جهاز ماك.
تحميل آمن
تحميل آمن
QuickTime Player - مسجل صوت مدمج لتلبية احتياجات الصوت البسيطة
QuickTime Player مُثبّت مسبقًا على جميع أجهزة ماك، وهو حل بسيط لتسجيل الصوت بسرعة على ماك. يعمل بشكل مثالي مع المذكرات الصوتية، والملاحظات، والبودكاست القصيرة دون الحاجة إلى برامج إضافية. علاوة على ذلك، يمكنك استخدم QuickTime لتسجيل فيديو الشاشة مع الصوت على جهاز Mac مجانا أيضا.
- الايجابيات
- مجاني ومثبت مسبقًا على نظام Mac.
- يأتي مع واجهة واضحة.
- جيد للمذكرات الصوتية السريعة.
- سلبيات
- يحتوي على ميزات محدودة لتحرير الصوت.
- لا يتم التقاط الصوت الداخلي بسهولة.
الخطوة 1.شغّل QuickTime Player. انقر على قائمة "ملف". ثم انقر على "تسجيل صوتي جديد". ثم اختر جهاز الإدخال من القائمة المنسدلة.
الخطوة 2.انقر على زر "تسجيل". الآن يمكنك بدء تسجيل صوت ماك. لاحقًا، انقر على زر "إيقاف" للإنهاء. احفظ ملفك في المكان الذي تريده.
GarageBand - مسجل ومحرر صوتي احترافي
أداة قوية أخرى من Apple، GarageBand، مثالية لأي شخص يرغب في تسجيل صوتي عالي الجودة مع أدوات تحرير احترافية. لا يقتصر الأمر على تسجيل الصوت على جهاز ماك، بل يمكنك أيضًا تحسين الصوت، وهو مثالي لمقدمي البودكاست والمغنين ومنتجي الصوت.
- الايجابيات
- تأثيرات مدمجة، وضواغط، ومعادلات.
- التسجيل متعدد المسارات مع عناصر تحكم تحرير متقدمة.
- يدعم التصدير إلى تنسيقات صوتية متعددة.
- سلبيات
- متاح فقط لأجهزة Apple.
- قد يكون الأمر معقدًا بالنسبة لتسجيل صوتي بسيط.
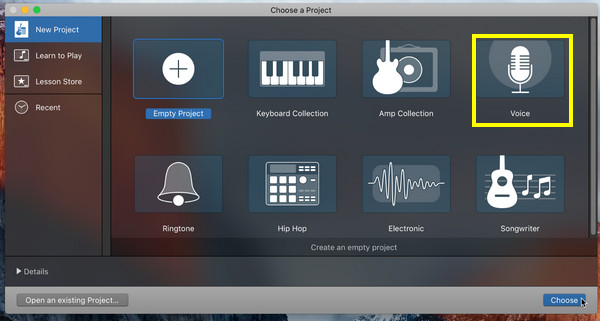
الخطوة 1.شغّل GarageBand على جهاز ماك، واضبطه على "مشروع صوتي". حدد جهاز الإدخال من "التفضيلات"، ثم "الصوت/MIDI".
الخطوة 2.انقر على زر "تسجيل" للبدء. تحدث في الميكروفون، ثم انقر على زر "إيقاف" عند الانتهاء. عدّل ملفك الصوتي واحفظه بالصيغة التي تريدها لاحقًا.
Audacity - أداة مفتوحة المصدر لتسجيل الصوت متعدد المسارات
واحدة من أكثر شعبية مسجل صوت مجاني لنظام ماك برنامج Audacity هو الأفضل. يوفر توازنًا ممتازًا بين القوة وسهولة الاستخدام، ويدعم الإضافات، ويتيح لك إنشاء طبقات وتحرير ومزج تسجيلات صوتية متعددة.
- الايجابيات
- يعمل مجانًا ومفتوح المصدر.
- يغطي العديد من التنسيقات مع العديد من التأثيرات.
- يحتوي على دعم المجتمع والبرامج التعليمية.
- سلبيات
- يعتبر التحرير متعدد المسارات محدودًا.
- أقل صقلاً من البرامج الأخرى.
الخطوة 1.عند فتح برنامج Audacity على جهاز ماك، اضبط مدخل الميكروفون. إذا كنت مستعدًا، فانقر على زر "تسجيل" لبدء تسجيل صوتك.
الخطوة 2.لاحقًا، انقر على زر "إيقاف" لإنهاء التسجيل. عدّل مسارك الآن باستخدام أدوات مثل أداة التشذيب والتلاشي، إلخ. احفظه عبر "ملف" ثم "تصدير"، ثم اختر "تصدير بصيغة MP3" أو أي صيغة أخرى.

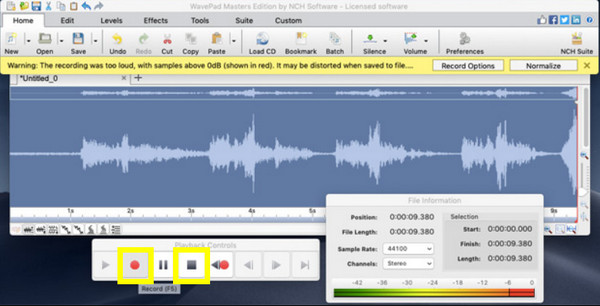
WavePad - مسجل ومحرر صوتي غني بالميزات
أخيرًا، يعمل WavePad بشكل أساسي كبرنامج متقدم لتسجيل وتحرير الصوت على أجهزة ماك، وهو مثالي لمن يرغبون في تحكم دقيق في صوتهم. يدعم هذا البرنامج تنظيف الصوت، والمعالجة الدفعية، والعديد من المؤثرات الصوتية.
- الايجابيات
- سهل الاستخدام مع ميزات جيدة.
- مثالي لتسجيل الصوت وتحرير الصوت بشكل عام.
- سلبيات
- ميزات متقدمة أقل، مثل المزج متعدد المسارات.
- النسخة المجانية لديها الكثير من القيود.
الخطوة 1.افتح WavePad على جهاز ماك، وانقر على "ملفات جديدة"، ثم اختر "تسجيل". حدد الميكروفون كمصدر إدخال.
الخطوة 2.انقر على زر "تسجيل" الآن، ثم انقر على زر "إيقاف" للإنهاء. الآن، يمكنك تعديل الصوت باستخدام الأدوات المُتاحة.
كيفية تسجيل مذكرة صوتية باستخدام تطبيق Voice Memos
عادةً ما يُستخدم تطبيق المذكرات الصوتية لتسجيل الصوت. سواءً كنت تستخدمه لحفظ تذكيرات سريعة أو لتسجيل ملاحظات اجتماعات، تتيح لك هذه الأداة المدمجة على أجهزة ماك تسجيل ملفات صوتية ببضع نقرات فقط. كما أنها تدعم قص واستبدال أجزاء من مذكرتك بسهولة. سيتم تصدير مذكراتك الصوتية بصيغة M4A. لمزيد من التوافق، يمكنك... تحويل المذكرات الصوتية إلى MP3.
لذا، قبل اختتام هذه التدوينة، إليك كيفية تسجيل الصوت على جهاز Mac باستخدام Voice Memos:
الخطوة 1.استخدم "بحث Spotlight" أو "التطبيقات" لتشغيل تطبيق "المذكرات الصوتية". بعد فتحه، سترى زر "تسجيل" الكبير؛ انقر عليه لبدء تسجيل صوتك.
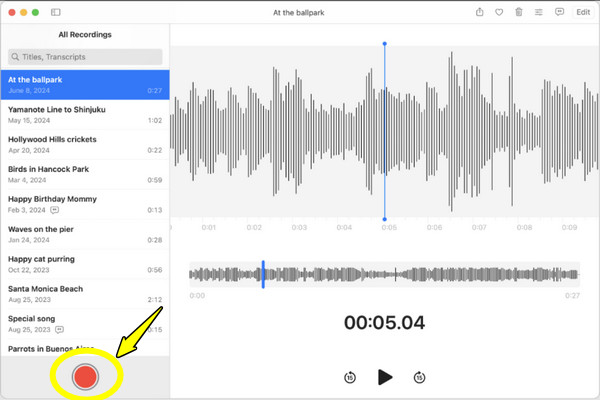
الخطوة 2.يمكنك في أي وقت الضغط على زر "إيقاف مؤقت" إذا كنت بحاجة إلى استراحة، ثم متابعة التسجيل باستخدام زر "استئناف". بعد ذلك، انقر على زر "تم" عند الانتهاء.
الخطوه 3.يظهر التسجيل على يسار التطبيق. يمكنك إعادة تسميته أو حتى قص الأجزاء غير المرغوب فيها. بعد الانتهاء، انقر بزر الماوس الأيمن عليه لمشاركته عبر AirDrop أو البريد الإلكتروني أو الرسائل، أو احفظه في المكان الذي تريده.

استنتاج
مع توفر العديد من الأدوات، يمكنك بسهولة العثور على ما يناسب احتياجاتك في التسجيل على جهاز ماك. من مذكرات الصوت البسيطة إلى ميزات GarageBand القوية، تقدم كل أداة مذكورة ميزة فريدة. تسجيل صوت الميكروفون على جهاز Mac. AnyRec Screen Recorder هو أفضل برنامج لتسجيل الصوت على نظام ماك. فهو لا يلتقط صوت الميكروفون فحسب، بل يوفر أيضًا إمكانية خفض الضوضاء، وتقليصها، وتعديل إعدادات الإخراج. علاوة على ذلك، يمكنك تسجيل صوت النظام مع صوت الميكروفون داخل البرنامج. سواءً للتسجيلات الاحترافية أو الشخصية، فإن البرنامج جاهز لأي غرض.
تحميل آمن
تحميل آمن
مقالات ذات صلة
نبذة عن مؤلفنا


