Popular
AnyRec Screen Recorder
Capturează fiecare moment. Înregistrează ca un profesionist.
Descărcare sigură
[Rezolvat] Capturile de ecran rapide nu se salvează automat pe Mac
Obțineți 6 soluții pentru a remedia capturile de ecran de pe Mac care nu se salvează:
- 1. Utilizați ca alternativă AnyRec Screen Recorder profesional.
- 2. Asigurați-vă că comenzile rapide pentru a face capturi de ecran sunt funcționale.
- 3. Verificați calea de salvare a capturii de ecran este ceea ce aveți nevoie.
- 4. Actualizați Mac-ul la cea mai recentă versiune a sistemului Sonoma.
- 5. Efectuați o resetare a NVRAM pentru a evita configurarea greșită.
- 6. Deblocați folderul capturi de ecran pentru a deschide cu ușurință capturile de ecran.
Descărcare sigură
Descărcare sigură
Te-am găsit Capturile de ecran Mac nu se salvează automat după actualizarea Mac Catalina? Poate fi cauzată de mai multe motive, cum ar fi setări greșite ale comenzii rapide, calea de salvare schimbată și multe altele. Deși comenzile rapide încorporate pe Mac sunt o modalitate ușoară și rapidă de a face capturi de ecran, pentru a evita problemele de salvare, puteți încerca și alte instrumente profesionale. Citiți mai multe pentru a rezolva problema cu capturile de ecran Mac care nu salvează cu 6 moduri eficiente.
Cea mai bună aplicație de captură de ecran alternativă pentru Mac 5 moduri de a remedia capturile de ecran de pe Mac care nu salvează problemele- 2.1 Verificați setările comenzilor rapide pentru capturi de ecran Mac
- 2.2 Verificați calea implicită de salvare a capturii de ecran
- 2.3 Actualizați Mac-ul dvs. la cea mai recentă versiune de sistem
- 2.4 Efectuați o resetare a NVRAM
- 2.5 Deblocați folderul Capturi de ecran
Cea mai bună aplicație de captură de ecran alternativă pentru Mac
Indiferent de ceea ce face ca capturile de ecran de pe Mac să nu fie salvate, puteți alege direct profesioniști AnyRec Screen Recorder pentru Mac/Windows. Nu este doar un set de instrumente puternic pentru capturi de ecran, ci are și funcții de editare puternice. De asemenea, oferă comenzi rapide personalizabile pentru a face capturi de ecran și a înregistra videoclipuri pe Mac. Fără a găsi nicio captură de ecran care să fie salvată pe Mac, puteți schimba calea de destinație de fiecare dată, în funcție de nevoile dvs.

Capturați cu ușurință capturi de ecran pe tot ecranul, cu ferestre și personalizate pentru regiuni.
Instrumente puternice de editare a capturilor de ecran pentru a adăuga adnotări și a face ajustări.
Exportați în toate formatele de imagine populare, cum ar fi PNG, JPG/JPEG, BMP și GIF.
Setați taste rapide personalizate și calea de destinație pentru a salva capturi de ecran cu ușurință.
Descărcare sigură
Descărcare sigură
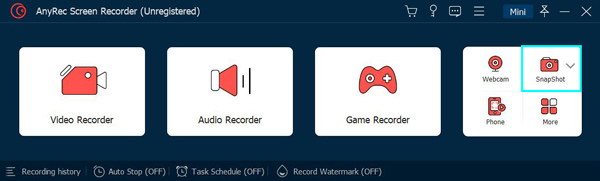
Pasul 1.Descărcați și instalați cea mai bună aplicație alternativă de captură de ecran pentru Mac de pe site. Faceți clic pe butonul „Snapshot” din partea dreaptă sus a ferestrei.
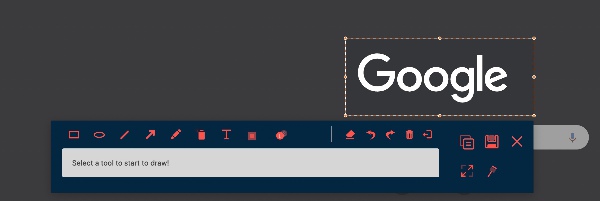
Pasul 2.Trageți cursorul mouse-ului pentru a selecta o regiune a ecranului, eliberați butonul mouse-ului, o captură de ecran va fi făcută automat pentru dvs.

Pasul 3.O bară de instrumente va apărea sub captură de ecran, oferindu-vă funcții avansate de editare. Odată terminată editarea, faceți clic pe butonul „Salvare” odată ce editarea este finalizată.
Notă: Daca esti întâmpinați probleme cu utilitățile de ecran pe PC-ul Windows, sau încercând să fac capturi de ecran iPhone pentru Facetime, avem și ghiduri complete pentru a vă ajuta.
5 moduri de a remedia capturile de ecran de pe Mac care nu salvează problemele
2.1 Verificați setările comenzilor rapide pentru capturi de ecran Mac
Este posibil ca utilitarul de captură de ecran pentru Mac să ruleze, dar tocmai ați apăsat pe o combinație de taste fără legătură și, desigur, ați constatat că nu a fost salvată nicio captură de ecran. Urmați pașii de mai jos pentru a reseta comenzile rapide de la tastatură pentru capturi de ecran.
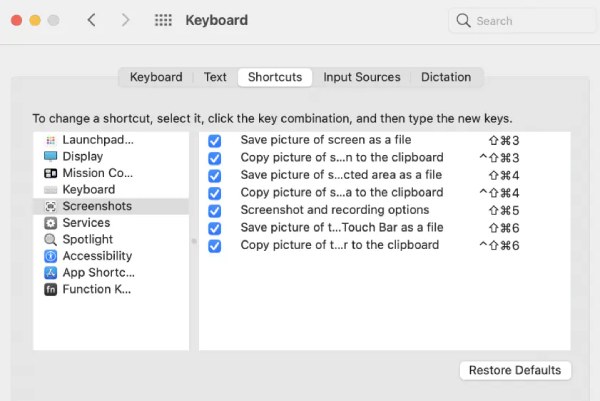
Pasul 1.Deschideți aplicația „Setări” și găsiți „Preferințe de sistem”. Apoi, navigați la opțiunea „Tastatură” și faceți clic pe butonul „Comenzi rapide”.
Pasul 2.Faceți clic pe butonul „Capturi de ecran” din panoul din stânga. În partea dreaptă a panoului, asigurați-vă că funcționalitățile capturii de ecran sunt activate.
Pasul 3.Faceți clic pe butonul „Restaurează valorile implicite” pentru a reseta toate comenzile rapide de la tastatură la valorile implicite. Apoi, verificați dacă captura de ecran Mac poate fi salvată cu comenzi rapide.
2.2 Verificați calea implicită de salvare a capturii de ecran
Este posibil să schimbați folderul de capturi de ecran implicit cu altul în afară de folderul Desktop, ceea ce duce la ca capturile de ecran să nu apară pe desktop. Astfel, ați putea crede că capturile de ecran pe Mac nu sunt salvate deloc. Urmați pașii pentru a schimba calea de destinație a capturilor de ecran realizate.
Pasul 1.Pe orice ecran, apăsați combinațiile de taste „Shift + Cmd + 5”.

Pasul 2.Faceți clic pe butonul „Opțiuni” din bara de instrumente. În selecțiile „Salvare în”, faceți clic pe butonul „Desktop”.
2.3 Actualizați Mac-ul dvs. la cea mai recentă versiune de sistem
Un alt motiv posibil este că sistemul dvs. Mac OSX este actualizat sau trebuie reparat. Ar fi ideal dacă aveți deja o copie de rezervă a sistemului dvs. Dacă nu, consultați pașii detaliați de mai jos:
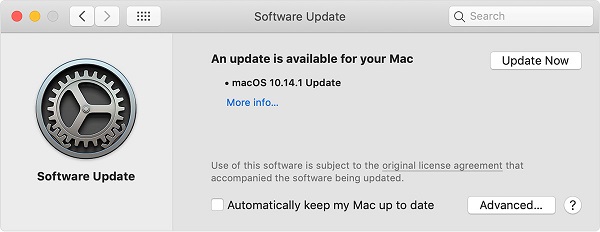
Pasul 1.Deschideți aplicația „Preferințe de sistem”. Faceți clic pe butonul „Actualizare software”.
Pasul 2.Este posibil să întâlniți o notificare care vă spune că este disponibilă o actualizare pentru Mac-ul dvs. Faceți clic pe butonul „Actualizați acum” și urmați instrucțiunile.
2.4 Efectuați o resetare a NVRAM
O altă problemă comună cu care s-ar putea confrunta Mac-ul dvs. este configurarea greșită a NVRAM. Uneori, problemele cu sistemul dvs. Mac OSX nu au putut fi rezolvate până când nu efectuați o resetare a NVRAM.
Pasul 1.Reporniți Mac-ul dvs. După ce auziți sunetul de pornire, apăsați imediat combinația de taste „Cmd + Option + P + R”.
Pasul 2.Continuați să apăsați butoanele timp de aproximativ 20 de secunde, Mac-ul dvs. poate părea că repornește de mai multe ori.
Pasul 3.Eliberați butoanele după aceea și porniți în sistem normal.

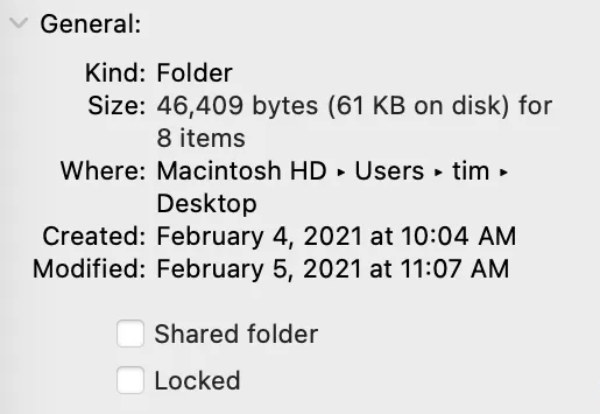
2.5 Deblocați folderul Capturi de ecran
Un alt motiv posibil pentru care capturile de ecran de pe Mac nu se salvează pe Mac este folderul blocat. Deși ați schimbat folderul de salvare pe desktopul implicit, acesta poate fi blocat de sistem și vă împiedică să îl deschideți. Obțineți pașii detaliați pentru a o rezolva:
Pasul 1.Accesați folderul de salvare setat. Setarea implicită este desktop.
Pasul 2.Faceți clic dreapta pe folder și faceți clic pe butonul „Obțineți informații” din lista derulantă.
Pasul 3.În secțiunea „General”, ar trebui să vă asigurați că caseta de selectare „Blocat” nu este bifată.
Întrebări frecvente despre capturile de ecran pentru Mac
-
Cum să remediați: nu aveți permisiunea de a salva în această locație pe Mac?
Deschideți aplicația „Finder” și navigați la folderul „Acasă”. În bara de meniu, navigați la „Fișier > Obțineți informații” și găsiți secțiunea „Partajare și permisiuni”. Asigurați-vă că opțiunea „Privilegiu” afișează „Citește și scrie”.
-
Cum schimb formatele de capturi de ecran Mac din png în jpg?
Dacă doriți să schimbați formatele capturii de ecran, deschideți o fereastră de terminal și introduceți următoarele comenzi: „defaults write com.apple.screencapture type JPG”. Apăsați tasta „Enter” pentru a aplica modificările.
-
De ce nu pot face capturi de ecran pe Mac cu aplicația Apple TV?
Utilitarul implicit de captură de ecran pentru Mac va fi dezactivat automat cu aplicația Apple TV. În schimb, puteți utiliza o aplicație de instantanee de ecran terță parte.
Concluzie
După cum am discutat în articol, acestea sunt cele mai bune 6 soluții posibile atunci când dvs Capturile de ecran pentru Mac nu se salvează pe desktop. Chiar dacă motivele variază, vă sugerăm insistent să utilizați cea mai bună captură de ecran - AnyRec Screen Recorder ca o soluție all-in-one pentru sarcinile dvs. de înregistrare a ecranului Mac.
Articol înrudit
Despre autorul nostru


