Popular
AnyRec Screen Recorder
Abadikan setiap momen. Rakam seperti profesional.
Muat Turun Selamat
[Diselesaikan] Tangkapan Skrin Pantas Tidak Disimpan pada Mac Secara Automatik
Dapatkan 6 penyelesaian untuk membetulkan tangkapan skrin Mac anda yang tidak disimpan:
- 1. Gunakan Perakam Skrin AnyRec profesional sebagai alternatif.
- 2. Pastikan pintasan untuk mengambil tangkapan skrin boleh dilaksanakan.
- 3. Semak laluan penjimatan tangkapan skrin adalah apa yang anda perlukan.
- 4. Kemas kini Mac anda kepada versi sistem Sonoma terkini.
- 5. Lakukan tetapan semula NVRAM untuk mengelakkan salah konfigurasi.
- 6. Buka kunci folder tangkapan skrin untuk membuka tangkapan skrin dengan mudah.
Muat Turun Selamat
Muat Turun Selamat
Mencari anda Tangkapan skrin Mac tidak disimpan secara automatik selepas kemas kini Mac Catalina? Ia mungkin disebabkan oleh banyak sebab seperti tetapan pintasan yang salah, laluan simpanan yang diubah dan banyak lagi. Walaupun pintasan terbina dalam pada Mac ialah cara yang mudah dan pantas untuk mengambil tangkapan skrin, untuk mengelakkan masalah menyimpan, anda juga boleh mencuba alatan profesional yang lain. Baca lebih lanjut untuk menyelesaikan tangkapan skrin Mac yang tidak menyimpan isu dengan 6 cara yang cekap.
Apl Petikan Skrin Alternatif Mac Terbaik 5 Cara untuk Membetulkan Tangkapan Skrin Mac Tidak Menyimpan Isu- 2.1 Semak Tetapan Pintasan Petikan Skrin Mac
- 2.2 Semak Laluan Simpanan Tangkapan Skrin Lalai
- 2.3 Kemas kini Mac Anda kepada Versi Sistem Terkini
- 2.4 Lakukan Set Semula NVRAM
- 2.5 Buka kunci Folder Tangkapan Skrin
Apl Petikan Skrin Alternatif Mac Terbaik
Tidak kira apa yang menyebabkan tangkapan skrin Mac anda tidak disimpan, anda boleh terus pergi ke profesional AnyRec Screen Recorder untuk Mac/Windows. Ia bukan sahaja kit alat tangkapan skrin yang berkuasa tetapi mempunyai ciri penyuntingan yang berkuasa juga. Ia juga menyediakan pintasan yang boleh disesuaikan untuk menangkap tangkapan skrin dan merakam video pada Mac. Tanpa mendapati tiada tangkapan skrin yang disimpan pada Mac, anda boleh menukar laluan destinasi setiap kali mengikut keperluan anda.

Tangkap tangkapan skrin penuh, bertingkap dan tangkapan skrin wilayah tersuai dengan mudah.
Alat pengeditan tangkapan skrin yang berkuasa untuk menambah anotasi dan membuat pelarasan.
Eksport ke semua format imej popular seperti PNG, JPG/JPEG, BMP dan GIF.
Tetapkan kekunci pintas tersuai dan laluan destinasi untuk menyimpan tangkapan skrin dengan mudah.
Muat Turun Selamat
Muat Turun Selamat
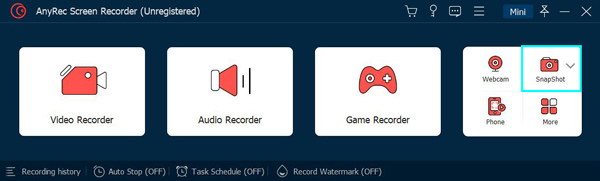
Langkah 1.Muat turun dan pasang apl tangkapan skrin alternatif Mac terbaik daripada tapak web. Klik butang "Snapshot" di bahagian atas sebelah kanan tetingkap.
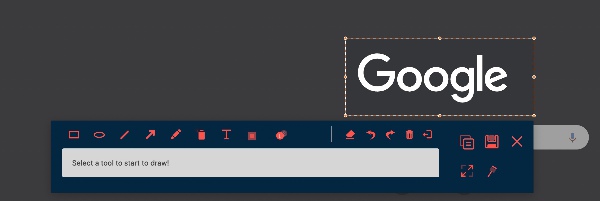
Langkah 2.Seret kursor tetikus anda untuk memilih kawasan skrin, lepaskan butang tetikus, tangkapan skrin akan diambil secara automatik untuk anda.

Langkah 3.Bar alat akan muncul di bawah tangkapan skrin yang memberikan anda ciri penyuntingan lanjutan. Setelah pengeditan selesai, klik butang "Simpan" setelah pengeditan selesai.
Catatan: Jika anda adalah menghadapi masalah dengan utiliti skrin pada PC Windows, atau cuba mengambil tangkapan skrin iPhone untuk Facetime, kami juga mempunyai panduan lengkap untuk membantu anda.
5 Cara untuk Membetulkan Tangkapan Skrin Mac Tidak Menyimpan Isu
2.1 Semak Tetapan Pintasan Petikan Skrin Mac
Ada kemungkinan utiliti tangkapan skrin Mac anda sedang berjalan, tetapi anda hanya menekan kombinasi kekunci yang tidak berkaitan dan sudah tentu mendapati tiada tangkapan skrin disimpan. Ikuti langkah di bawah untuk menetapkan semula pintasan papan kekunci tangkapan skrin anda.
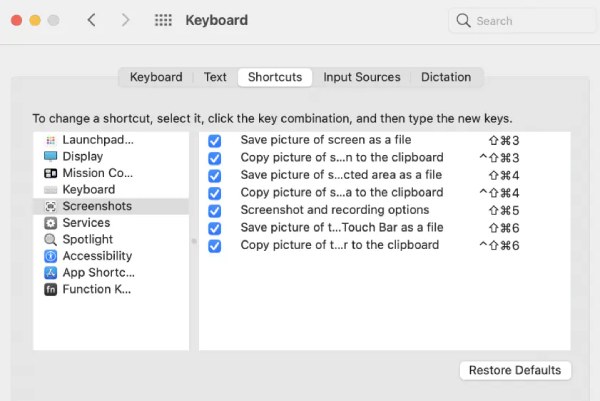
Langkah 1.Buka apl "Tetapan" dan cari "Keutamaan Sistem". Kemudian, navigasi ke pilihan "Papan Kekunci" dan klik butang "Pintasan".
Langkah 2.Klik butang "Skrin" pada panel kiri. Di sebelah kanan panel, pastikan fungsi tangkapan skrin didayakan.
Langkah 3.Klik butang "Pulihkan Lalai" untuk menetapkan semula semua pintasan papan kekunci kepada lalai. Kemudian, semak sama ada tangkapan skrin Mac anda boleh disimpan dengan pintasan.
2.2 Semak Laluan Simpanan Tangkapan Skrin Lalai
Anda mungkin menukar folder tangkapan skrin lalai kepada folder lain selain folder Desktop, menyebabkan tangkapan skrin tidak muncul pada Desktop. Oleh itu, anda mungkin berfikir bahawa tangkapan skrin mac tidak disimpan sama sekali. Ikuti langkah untuk menukar laluan destinasi tangkapan skrin yang diambil.
Langkah 1.Pada mana-mana skrin, tekan kombinasi kekunci "Shift + Cmd + 5".

Langkah 2.Klik butang "Pilihan" pada bar alat. Dalam pilihan "Simpan ke", klik butang "Desktop".
2.3 Kemas kini Mac Anda kepada Versi Sistem Terkini
Satu lagi sebab yang mungkin ialah sistem Mac OSX anda dikemas kini atau perlu dibaiki. Adalah sesuai jika anda sudah mempunyai salinan sandaran sistem anda. Jika tidak, lihat langkah terperinci di bawah:
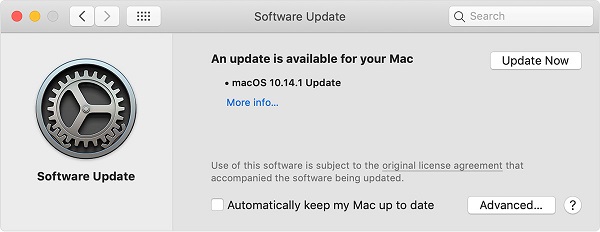
Langkah 1.Buka apl "Keutamaan Sistem". Klik butang "Kemas Kini Perisian".
Langkah 2.Anda mungkin menghadapi pemberitahuan yang memberitahu anda bahawa kemas kini tersedia untuk Mac anda. Klik butang "Kemas Kini Sekarang" dan ikut arahan.
2.4 Lakukan Set Semula NVRAM
Satu lagi isu biasa yang mungkin dihadapi oleh Mac anda ialah salah konfigurasi NVRAM. Kadangkala isu dengan sistem Mac OSX anda tidak dapat dibetulkan sehingga anda melakukan tetapan semula NVRAM.
Langkah 1.Mulakan semula Mac anda. Sebaik sahaja anda mendengar bunyi permulaan, tekan gabungan kekunci "Cmd + Option + P + R" dengan segera.
Langkah 2.Teruskan menahan butang selama kira-kira 20 saat, Mac anda mungkin kelihatan dimulakan semula beberapa kali.
Langkah 3.Lepaskan butang selepas itu dan but ke dalam sistem anda seperti biasa.

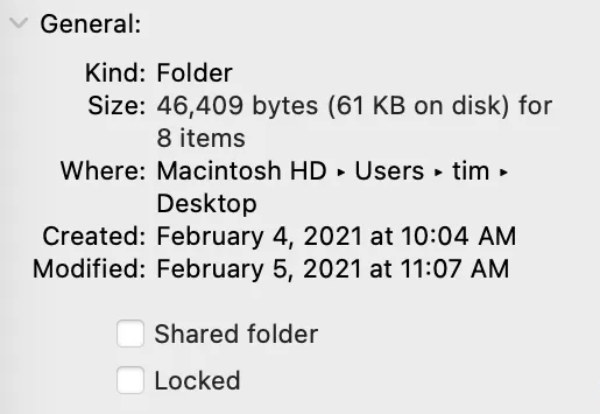
2.5 Buka kunci Folder Tangkapan Skrin
Satu lagi sebab yang mungkin menyebabkan tangkapan skrin Mac anda tidak disimpan pada Mac ialah folder terkunci. Walaupun anda telah menukar folder simpanan kepada desktop lalai, ia mungkin dikunci oleh sistem dan menghalang anda membukanya. Dapatkan langkah terperinci untuk menyelesaikannya:
Langkah 1.Pergi ke folder menyimpan set. Tetapan lalai ialah desktop.
Langkah 2.Klik kanan pada folder dan klik butang "Dapatkan Maklumat" dari senarai juntai bawah.
Langkah 3.Di bawah bahagian "Umum", anda harus memastikan kotak pilihan "Dikunci" tidak ditanda.
Soalan Lazim tentang Tangkapan Skrin Mac
-
Cara membetulkan: Anda tidak mempunyai kebenaran untuk menyimpan di lokasi ini pada Mac?
Buka apl "Finder", dan navigasi ke folder "Home" anda. Pada bar menu, navigasi ke "Fail > Dapatkan Maklumat" dan cari bahagian "Perkongsian & Kebenaran". Pastikan pilihan "Keistimewaan" menunjukkan "Baca & Tulis".
-
Bagaimanakah cara menukar format tangkapan skrin Mac daripada png kepada jpg?
Jika anda ingin menukar format tangkapan skrin, buka tetingkap terminal dan masukkan arahan berikut: "defaults write com.apple.screencapture type JPG." Tekan kekunci "Enter" untuk menggunakan perubahan anda.
-
Mengapa saya tidak boleh mengambil tangkapan skrin pada Mac dengan apl Apple TV?
Utiliti tangkapan skrin Mac lalai akan dilumpuhkan secara automatik dengan apl Apple TV. Anda boleh menggunakan apl petikan skrin pihak ketiga sebaliknya.
Kesimpulan
Seperti yang telah kita bincangkan dalam artikel, ini adalah 6 penyelesaian terbaik yang mungkin apabila anda Tangkapan skrin Mac tidak disimpan ke desktop anda. Walaupun sebabnya berbeza-beza, kami amat menyarankan anda menggunakan tangkapan skrin terbaik - AnyRec Screen Recorder sebagai penyelesaian semua-dalam-satu untuk tugas rakaman skrin Mac anda.
Artikel Berkaitan
Mengenai Pengarang Kami


