Популярный
Ремонт видео AnyRec
Быстрый ремонт видео с дронов, GoPro и камер.
Безопасная загрузка
Воспроизведение Premiere Pro прерывистое? Исправьте это, чтобы получить плавный предварительный просмотр
При редактировании в Adobe Premiere Pro вы можете не обращать внимания на прерывистость процесса; однако после предварительного просмотра это становится дополнительной головной болью. Эта проблема с прерывистым воспроизведением Premiere Pro может быть связана с устаревшим программным обеспечением, неправильными настройками, нехваткой ресурсов и т. д. Чтобы обеспечить плавный предварительный просмотр без зависаний, в этом посте вы найдете 8 лучших исправлений для работы с запаздыванием воспроизведения в Premiere Pro. Итак, читайте прямо сейчас!
Список руководств
Решение 1. Включите ускорение графического процессора Решение 2. Уменьшите разрешение воспроизведения Решение 3. Консолидация проекта Решение 4. Очистите медиа-кеш Решение 5. Отключите эффекты FX Решение 6. Оптимизируйте настройки рендеринга и воспроизведения Решение 7. Отключите неиспользуемые клипы Решение 8. Исправьте проблему прерывистости в оригинальных видео FAQsРешение 1. Включите ускорение графического процессора
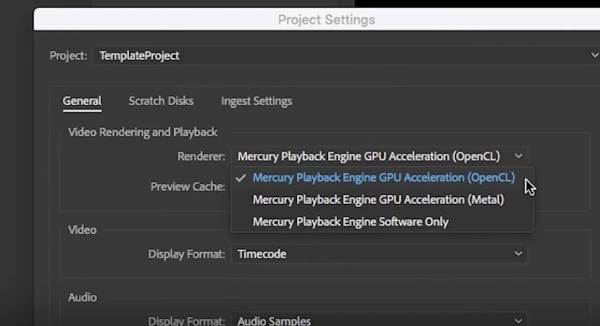
Убедитесь, что ускорение графического процессора включено, чтобы гарантировать плавное воспроизведение видео в Premiere Pro. Эта технология позволяет графической карте выполнять обработку данных за счет процессора, обеспечивая более быстрый визуальный рендеринг. Вот как его включить, чтобы исправить проблему, когда откладывание Premiere Pro постоянно останавливается:
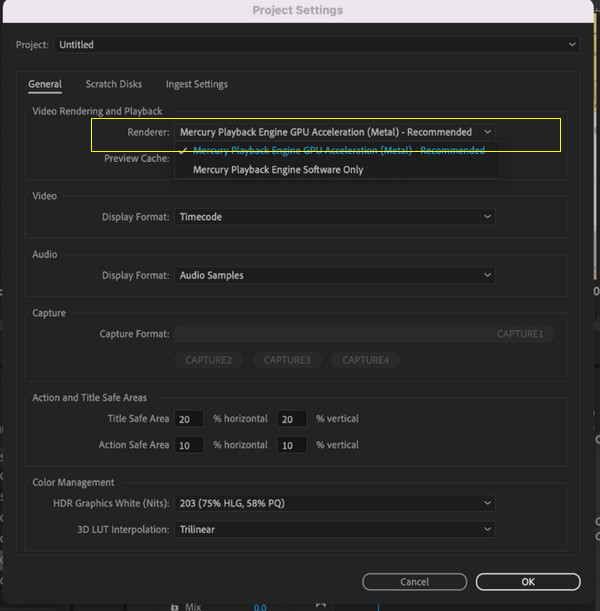
Шаг 1.В Premiere Pro перейдите на вкладку «Файл», выберите «Настройки проекта», затем перейдите в раздел «Общие», чтобы просмотреть окно настроек проекта.
Шаг 2.В меню «Рендерер» выберите «Ускорение графического процессора Mercury Playback Engine». Затем нажмите кнопку «ОК», чтобы установить новые настройки.
Решение 2. Уменьшите разрешение воспроизведения
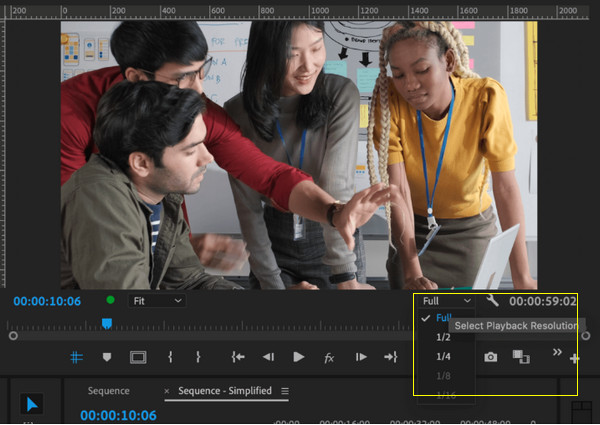
По умолчанию Premiere Pro воспроизведет ваш монтаж в зависимости от настроек эпизода: разрешение 1080p или выше. Таким образом, если вашему компьютеру не хватает ресурсов для работы с видео высокого разрешения, вы наверняка столкнетесь с проблемой прерывистого воспроизведения Premiere Pro.
При уменьшении разрешения воспроизведения программному обеспечению потребуется отображать меньше информации за кадр, что можно сделать в раскрывающемся меню в правом нижнем углу «Просмотра мультимедиа».
Решение 3. Консолидация проекта
Рекомендуется учитывать структуру файлов для ваших видеопроектов, поскольку Premiere Pro может споткнуться, если они немного сложны, что приводит к задержке воспроизведения Premiere Pro. Таким образом, с помощью инструмента консолидации все ваши медиафайлы будут находиться в одном месте, что позволяет избежать необходимости программного обеспечения искать все файлы при воспроизведении.
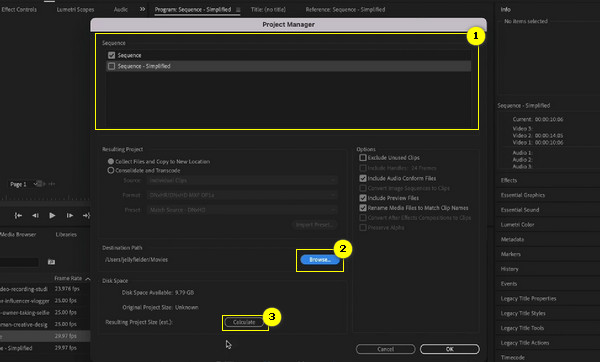
Шаг 1.Перейдите на вкладку «Файл», затем перейдите к опции «Менеджер проектов». Выберите последовательности, которые вы хотите скопировать, установив флажок.
Шаг 2.Нажмите кнопку «Обзор», чтобы указать новый путь, и нажмите кнопку «Выбрать». Затем нажмите кнопку «Рассчитать», чтобы узнать, насколько большой будет копия проекта. Наконец, нажмите «ОК».
Решение 4. Очистите медиа-кеш
Premiere Pro будет добавлять файлы каждый раз при воспроизведении видеопроекта, и они сохраняются в Media Cache. Как только кэш заполнится, он займет много места, что существенно повлияет на производительность Premiere Pro, что приведет к проблеме прерывистого воспроизведения Premiere Pro.
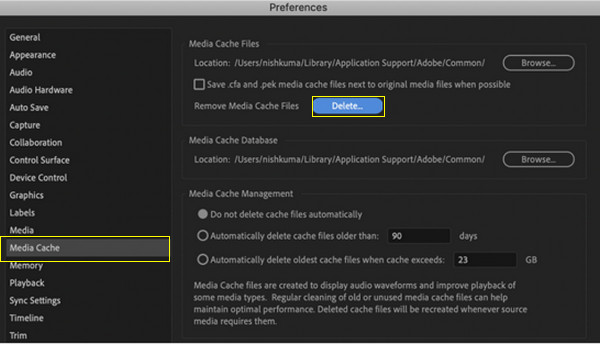
Шаг 1.Сначала выйдите из видеопроекта, затем перейдите на вкладку «Редактировать», выберите «Настройки», нажмите «Кэш мультимедиа» и нажмите кнопку «Удалить» рядом с надписью «Удалить файлы кэша мультимедиа».
Шаг 2.Выберите опцию «Удалить неиспользуемые файлы кэша мультимедиа» и нажмите кнопку «ОК», чтобы подтвердить действие.
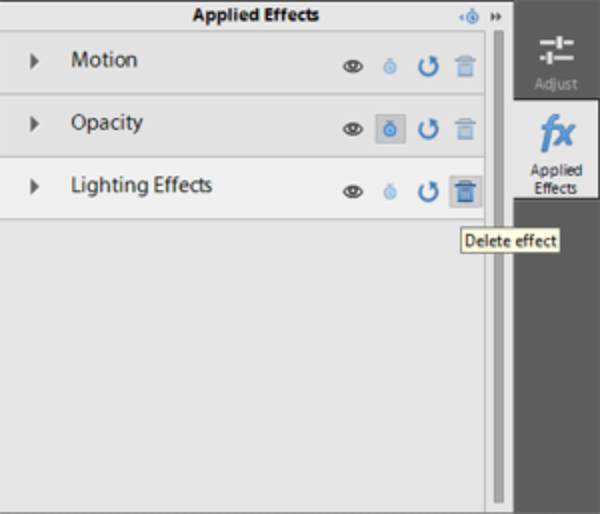
Решение 5. Отключите эффекты FX
Предположим, ваш проект Premiere Pro содержит множество эффектов или слоев. Возможно, из-за этой сложности у вас возникли проблемы с заиканием или прерывистым воспроизведением, поскольку эффекты увеличивают рабочий размер видео. Таким образом, вы можете отключить визуальные и звуковые эффекты, чтобы исправить сбои при воспроизведении видео в Premiere Pro и проверить, хорошо ли воспроизводится видео. Вот как это сделать:
Шаг 1.См. панель инструментов ниже «Просмотра мультимедиа» и найдите кнопку fx. Если ничего нет, нажмите кнопку «Добавить».
Шаг 2.Найдите кнопку «fx», и вы увидите все примененные эффекты к вашему видео. Просто нажмите кнопку «Удалить», чтобы удалить все эффекты и устранить проблему прерывистого воспроизведения Premiere.
Решение 6. Оптимизируйте настройки рендеринга и воспроизведения
Программное обеспечение для редактирования видео всегда воспроизводит эпизоды в реальном времени и использует полную частоту кадров. Однако это происходит не всегда, особенно в сложных разделах, что приводит к неработающему воспроизведению Premiere Pro. Следовательно, рендеринг видео предварительного просмотра для каждого раздела поможет вам исправить ошибки воспроизведения в Premiere Pro.
Шаг 1.Переместите игровую головку в начальную точку, нажмите «I» на клавиатуре, чтобы установить ее, затем перейдите к размещению игровой головки в конечной точке и нажмите «O», чтобы установить ее.
Шаг 2.Перейдите в «Последовательность» и выберите «Render In to Out». Как только это будет сделано, вы должны отредактировать видео без проблем с заиканием.
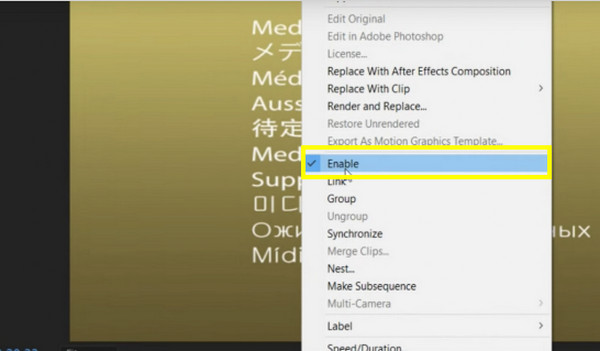
Решение 7. Отключите неиспользуемые клипы
Один из простых способов решить проблему прерывистого воспроизведения Premiere Pro — отключить неиспользуемые клипы, чтобы минимизировать нагрузку на программное обеспечение в ваших системах, особенно если вы редактируете длинный проект. Хотя этот метод потребует повторного включения клипов, вы можете рассмотреть его, особенно если вы используете компьютер низкого уровня.
Шаг 1.Определите клипы, которые вы не используете, а затем выделите их, перемещая курсор от одной точки к другой.
Шаг 2.Щелкните правой кнопкой мыши и выберите из списка опцию «Включить»; убедитесь, что он снят.
Решение 8. Исправьте проблему прерывистости в оригинальных видео
Ни одно из вышеперечисленных решений не устраняет проблемы с прерывистым воспроизведением Premiere Pro? Если так, не волнуйтесь; у вас все еще есть программное обеспечение, которое станет вашим отличным помощником на протяжении всего процесса ремонта. Узнайте о Ремонт видео AnyRec. Инструменты восстановления могут исправить прерывистые, поврежденные, невоспроизводимые и сломанные видеофайлы во многих форматах, таких как MP4, AVI, MOV и т. д. Независимо от того, получены ли они с камер, телефонов, компьютеров, записывающих устройств или любых других устройств, инструмент может исправить видео с помощью высокое качество и обещание без прерывистости при воспроизведении Premiere!

Программное обеспечение для восстановления с поддержкой искусственного интеллекта, позволяющее исправить прерывистые, сломанные и невоспроизводимые видео.
Ремонт видео с камер и устройств хранения известных марок.
Возможность настройки выходного видео, включая формат, качество и многое другое.
Окно предварительного просмотра позволяет вам проверить исправленное видео, если оно получилось хорошим.
Безопасная загрузка
Безопасная загрузка
Шаг 1.Начните с открытия Ремонт видео AnyRec. Затем вы увидите кнопку «Добавить» с обеих сторон; щелкните левый, чтобы импортировать прерывистое видео, а правый — для примера видео.
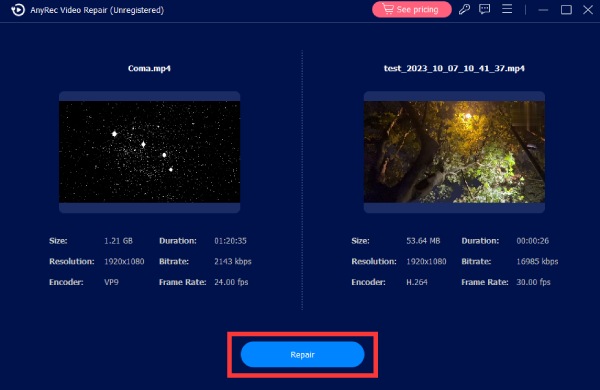
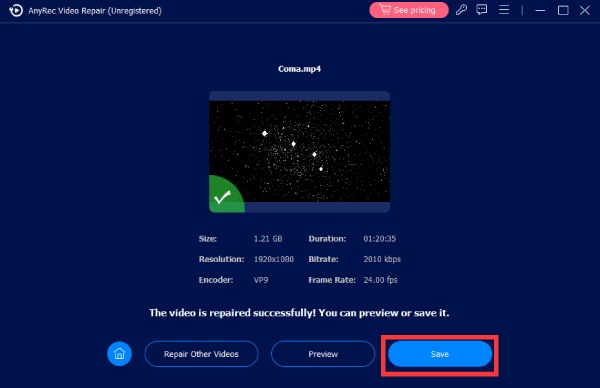
Шаг 2.Нажмите кнопку «Восстановить», чтобы исправить проблему прерывистого воспроизведения Premiere. После завершения проверьте видео, чтобы убедиться, что оно не прерывается, нажав кнопку «Предварительный просмотр».

Шаг 3.После этого проверьте такие параметры, как разрешение, продолжительность, битрейт и т. д., если они правильно настроены. Нажмите кнопку «Сохранить», чтобы завершить процесс устранения задержки воспроизведения Premiere Pro.
Дальнейшее чтение
FAQs
-
Какие факторы следует проверить, если у меня возникла проблема с прерывистым воспроизведением Premiere Pro?
Вам следует проверять наличие обновлений, поскольку Premiere Pro и ваша система нуждаются в регулярных обновлениях, поскольку более старая версия может вызвать проблемы. Кроме того, проверьте настройки клипа, если заикание происходит только с определенными клипами.
-
Может ли закрытие ненужных приложений помочь мне исправить задержку воспроизведения Premiere Pro?
Да. Если на вашем компьютере запущено много приложений, это повлияет на Premiere Pro, поскольку для бесперебойной работы требуется много вычислительной мощности. Рассмотрите возможность закрытия активных приложений, которые вы в это время не будете использовать, и запускайте только те, которые вам нужны для редактирования.
-
Сколько оперативной памяти необходимо для бесперебойной работы Premiere Pro?
Premiere Pro потребуется 16 ГБ или более для редактирования HD и многозадачности, чтобы избежать сбоев и зависаний. Если вы занимаетесь редактированием 4K и выполняете гораздо более требовательные проекты, у вас должно быть 32 ГБ ОЗУ или выше.
-
Как создать прокси-видео, чтобы устранить задержку воспроизведения в Premiere Pro?
На панели проекта выберите видео и щелкните правой кнопкой мыши. Выберите «Прокси», выберите «Создать прокси», а затем выберите прокси с низким разрешением в качестве предустановки; нажмите кнопку ОК. Прокси-видео — это версии исходных видео с низким разрешением.
-
Какие альтернативы я могу использовать, если зависания Premiere Pro продолжаются?
Если вы решите не использовать Premiere Pro, вы можете использовать такие альтернативы, как Filmora, iMovie, Final Cut Pro, Lightworks, PowerDirector, Vegas Pro, CapCut, Canva и другие.
Заключение
Вы видите, что проблема с прерывистым воспроизведением в Premiere Pro расстраивает, но хорошая новость заключается в том, что ее можно исправить. С помощью множества упомянутых решений вы можете исправить заикание или задержку при предварительном просмотре видео в Premiere Pro. Среди них уверенное устранение проблем с воспроизведением видео с помощью Ремонт видео AnyRec. Программное обеспечение может исправить прерывистое, заикание или задержку видео всего одним щелчком мыши, не жертвуя при этом качеством. Попробуйте программу сегодня и исправьте с ее помощью все свои проблемные видео!
Безопасная загрузка
Безопасная загрузка
Статьи по Теме:
Об авторе


